Pages

Thursday, November 28, 2013

Flowers

I can't believe I haven't posted all week. I have been busy creating on projects that can't be shared yet. I decided I would sneak in a post from a project done for the new Stampendous release.  I had created a canvas using a mix of techniques and the new Wild Roses stamp.


I painted the canvas with white acrylic paint.  I stamped the background with black ink and the seed background stamp.  I stenciled using black embossing paste the clocks over the background.  I added a layer of silver embossing paste through the sequin waste. While the silver embossing paste was wet I added black embossing powder.  I let the embossing paste dry and then heated up the embossing powder.

I sprayed pink glimmer mist onto white cardstock. After it dried I stamped the flowers and cut them up to create my dimensional flower.  I added the baby butterflies.  I stamped the Flower Path sentiment onto tissue paper using StazOn ink and decoupaged the sentiment to the canvas.

My idea for this canvas was to do an all black and white canvas with one pop of pink.  Of course after I put that flower on which was what was my design intent I had to add the butterflies. :)

Have a wonderful Saturday!

Suzz

Sunday, November 24, 2013

Countdown to the Holidays

Simon Says Stamp Monday Challenge  is challenging us to start the Holiday Countdown this week.  You can interpret it any way you want.  I started thinking about the countdown to the holidays as in an advent calendar. 


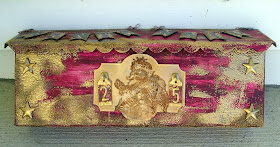
In our house we have little prizes for every day until the holiday starting on December 1st.  I decided to up cycle this mailbox.


It had a big plastic eagle on the front which I had my DH remove.  I then primed the box with a coat of white acrylic paint.  Then I stopped for  awhile thinking of what I wanted to do next.  I searched on Pinterest and found some vintage mailboxes.  I decided I wanted a red rusted look.

  1. Paint the surface using red paint. Smear brown paint over the surface.  
  2. Sponge edges with Versamark Watermark Ink Pad. 
  3. Sprinkle Aged Gold Embossing Enamel over the surface. Heat up until melted.  I left it partially heated to give it a rusted and textured effect. 
  4. Repeat all around the edges and on the top. 
  5. I then die cut a shape for the front from white cardstock. 
  6. Paint the die cut using gold and bronze paint. 
  7. Stamp Santa image using brown ink. 
  8. Pop Dot and attach to the front of the mailbox.
I wanted the numbers for the countdown to be on the mailbox. 

  1. Ink up the hooks with Versamark. Heat emboss with Aged Gold Embossing Enamel. 
  2. Die cut numbers from white cardstock.  Heat emboss with gold embossing powder. 
  3. Die Cut tags from red pattern paper. Apply Versamark on top and bottoms of the tag. Heat emboss with gold embossing powder.

To create the banner I took Christmas pattern paper and cut banners.  I then painted metallic letters with gold paint.  I then tied them across the top with red and white striped twine.

Now I have a box to use as letters to Santa (although my kiddos are too old) and a way to drop in an advent gift every day until Christmas.

Products: StaZon - Timber Brown, Simon Says Simple Numbers, Stampendous Aged Gold Embossing Enamel,  Kelly Purkey Wafer Thin - Labels Dies Versamark Watermark Ink, Authentique Christmas Paper, Bakers Twine, Paper Artsy Santa, Ranger Distress Ink - Vintage Photo, Spellbinders Label 21, Pop Dots, PaperArtsy - Claret, PaperArtsy - French Roast, Ranger Distress Paint - Gold, Ranger Distress Stain - Bronze

The ever generous  Simon Says Stamp. is offering a $50 Gift Voucher for one randomly selected participant in the challenge.  Come share your holiday countdown with us!


Thanks for stopping by!


Suzz

Follow Your Art


I am so excited... I am off for a week now before the Thanksgiving holiday and I am going to be spending time in my craft room playing around. Yeah!

I have been exploring more mixed media techniques and textures.  I up-cycled a previous project that I had done as a clipboard at a make and take.
I painted the surface using white acrylic paint.  I started adding a mix of purple, green and blue acrylic paint over the surface. 

I then stenciled some sequin waste with embossing paste.  I let that dry completely.  I added images by stamping them onto tissue paper and heat embossing them with black embossing powder.  I glued them to the surface and added highlights with a gel pen.

Products: Americana Satin Paints, DecoArt Embossing Paste, Stampendous - Luv Art, Coffee Mug, Follow Your Art,   Alice In WonderlandBlack Embossing Powder, STAEDTLER Karat Aquarell Watercolor Pencils. Signo Uni-Ball White Gel Pen

Have a wonderful blessed Sunday!

Suzz


Wednesday, November 20, 2013

Fall Tags

Today is the  Artistic Outpost  monthly blog hop.  The Design Team has a variety of wonderful projects on their blogs today.  Of course I took this as an opportunity to whip up a few more tags!


I had created a background using Tattered Angels Glimmer Mist, Tissue paper and leaf dies.  I covered the paper with a mix of yellow, orange and red glimmer mists.  I then spritzed the same colors on tissue paper.  After the tissue paper dried I die cut a series of leaves. 

I applied Decoupage medium to the misted background and laid a series of leaves across the surface.  I then coated the entire sheet with the decoupage medium again and added a sprinkling of crystal glitter.

After the background dried it sat on my desk waiting for the right opportunity to use the background.  I decided to cut it into three tags.  I then stamped the leaves from the Artistic Outpost Old Grist Mill and The Outpost with archival ink on the background.   I was originally going to put the together.  After I started stamping images I decided to create three different tags. 

The first tag I used the tissue paper to stamp the image form the Serenity plate using brown ink. I heat embossed the image with brown embossing powder.  I then attached it to the surface.  I stamped the birds form the Bluebird plate directly on the surface using StazOn brown ink.  I heat embossed the birds with brown embossing powder.  


My second tag used the bird from the Birds of Feather and the sentiment from the Quotes and Quotable plate. I added background text from the Birds of a Feather randomly stamped across the background.

For my final tag the image is from the Bluebird and the sentiment from the Old Grist Mill. 

Hop along for some fabulous inspiration from the design team:


Thanks for stopping by!

Suzz

Tuesday, November 19, 2013

Santa Claus

I just realized how many tags I have been making. :)  I think because I keep getting behind on Linda's 12 tags of Christmas and then I create a bunch to catch up.  Week #8 has a fun technique that I couldn't wait to try.  Linda's challenge has fun prized provided  by her store The Funkie Junkie Boutique
I started with stamping a starry background with versamark on white cardstock.  I heat embossed the image using clear embossing powder.

I then smeared Ranger Distress Ink - Peacock Feathers over the surface to show off my resist.  Tammy's technique then calls for covering it in White paint to show off the resist.  Which at this point I realized oops I was supposed to put color down first and then resist.  So I decided to do a double resist. :)  This is the stamping gymnastics of a double resist into a full out landing.

I stamped the script using versamark over the peacock resist background.  I heat embossed it with clear embossing powder.  (Tip: make sure you heat set your dye ink so it is completely dry as to not pick up any embossing powder in areas you don't want it to.)

Now I could use the white acrylic paint smeared over the surface to show up the script.  I was really pleased with how this turned out.

I loved Linda's sweet Santa on her tag and I just purchased this Paper Artsy Santa and was happy to ink him up and put him on my tag:

I stamped the Santa on tissue paper using black archival ink. I then cut him out and attached him to my surface.  I stamped the sentiment in on the vellum and attached that.  I wanted a hint of pink so I found some pink shimmer snowflakes to accent.

Happy Tuesday!

Suzz

Sunday, November 17, 2013

Elementary

I love a good mystery!  This week at Simon Says Stamp Monday Challenge the challenge is Mystery.  We provided little snapshot of our projects to queue up our mystery.

Here is my sneak peek:


When I started thinking about mysteries I thought of all my favorite authors, books, television and movies. I think the reason I enjoy them is the puzzles to be found.  I started thinking about logic and equations which lead me to Elementary and what better way to show elementary than rulers!

I started with a stack of rulers purchased on clearance and an old cigar box. 
 The rulers:


 The cigar box was a little shorter than twelve inches.  I started with cutting my first ruler to fit the width of the box.  I then took the remainder of the ruler as the next row.  I cut of the excess again to finish the second row.  I continued my pattern until I had enough pieces to cover the top of the box. The next step was to take the distress stains and stain the different pieces of the rulers in a variety of colors. 

I used the rotary cutter to cut my wooden rulers. I love the rotary cutter for unusual surfaces. 

I painted and stained the surface of the cigar box with white acrylic paint and vintage photo stain.

I then cut rulers for around the edges.  I also sponged the edges of the rulers with brown dye ink. I then used a glue gun to glue all the pieces to the box.
The box has little wooden spool legs stained to coordinate.

The finished top looked like this:

I loved how the box looked like.  I painted the inside with chalkboard paint.  I tried a variety of layouts for my cover:

 The girls liked the black chalkboard in the center with the fun letters:

The second layout: 

Products: Ranger Distress Stains - Barn DoorBroken China, Mustard Seed, Peeled Paint, Ripe PersimmonWalnut Stain,  Ranger Distress Ink - Walnut StainWood Letters,
Buttons, Maya Road Wood Spool, Chalkboard Paint, Artistic Outpost - Kudzu Kafe, Rotary Trimmer

Come join in the fun for a chance to win a $50 Gift voucher from  Simon Says Stamp.

Have a wonderful Monday! 

Suzz

Friend Strengthens

I was inspired by the Mojo Monday Sketch #319  and decided to pull out some pretty papers and create a quick card. Since I am thankful for good friends I also am adding this to the Gratitude challenge at My Minds Eye.

I cut all the pieces form the paper, distressed them and added a touch of white paint.  I stamped the beautiful Verses Rubber Stamps - Friend Strengthens using Versafine Orange ink onto the paper. 

For the flowers I cut them from the Paper and crinkled them to give them texture.  The paper is My Minds Eye - Tangerine. 

Have a wonderful Sunday!

Suzz


Saturday, November 16, 2013

Life is Art

I really love the new peacock stamp from Stampendous.  It is a jumbo cling and it has beautifully drawn feathers.  It is available at Stampendous or at Simon Says Stamp

I started with a canvas which I painted with a white undercoat.  I then painted it with a teal paint mixed with a hint of green and silver.  

I then added a layer of Embossing paste.  While the embossing paste was wet I laid a piece of tissue paper over the embossing paste.  I inked up the image using StazOn ink and pressed it into the tissue paper over the embossing paste.  This was so cool. It ended up with the black lines and an imprint.  I let that dry and then spritzed more green and teal color sprays over the surface. 

I then colored the feathers with highlights of green.  I added glitter with glue pens into the surface and finished off my peacock with a silver lustre around the edges. 

To finish off the area around my peacock I stamped the Stampendous medallions and sentiments on tissue paper which I decoupaged to the surface. 

The Deco Art company provided the Stampendous DT  with some fabulous paints, decoupage, and embossing paste which I used on this project.  I loved everything they sent.  I made several mixed media projects playing with their products. If you want the step by step instructions for this project go here.

Hope you are having a wonderful weekend!

Suzz

Friday, November 15, 2013

Merry Christmas

A very Merry Friday!  Our weather has shifted and we had an inch of snow already. Getting us in the wintry weather.  Here is a bright Christmas card using the new Artistic Outpost release Christmas Chalk and Frosty and Friends. 

The best news is that Artistic Outpost is having a sale on all their stamps.  The sale is  Today through November 18th, enjoy 15% off Click here to shop the website.  Be sure to use coupon code November2013 when checking out in order to receive the sale price.

Have a wonderful weekend!

Suzz

Wednesday, November 13, 2013

Untie the Ribbons

I am back with my second tag catching up with Linda's 12 Tags of Christmas. This tag is inspired by her week #6 tag.  The challenge is sponsored by her store The Funkie Junkie Boutique.  

My tag:
I had every intention of creating a Christmas tag.  I made the mistake of pulling out new pattern papers from Authentique mixed in with my Christmas papers.   When I saw the roses it inspired the whole tag.  I followed the design from Linda's tag as my layout and just used different elements.

Producst: Authentique Cherish, Verses Rubber Stamps - Untie the Ribbons, Tattered Angels Chalkboard Ink - Strawberry Shortcake, Seambinding, Buttons, Ranger Archival Ink - Coffee, Tulle

Thanks for stopping by!

Suzz

Tuesday, November 12, 2013

Joy To You

I have been trying to play along with Linda in her 12 Tags of Christmas.  I am three tags behind. I finished up one this morning based on her beautiful week #7 tag.  Her challenge is sponsored by her store The Funkie Junkie Boutique.

 I was inspired by Linda's background on her tag and set about trying to recreate the effect.


 I painted white cardstock with a coat of gold distress paint.  I added a touch of bronze metallic distress stain.  After that had dried I stamped the HeroArts Snowflake using Versamark randomly over the background.  I heat embossed the snowflakes with Stampendous Kaleidoscope Embossing Powder.

I then wanted them to stand out so I smeared StazOn Brown Ink over the snowflakes and background.

 A close-up of the snowflakes:
 It is difficult to show how beautiful the effect is.  There is a glisten to the snowflakes because the embossing powder has glitter built in. 

The reindeer was cut from white cardstock and painted with the same gold paint.  I stamped over the deer with a Hero Arts script and embossed with brown embossing powder.  I gave him a wreath of bells. 

Have a wonderful day!

Suzz

Sunday, November 10, 2013

Inky Fun

I have to admit I love ink, whether it is sprays, mists, re-inkers or ink pads... I love playing with it and trying new things.  This week at  Simon Says Stamp Monday Challenge  it is all about the ink.  Easy enough! 

I decided to play with my mists and embossing folders.


I sprayed the folder with the mist on the inside of the embossing folder. On both the front and back.  I then put a piece of paper inside and closed it and ran the brayer over the surface to get an even coat of ink. 


When you are done you can see which side you like better. :)  There will be two images one on the front and one on the back. Alternatively you could put two pieces of cardstock in and end up with two prints.


I tried stamping on tissue paper first with black ink and applying it but decided to stamp directly onto the inked up background.

I colored the image using watercolor pencils and waterbrush.  I added coordinating ribbons and flowers died to match with glimmer mists.

Products:  Tattered Angels Teal High Heel chalkboard spray     Tattered Angels Glimmer Mist Purple 
Stampendous Peacock,      Ranger Archival Ink - Black, Prima Charlotte FlowerProvo Craft Acanthus Anna Griffin Embossing Folder

Come join in the fun and get inky  for a chance to win a $50 Gift voucher from  Simon Says Stamp.

Thanks for dropping in!

Suzz


Thursday, November 7, 2013

The Rest of the Year

I am back with the second half of the year for my mini-calendar using Stampendous stamps.  I was fun looking through my Stampendous stamps to come up with different ideas representing the various months. When I went to pull all my months to share there were a few that I must have loaded on my other computer.  If you want to see what August looks like you will have to hop over to the Stampendous blog. :)


July

September:

October:
November:

December:

For all the details and products used on these mini pages go here.  The Stampendous blog is featuring projects showcasing the charms sets all this week including my mini-calender. 

Thanks for stopping by!

Suzz


Wednesday, November 6, 2013

Chalkboard Tags

The chalkboard craze has eluded me until I saw Tim's tag this month.  He had me trying something new and fun. My example didn't turn out like his but I was very happy with the results and ended up with two different tags.


My first attempt: 
 I started with stamping the image on black cardstock using versamark.  I heat embossed with clear embossing powder.  I then sprayed goose bumps over the background to create snowflakes.  I waited until it dried and then smeared chalk across the surface.

My embossed image didn't pick up the chalk but it gave a beautiful soft white backdrop.  I added the sentiment and was done.  I love how this turned out. It reminded me of those nights when the snow is coming down and it is very quiet and you can feel the quiet. :)

My second attempt:
 I didn't emboss the image and smeared STAEDTLER karat soft pastel chalk over the versamark image.  I smeared versamark along the bottom to pick up the chalk.  I colored the stars through the stencil with a white gel pen.  I embossed in black the sentiment over the chalk along the bottom.  I wiped off the excess chalk with a damp wipe.

The image and sentiment are Stampers Anonymous.

Have a wonderful week!

Suzz


Tuesday, November 5, 2013

A Charming Mini Calendar

Stampendous has a series of Charms stamps that are perfect for projects where you need mini images.  They work beautifully for jewelry or mini cards or even to make a mini calendar. :)

I am sharing the first half of the year of a mini calendar today and the other half on Thursday. I searched on-line for a mini calendar that I could print out and use as the base for my project.  I printed it out a few times just in case you have a few mistakes. (of course I ended up using my extras)  The rest is a mix of stamping, and coloring.

January
February
March:

April:
June:

The full instructions and all the months are located here on the Stampendous web-site under projects.  There are a ton of projects from the design team with lots of ideas.  The charms stamps can be found here.  I colored many of the images using STAEDTLER Karat Aquarell watercolor pencils.

I will be back on Thursday with the other half of the year.  The new release for Stampendous is now available on-line.  I have to say there is so many beautiful stamps in this release I had quite a few favorites.

Have a wonderful Tuesday!

Suzz


Sunday, November 3, 2013

Patchwork


This week at  Simon Says Stamp Monday Challenge we are patching things together.  Your inspiration is patchwork which you can interpret any way you want!  I cannot sew at all and love quilts so I decided to create a faux quilt square on my card!
I checked a book out of the library showing modern retro quilt patterns and they were all created with beautiful colors and patterns.  I used that to inspire my first card with a star pattern.  I used the beautiful pattern papers fromMy Minds Eye - Skys the Limit - Find your Wings and Fly and the triangle dies from My Favorite Things to cut my shapes.  I spent some time arranging them and then distressed the edges I found coordinating paper to put around the outside edges. I added a coral ribbon and button as accents.  I stamped the xxx thank you using Ranger Archival Ink - Rose Madder which has a lovely coral hue.

My second card is more traditional and uses inchies as backdrops to butterflies.
This one was made because of all my scraps from the first card. I just cut up the remnants and then punched a flock of butterflies.  I added coordinating buttons and then stamped the lovely sentiment Beautiful Words using the Rose Madder Archival Ink

My last card was made by masking off sections of the card with post it notes and using the new Tim Holtz Stencils and a variety of inks.
I thought it would be fun to create a steampunk patchwork effect.  I used the following elements: Tim Holtz Stencil  Clockwork Stencil, Measure Stencil, Cargo Stencil, Stripes, The Crafters Workshop - Travel Stencil, Memento Sweet Plum, Memento Pear Tart  ink.   Ranger Archival Coffee, Visual Artistry Lifes Possibilities Visual Artistry - Lost and Found,   Idea-ology TImepiece Faces, Ranger Distress Ink - Vintage Photo

Don't forget the challenge and the new blog is up here:

SSS_checkoutnewblog

I hope you share your patchwork inspired project for a chance to win a $50 Gift voucher from  Simon Says Stamp.
Thanks for stopping by!


Suzz