Pages

Tuesday, April 29, 2014

Potrait of a Lady

StampendousImagine Crafts, and Ice Resin are sharing projects this week!  Hop over to the Stampendous blog for all the details. 

I was lucky enough to have a few bezels which had me creating charms:
I stamped a mix of images from the Vintage Ladies Clear Set and the Charmed Art to place in the bezel.
I added a little string of bling and flower to accent her hair.  I colored the image with watercolor pencils and used glue to place the finished image into the bezel.

The finished project:

My second project uses the Butterfly Charms with a layered butterfly embedded in the resin.
I stamped the image using the StazOn Midi inks on the cardstock and on Acetate.  The StazOn ink allows you to stamp on various surfaces.  I colored the bottom butterfly with STAEDTLER Karat Aquarell Watercolor Pencils. 

I used the beautiful Rue Romantique ribbon to create a bracelet with my bezel and attached a little charms to dangle on the side.

Have a lovely Tuesday!

Suzz

Sunday, April 27, 2014

Mellow Yellow

How about some bright yellow sunshine?   Simon Says Stamp Monday Challenge  this week is Mellow Yellow!  I was excited to play with yellows. 


I think I have been overdosing on the Stampers Anonymous bird.  He has been out on my desk quite a bit lately.

I decided to take an old wood plaque (green) and paint it to a lovely yellow color.  I painted it white with gesso.

I added a layer of Embossing Paste through the honeycomb stencil.  Then layers of yellow mists with a few coats of a darker yellow mist to provide shading.

I stamped the rulers using a gray ink and distressed the honey combs with a touch of brown dye ink.


Then a nest of ribbon died yellow, ruler stamped on ribbon, and raffia.  I added a few eggs in the nest.


I first finished my plaque and walked away to think about what I could add and I decided a branch full of flowers.


Outside I went to get a branch to add to the background.  I misted up tissue paper and cut layers of flowers and put them together on the branches.

Products:  Gesso Tattered Angels – Glimmer Mist – Sun Sisters.  I Ranger Archival Ink – Watering Can  Stampers Anonymous Bird Feather SetTim Holtz Layering Stencil - HoneycombMemory Box Blossoms Flower Die,   Maya Road Art Journaling Stamps, Stampers Anonymous - Artful Tools,    Stampers Anonymous - Tiny Words,

Come play along with us  for an opportunity for a chance  to win a   Simon Says Stamp $50 Gift Voucher.


Thanks for stopping by!

Suzz


Friday, April 25, 2014

Stampendous & Dreamweaver Bloghop

Today is the final day of the Dreamweaver Stencils and Stampendous blog hop.  I was inspired to continue playing with the canvas panels from yesterday.


 This lady started from a panel coated in gesso and a layer of misted cherry blossoms.

I used the Cherry Blossom Stencil from Dreamweaver and spritzed the Dark Cherry Glimmer Mist onto the canvas.  I had to mask around the stencil to protect the rest of the canvas.

I stamped the lady image onto the canvas using black ink and heat embossed it with black embossing powder.  I spritzed the same glimmer mist onto white cardstock and stamped the the flowers using black ink. I stamped them 12 times and cut them out to create the layered flowers.  I stamped two small butterflies on the same background and highlighted them with the white gel pen.

I stamped the sentiment on tissue paper and used decoupage to attach to the canvas.

For my second project I used the Steampunk stencil and placed it on an old book page.

I used the Dreamweaver Embossing Paste (White) to stencil the image onto the textbook page.

After the image dried I spritzed brown, blue sprays over the surface.  I then used gold paint to highlight the embossed areas.  I mixed in images from the Stack Art kits along with the sentiment form the coordinating clear stamps.  I added a few stamped images on tissue paper which were decoupaged to the surface and blended with more sprays and inks.

Products: Steampunk Stencil (LX7018),   Cherry Blossom LG644, Dreamweaver Embossing Paste,
Stampendous - Stack Art - Angel Wings StampsDaVinci HorseSteampunk Charms, Art Perfectly Charms, Stack Art - Regal Bid Quotes Clear Stamps,   Gold Paint, Glimmer mist - Blue, Dylusion - Brown, Gears, Snaps, Screw Brad

Hop along to all the other fabulous inspiration:

Thanks for stopping by!

Suzz


Thursday, April 24, 2014

Dragonflies and Cherry Blossoms

Stampendous  and Dreamweaver are hopping this week.  The hop started Monday and there are so many beautiful projects you will want to go start from the Stampendous blog and take a tour of all the blogs.  There are prizes.... all you have to do is leave comments along the way for an opportunity to win some goodies.

I have to say these two projects I made today make me want to go have them framed as I really love how they turned out.


 I started with canvas panels as the base for my projects.


I painted the center of the panels with a coat of gesso.  After the panel dried I spritzed the backgrounds with a mix of Tattered Angels Glimmer Mists and Americana DecoArt Acrylic Paints.

I let the canvases dry and then applied a coat of white embossing paste with the stencils.  I let these dry.  After they dried I added more paint/mists to give a darker pooling of color around the stenciled areas.  I also used watercolor pencils to add shading to the edges.

On my first project I stamped the flowers over the stencil using brown ink and heat embossed brown embossing powder to add more depth.   I stamped coordinating butterflies which then were cut with the new dies to attach to my canvas.

On the second canvas I stamped letters and words over the background and on my flowers and dragonfly.  I then stamped the sentiment on tissue paper which was misted to the same colors.  I heat embossed the sentiment with white embossing powder.  I decoupaged the sentiment to the canvas using the DecoArt Decoupage medium. (I love this medium it applies the tissue paper perfectly)

Products:
Stampendous - Beautiful Life, Stacked Art - Royal Heart Kit, Lovely Garden Die Cut, Lovely Garden Stamp Set,   Fuchsia,    Courage Quote,  Tattered Angels Glimmer Mist - Sun Sisters, Black Cherry, Orange, Stonewashed Blue, Americana - Yellow, White, Sienna, Versamark Watermark Ink, Stampendous White Embossing Powder, Bark Embossing Powder, 
  Dreamweaver Stencils - Cherry Blossom - LG644Dragonfly - LS56, Fern MaidenHair LJ846

Hop along to the Stampendous blog to see the beautiful inspiration for the week and hop over to the designers sharing their lovely art today:
 
Thanks for stopping by!

Suzz


Wednesday, April 23, 2014

Sing A Song

Welcome to the Artistic Outpost Monthly Hop.  This month's hop is anything goes and the design team has created some beautiful projects!


I have been creating projects for my MIL who has a birthday and mother's day in May.  So this will be one of her cards.


I pulled out the beautiful Bloom & Grow plate to crate a frame for my flowers and bird.

I used the rulers to create the background for my card.   I added several seed packets with a bird and the poppies.

The sets used for this are Artistic Outpost - Birds of Feather, Bloom and Grow, Flower Market, Whimsical Melange.  I used a combination of Glimmer Mists to get the pretty yellows on my background.  I sponged distress inks around the edges.

Hop Along and see all the fabulous inspiration from the rest of the Design Team!


Thanks for Stopping by!

Suzz

Sunday, April 20, 2014

Folded Up


The challenge at  Simon Says Stamp Monday Challenge  is all about the big stamp. Whether it is a background, large image, pattern, or maybe just a big stamp pad.  I have a great fondness for big stamps and love to use them in the background to add texture. 

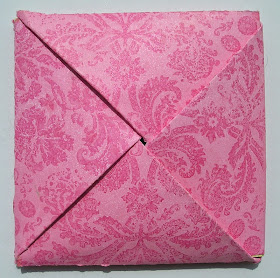
To show off many of my big stamps I decided to try out this folded up card.  This is the back of the card which actually could be mailed with an address.  When you flip it over the other side looks like this:


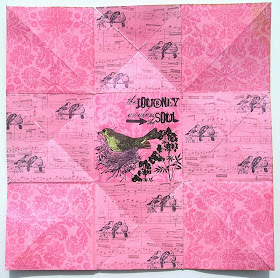
and here is it opened up:


On the other side:


Partially opened which explains the funny angles on the previous picture:


And finally in the process of being opened:


Want to see how to fold this up? 


I actually created two of these and I am going to show you some of the folds with my second version of the project.

1. Measure out your paper into thirds.  I used 12 x 12 for this to make it easier. :) I knew my thirds would be every 4".


2.  Turn the paper 45 degrees and repeat the score at 4" from the edge.  Do this for each side of the paper.

3.  Next we are going to fold each corner into the center. Take the corner and pull it to the center and using a bone folder score the edge.  Repeat this again on each corner.


To make mine more flexible I flipped my paper over and repeated the scoring.   The next step is a little trickier.

4.  Fold the paper in a diagonal over so that the opposite corners touch.  But don't score across and don't fold completely.  Score only the corner to the middle square.  See the diagram below.


Repeat this in both directions.  This will leave you the square with no crease for your front.  After you complete this you will have completed your scoring and you know can fold it up. 

5.  The first step is to pull the sides up all around.  Push in the centers on the side to start the folding in to the center.  You can see I have pushed in the triangles which has the large triangle flaps starting to form.


This is how the flaps should fold in together.  I had a really hard time getting this to work and had to have my older daughter help me. :)  So don't give up. Keep trying until you get the folds to work.


This is how it looks when it all folds together.  This view is from my second project. 


6.  To tuck in the folds to the center start with one flap and fold it to the center.

Take the second flap and fold it over and tuck it under the first flap:


Take the third flap and tuck it under the second flap.


The fourth flap tucks in under the third flap:


And the finished product.  The front on this one:


Here is the inside and out of this project:


I used a variety of big stamps and small to create my projects.  I will list them all in the products section.  I spritzed the front and back of my white cardstock with a spray and let it dry before I started any stamping.

I made a model from white cardstock and marked it up to determine where to stamp to coordinate.  I masked off the sections with post it notes to stamp the sections.

Products:

Heidi Swapp - Color Shine - PrimroseRanger Archival Ink - Magenta Hue, 
  Impression Obsession - SplatterHero Arts Classic Fabric Design,   Hero Arts Large Fabric Design,
  Stampers Anonymous - Bird Feather,     Botanical Remnant Rubs,   Visual Artistry - French Connection,       Heidi Swapp - Color Shine - Citron,   Hero Arts Music Background,     Stampers Anonymous - Spring Sprung,       Stampers Anonymous - Tiny Things,    Visual Artistry - Lost & Found,    Simon Says Exclusive - Stars Dies ,   Simon Says Exclusive - Amazing BirthdayMemento - Pear Tart,  Ranger Distress Ink - Picked Raspberry    The Crafters Workshop - Star Stencil,     Hero Arts - Life of the Party Dots  Impression Obsession Swirls & Stars

Come play along with us  for an opportunity for a chance  to win a   Simon Says Stamp $50 Gift Voucher.

Thanks for stopping by!

Suzz

Saturday, April 19, 2014

Flowers at Midnight

Happy Saturday!  Things have been so hectic I haven't been inking as much as I would like. I started creating something a few days ago and mucked it up.  So this morning I sat down to follow the same creative path and see if I could finish it.

I was happy with what I finished.  I decided to use it as my blog header too!  I created this from a large piece of cardstock spritzed with two layers of Tattered Angels Glimmer Mist.  I used a lighter yellow and a darker yellow together.  I had to let that dry. (My first version was a scrap paper which I tried this on and messed up)

After it had dried I took a background stamp from Hero Arts which had never been inked up and in my collection for over a year at least and stamped it with black archival ink on the left. I then inked it up and repeated the pattern varying the height to create a garden.  Of course I wasn't good enough to completely cover my background with black ink. I found another background stamp with a nice area of plain rubber and used that to ink in areas that weren't completely covered in black. I also used a blue water color pencil and added a hint of blue to the background.

I added a touch of gold shading on the edges of my flowers with the watercolor pencil and waterbrush.

I then came back in and stamped randomly a touch of script in black ink.  I punched out baby butterflies to sprinkle across the canvas.  For my white spots I put a dollop of white acrylic paint on my craft mat and gave it a nice dose of water.  After I mixed it in I took a paint brush with a flat edge and covered it in watery paint and ran my finger over the brush to create a spray of white paint over everything. (I mean everything so you might want to move everything out of the way!)

I couldn't bring myself to cut down my image so my MIL is going to get an extra large card for Mother's Day :)

Products: Hero Arts Garden Silhoutte , Ranger Archival Ink, STAEDTLER watercolor pencils, White acrylic paint, ED Success Punch, Tattered Angels Glimmer Mist

Have a Happy Saturday!

Suzz

Wednesday, April 16, 2014

Create Art

Good Morning! Here is a little inspiration to get your ink flowing... The new DarkRoom Door Create Art got me creating a paint speckled card.

I stamped everything in black and then used paint to add the pops of color.  I created my own background emulating the stamp on the bottom layer with a touch of black ink and pops of color. I took the tops off of some old brushes as a fun embellishment.

Thanks for stopping by!

Suzz

Tuesday, April 15, 2014

Live Happily

I have to admit that I am quite addicted to the cute House Mouse Designs.  I get to play with the new releases from Stampendous of these adorable images.  I have two from the April release.  This first one is just too cute.  Lazing around in an inner tube with his big glass of pink lemonade. 

I colored the image with STAEDTLER Karat Aquarell watercolor pencils.  Sponged some yellow dye ink around the top and blue dye ink around the bottom.  I highlighted the fish with a touch of glitter and the water with a mix of crystal and light blue glitter.

The second one reminds me of Templeton in Charlotte's web at the fair when he ate all that junk food.
This was a quick card to create and I had fun coloring the image. I love stamping these images and then taking them on the road with me when I travel along with my STAEDTLER Watercolor pencils. Although this image was colored with Copics, something I don't usually do but I wanted that bright blue and green combo which the Copics make shine.

Products: Stampendous - Cupcake Belly, Stampendous - Happy Birthday, Stampendous - Inner Tube Nap, Stampendous Live Happily, STAEDTLER - Karat Aquarell Watercolor Pencil, May Arts, Signo Uni-Ball White Gel Pen, Stampendous Ultra Fine Glitter - Yellow, Blue, Memento Dandelion Dye Ink

Hope this brightened your day today!

Suzz

Sunday, April 13, 2014

Wings


This week the challenge at  Simon Says Stamp Monday Challenge is all about winged things. 
 Of course you know I started thinking about butterflies and birds right away but you can be inspired by airplanes, fairy wings or dragonflies.

I started playing with a brand new stencil from Memory Box called Happy Days.  I laid it onto white cardstock and started misting away.


These are just two of the pieces I created.  I added a bit of tulle with a little tag and a sweet little sentiment and a swarm of baby butterflies.

Products:
Memory Box - Happy Day, Heidi Swapp - Color Shine - Primrose, Memory Box - Dancing Butterflies Die, Memory Box - Wishing You, CrinolineVersafine Toffee Ink, Dylusions Sprays, Memory Box - Jingle Bells, Ranger Archival Ink - Magenta Hue, 
  StazOn - Teal Blue

Come play along with us  for an opportunity for a chance  to win a   Simon Says Stamp $50 Gift Voucher.

Happy Monday!

Suzz