Pages

Saturday, April 28, 2012

All Things Beautiful

Happy Sunday!  The  CR84FN53 challenge this week has some beautiful soft colors... I combined the challenge with the ODBDSLC106 No Designer Papers.
 
I had a nice piece of cardboard sitting on my desktop.....


The piece of cardboard became the base for my project.  The background was covered in  paint (white, pink) and embossed with white embossing powder using the lovely Honeycomb Background stamp.

I pulled out a piece of canvas and gave it a coat of paint smeared across the surface (pink and white).  Distressed the edges. Tore it along the bottom. Stamped the cattails form ODBD With Heartfelt Sympathy colored them with watercolor.  The Dragonflies are from the ODBD Faithful Friend set and were stamped in black on white cardstock and glimmer misted to get the shade of blue.  Stamp the sentiment from ODBD Faith.  Accented the whole hanging with roses, seam binding and flourihes.  Distressed all the edges with a touch of brown distress ink.


Here are the soft and dreamy colors:


For all the details on the challenge this week go to the CR84FN blog. 

Please visit the fantastic CR84FN Design Team:

Deborah Frings * Sue Lelli  * Andrea Matthews *  Suzanne Czosek (me)  *  Heather Jensen * Mona Pendleton  * Lisa Somerville * Shannon White* Pauline Pollington

Thanks for stopping by!

Suzz

Spectacular Spectacles

The Moxie Fab World Challenge The Spectacular Spectacles got me thinking about this handsome gent and his finery with his glasses.    I stamped him (CRP161-R Cling Felinus) using black ink on white cardstock.  He is colored with a hint of watercolor pencils.  I then cut him out to put him into a little arch decorated with beautiful fuzzy pattern paper and an acetate chandelier CRP149-R Cling Single Chandelier hanging behind him. The edge was glittered with Blue Glass Glitter.

Hope you are having a lovely weekend... We are looking at rain, no rain and then another week of rain! :) Spring weather for sure!

Suzz

Friday, April 27, 2012

ATC's on Parade

 Here is my parade of ATC's...


 I dug through my piles and finished a few ATC's to send off.  I didn't use up nearly enough of my stamped pieces but did make a small dent! What was fun was to see what I could pair together to form my ATCs.

The Route 66 ATC was fun as I started with the car image and added the dog from my stash.  I love how cute that dog looks hanging out the window.   My older dog loves to do this. The background was just layered up with signs from the Artistic Outpost Diesel Punks  and Route 66 plates.

The AO train image prompted me to pull out this wonderful Cornish Heritage Farms set of trains that I had never inked up and add a small train in the background and a few other stamped images.

The bird ATC is a mix of existing images blended with a few new images.  I am ashamed to say my scrap pile has a whole flock of birds and I could have made at least 5 new ATCs or projects with birds alone!  The Butterflies were the other big collection although none of them made it onto these ATCs.


So many different sets and product was used on my ATC's. If you have a question about any of them drop me a line and I will look it up and tell you who they are from.

Have a happy Friday!

Suzz

Thursday, April 26, 2012

Hope

I have been playing with ATC's again... I pulled out my scrap pile that I organized earlier this week and pulled out all my stamped pieces that haven't been used on projects, backgrounds, and die cuts.

This project started as an ATC but those wings just wouldn't fit! I decided to continue on and put together a card.  The card is for the Simon Says Stamp and Show your Favorite Word as it speaks to Hope.  I also am playing in the Frilly & Funky challenge which is to re-cycle/re-purpose.  I re-cycled the doily and dress from from my scrap pile of old projects.  The dress form is cut out from a food box. (The technique was from the 12 Tags at Christmas with Mr. Holtz)

Here is my project:
The doily is from Hero Arts. The dress form is Sizzix Die Cut.  I painted it with crackle paint and then added a layer of glimmer mist and a coat of clear embossing powder to make the color pop. 

The sentiment is from Artistic Outpost - Quotes & Quotables plate.  The wings are embossed using Stampendous Silver embossing powder and are from Chocolate Baroque - Punky Romance. 
The paper is from the latest BoBunny Country Garden.

The flowers are new Prima Flowers.  The ribbon is glimmer misted using Tuscan Sun.  The touch of orange is Ranger Distress Inks - Rusty Hinge.

Have a lovely Thursday!

Suzz

Tuesday, April 24, 2012

Happiness

I bundled a few challenges to create my card today:  Mojo Monday provided the layout, City Crafter Challenge is a Little Rough Around the Edges (Use Burlap) and Simon Says Stamp and Show Your Favorite Word and Fashionable Stamping Challenges is Embossing.

When I saw the Mojo Monday card was a grid card I was determined to go into my scrap pile to create my grid card.  So the stamped backgrounds, embossing and paper were all in my scrap pile. (Yeah!)


I thought it would be fun to do the negative outlines from mini punches and pulled out two to create the dragonfly and leafy branch.  The best part is they popped nicely on the burlap and embossed background.

I stamped a variety of images and words on the scraps to add to the stamped backgrounds.  My word is happiness.  The sentiment actually is Embrace Happiness and I love it!

The products:  Cuttlebug Embossing Folder, 7 Dots Studio Paper, Hero Arts Wood Finish, Friends Definition, Flourishes Berry Sweet, Lily Bee Designs Clear Stamp Set, Marks Finest Papers, Inkadinkado, Prima Flowers, EK Success Punches

******************************************************************
I was asked by a few people what I did to create my pocket tag from the other day. So I took a few more pictures and created a template with score lines and measurements drawn on the paper.  So you can skip this part of my post if you haven't any interest. :)

The project:

 The measurements for the pocket:
  1.  Cut a 3" x 6" piece of white cardstock.
  2. Score from left side 1/4", 1/2", 3/4". 
  3. I made the center part a little bit larger than the 4 1/4"  you will end up making the next score at 5 1/8", 5 3/8", 5 5/8"
  4. Score along the bottom 1/4", 1/2", 3/4". 
  5. Cut out corners. (Trim a little further in on the bottom from the corner.) You can see on mine below that the folds conflicted with each other as they were tight. 
  6. Fold score line (3/4" from edge) under. 
  7. Fold second score line (1/2" from edge) forward. 
  8. Fold last score line (1/4") under.
  9. Tape 1/4" around the edges and attach to the main panel which measures 4 1/4" x 5 1/2". 
 A side view:
 The back and bottom view:
 I attached my pocket on the outside of the main panel. I should have put it on the inside for a cleaner look. :)
Hope that helps. Sorry for the long post.

Suzz


Sunday, April 22, 2012

Altered Alice Challenge - Splendidly Dressed

 If you are here for my CR84FN post scroll down or click HERE.

This month Stampendous is sponsoring the wonderful Altered Alice Challenge.  For all the details hop on over to the Altered Alice Blog.  The inspirational quote:

"After a time she heard a little pattering of feet in the distance, and she hastily dried her eyes to see what was coming. It was the White Rabbit returning, splendidly dressed, with a pair of white kid gloves in one hand and a large fan in the other: he came trotting along in a great hurry, muttering to himself as he came, `Oh! the Duchess, the Duchess! Oh! won't she be savage if I've kept her waiting!'"-- Chapter 2; Alice's Adventures in Wonderland


My project:


I had picked up this little crown awhile ago and it was a great deal.  I was saving the crown for a special project and this was the perfect challenge.  The images are all from the Stampendous Wonderland set.

I stamped the cards and hearts using the Crimson red from Ranger Archival Inks.  I accented the crown with some bits and pieces of trim gems, and lace.  

Alice was stamped in black and colored with watercolor.  I created the base from acetate supports attached to the bottom of the crown and added Websters Pages Lace Panel in the bottom to cover my base and give a softness to the crown.

I love that I was able to use those playing cards. I can't tell you how many half decks we had in our card selection.  I went through and took any deck that was missing more than a few cards and put them in my alterable stash. :)

Hope your Sunday is blessed!

Suzz

Saturday, April 21, 2012

Flowers in Bloom

Part two of the  CR84FN52 challenge starts today.  The lovely soft colors inspired me to pull out the beautiful Prima Almanac papers and create another flowery card. .


The hydrangeas from Hero Arts are stamped onto the paper using Ranger Archival ink  and colored with watercolor pencils.  The sentiment is from Verses Rubber Stamps - Flowers in Bloom - FS1119. and stamped onto tissue paper using black archival ink. The bees are from Impression Obsession and were added at the end..   The flowers look more purple in my photo but in real life are a lovely pink.


Here are the sweet colors:

For all the details on the challenge this week go to the CR84FN blog. 

Please visit the fantastic CR84FN Design Team:

Deborah Frings * Sue Lelli  * Andrea Matthews *  Suzanne Czosek (me)  *  Heather Jensen * Mona Pendleton  * Lisa Somerville * Shannon White* Pauline Pollington

Thanks for stopping by!

Suzz
Cottage Roses, Lace and Butterflies

Who could resist Cottage Roses, Lace and Butterflies?  Not me... :)  My project today is for the monthly  Stampendous challenge to re-cycle or re-purpose and also for the Simon Says Stamp and Show Anything

My re-cycled project was triggered from a few things.  One is all the fantastic chunky ATC's (just one of them from Tracy that I loved!)  I have been seeing all over in blog land.  Two, it was time to take down the old swing set in our back yard as our kids are getting too old for it and it was starting to show it's age. That meant piles of wood scraps in the backyard and of course a few of those old pieces of wood happened to make their way into my craft room. :)

Here is what happened to one of those scraps of wood:  


Recipe:

  1. Paint surface with white acrylic paint. 
  2. Distress edges with brown dye ink. 
  3. Stamp image (Cottage Rose Jumbo Cling) using Ranger Archival Ink onto surface.  This was tricky as the surface is uneven so make sure to rock it slightly and press down firmly.  I also filled in with my micron pen where the image was softer. 
  4. Spritz glimmer mist onto craft mat and color flower using waterbrush. After dry shade with watercolor pencils. 
  5. Smear green dye ink on craft mat and paint leaves with waterbrush. Shade with watercolor pencils.
  6. Stamp sentiments onto white cardstock. Cut out and distress with brown dye ink.  (I promise the sentiments were straight IRL and only appear off-kilter in the photo LOL!) 
  7. Accent with butterflies.  (I embossed the flower and butterfly from silver to gold using embossing powder and versamark)
  8. Apply Versamark Ink over the surface and heat emboss using clear embossing powder. This will give a smooth finish and enhance the soft colors. 
  9. Assemble and accessorize. :) 
All the new stamps from the new release are available in the Stampendous Store

For more inspiration:

To play along you  have until Thursday, May 3, 2012 at 11:59 PM EST to add your direct link to our collection at the end of this post (or on the Stampendous blog).  You do not have to use Stampendous products.  The prize (drawn at random) is this a lovely Mother's Love Perfectly Clear Stamp Set.  Available in stores now, it will be on the website for purchase soon!

Due to shipping restrictions, the winner must have a US address. 

Pin It

Thanks for stopping by!

Suzz

Friday, April 20, 2012

The Secret Garden

I love the idea of this little girl finding a secret beautiful garden to sit and read her book. Or maybe the garden grew from her imagination and her book?

The little girl is from the Favorite Book plate with the new Secretary Pool set. Her dress was pieced from the stamped script in the Secretary Pool.  The background on the main panel is stamped in fire brick red using the alphabet from the set.  The fence is made of pencils.  The flowers are from the new Flower Market.  

This is being submitted to the Simon Says Stamp and Show Anything Goes  challenge.

Thanks for stopping by!

Suzz

Thursday, April 19, 2012

Tuesday Trigger - Butterflies and Watercolor

The gorgeous Tuesday Trigger at Moxie Fab World had me pulling out my butterflies and creating a soft inky background.  The Simon Says Stamp and Show challenge this week is Anything Goes and the Our Daily Bread Challenge is S-P-R-I-N-G (Sponging, Punch, Ribbon, Inking, Glimmer Mist).

This started out from some leftover tags in my scrap pile... (I know my scrap pile seems full of things and it is! )  I throw everything that doesn't get used on a project after I finish a project in about 6 different envelopes.  They are overflowing with bits and pieces and I try to use them when I can.

I created a little pocket card.  The pocket has an accordion fold to allow more room to insert goodies.

 And here it is with the tags pulled out:
The tags all have friendship quotes on them.  They come from the beautiful Our Daily Bread Designs - Faithful Friend set.  The butterflies (ODBD Two Step Butterfly) were leftover from another project. I was happy to pull them out and attach them to baby clothespins. They are the coolest little clip-ons now. The recipient of this can take the butterflies off and clip them onto other things. :)

The background was created by inking up an acrylic block with yellow, orange and pink dye inks and spritzing it with perfect pearls.  Then I used a ODBD grunge butterfly background stamp to stamp onto white cardstock. I finished off with dragging the white cardstock through the remaining ink on the block.

After that cardstock dried I cut it into the tags and background pieces.  I stamped over the edges with orange dye ink using the Our Daily Bread Gods Love set.

I think this would be a nice set to give to a friend who needs a little encouragement. I could clip additional gift cards, sachets, or candy to the tags with my butterfly clips. :)

Thanks for stopping by!

Suzz

Tuesday, April 17, 2012

Artistic Outpost - Blog Hop Paris Exposition

Welcome to the Artistic Outpost Blog Hop!   Today the Artistic Outpost Design Team  is sharing projects featuring Paris Exposition!

 Click to Enlarge

A close up of the charms on either side:


 I purchased this wonderful wooden arrow already painted in a lovely ivory color with the hanging wire. My  color combination of the Ivory and Black with a hint of pink comes from this week's City Crafter Challenge Just a Hint of Pink.  I am also playing along with the Simon Says Stamp and Show Anything Goes Challenge.

The stamps used are from the Paris Exposition  and  French Flight plates to create the collage of images.

The charms are stamped onto the clear fragments using Stazon Ink.  Apply glossy accent to acrylic and back with ivory cardstock.   The flowers are from the Flappers Fashions plate. I accented with a touch of pink watercolor pencil and water.

The edges of the arrow was distressed with Ranger Black Archival Ink. The tulle was the finishing touch on the wire.   

To see all the other fabulous projects from the design team:


Thanks for stopping by! 

Suzz

ODBDLYLS16 Layout Challenge - Garden Recipe

This month the ODBD scrapbook challenge is a garden recipe.You still have time to play along as the challenge goes until the end of the month!

My layout features wood, green grass, and flowers: 

The layout is 9" x 9".  The ODBD Products Used: Dog Sympathy.

The background is some lovely paper from the 7 Dots Studio with a smearing of dye inks on the surface around the edges to create the effect of the woodgrain.

The image and sentiment are from the new release and worked perfectly for me on my layout as Emma our youngest dog is a beagle mix and looks a lot like the sweet puppy in the set.  I took a picture of my son playing with Emma outside as my focal point.   I created a faux dog house.  (This took several tries to get the proportion correct).  The new release from ODBD is for those of us who have pets or want to share a sympathy card with people who have lost their family pet.   I was happy to scrap this sweet picture of Zac and Emma! 

For all the details visit the ODBD blog.  For more inspiration go see Lisa's wonderful layout! 


Thanks for stopping by!

Suzz

Monday, April 16, 2012

Small Things

Monday again!  Always a slow start around here. :)

I have a tag that is for the Simon Says Stamp and Show Anything and for Linda's new challenge blog Frilly and Funkie which is I'll Take your Word For It.   When I saw the challenge at Frilly and Funkie I knew I had to play along as I love my verses.


The Floral part of the tag was part of a tag kit from October Afternoon. The background was sponged with white acrylic paint and brown dye ink.  The sentiment is from Verses Rubber Stamps stamped using brown ink over the background.  A layer of flourishes (Hero Arts) around the edges and a touch of small birds (B-Line Cube) to finish off the background.  Then accented the tag with flowers, leaves, brads, lace and pearls. 

Hope your week is off to a good start!

Suzz

Saturday, April 14, 2012

CR84FN52 - Spring Flowers are Blooming!

Happy Sunday!  The new CR84FN challenge is here with some soft and pretty new colors.

Spring flowers came out and appeared onto my card: :) 


Part of my bouquet of cards created this past week. :)  See I can have a green thumb! LOL! 

The stamps are  Memory Box: Dogwood Branch, Happiest Birthday, Mail Definitions, Renaissance Tile and  Meadow Dragonfly Die. 


Here are the sweet soft muted colors:

For all the details on the challenge this week go to the CR84FN blog. 

Please visit the fantastic CR84FN Design Team:

Deborah Frings * Sue Lelli  * Andrea Matthews *  Stephanie Kraft * Suzanne Czosek (me)  *  Heather Jensen * Mona Pendleton  * Lisa Somerville * Shannon White* Pauline Pollington

Thanks for stopping by!

Suzz

Dreamweaver & Stampendous - Beautiful Fern

Welcome to the final day of the  Dreamweaver Stencils' Dream Team and Stampendous Design Teams hop.  There are multiple opportunities to win some fabulous prizes from both companies. Both the Stampendous Impressions' blog or the Dream It Up! blog are sharing wonderful projects which pair up fabulous products from both companies.

All of my  projects feature the beautiful  LJ 846 - Maidenhair Fern.


My first project uses the CRR137-R Cling Garden Background stamped on white cardstock and colored with glimmer mists using a waterbrush.  The next layer was created by  taping down the fern stencil and using black embossing paste. While the paste was wet add the layer of shimmer (Pixie Blush). I brushed off so that the black still was visible with a hint of the shimmer.

Next up


The Fern was laid down onto the cardstock and taped in place using repositionable tape.  The Dream Text was stamped using brown ink.  Then sponged the background using orange and yellow dye inks with a hint of brown dye.

The background panel is the beautiful Cling Jumbo Rosehips inked up using brown and orange dye ink and stamped repeatedly.

Stamp the Jumbo Cling Songbird  and color using coordinating colors.

The last image is just a panel I created but didn't put on a card... yet!


I used the same fern stencil but use the gold metallic embossing paste with a coat of Stampendous Halo Glitter sprinkled over the surface.  I think this would be a fantastic combination for a Christmas card!

Be sure to leave comments as you tour the blogs (with your email addy!) for a chance to win* one of three combined sets of these Dreamweaver and Stampendous goodies:


Here is the complete list of people playing along today:


Dream It Up!
Stampendous Impressions!
Kristine Reynolds
Cherylynn Moser
Susie Moore
Lynn Mercurio
Laura Drahozal
Pam Hornschu
Terrece Siddoway 
Wendy Price
Liz Martin
Taylor Usry
Jessie Hurley
Krissy Fossmeyer
Cyndi Bundy
Jennifer Ingle
Georgia Sommers
Melinda Gleissner
Kristi Van Doren
Stephanie Lee
Wendy Jordan
Suzanne Czosek
Lee Kellogg
Janelle Stollfus
Louise Healy
Jennifer Dove

Also, be sure to stop by Tenia Nelson and Lea Kimmel's blogs today - they made projects for our monthly Stampendous challenge!

*For shipping and handling purposes, USA/APO/FPO/Canada winners only.

Thanks for stopping by!  

Suzz

Friday, April 13, 2012

Lovely in Lace

Flourishes challenge this week to celebrate their new release is Lovely in Lace.  I have been creating a summer bouquet over the past four days.  I created this one for the Lovely in Lace challenge.


I used the lovely Sweet Peas set from flourishes for my flowers and butterflies.  The background is Hero Arts Lace Design Block.

Have a wonderful Friday!

Suzz

Thursday, April 12, 2012

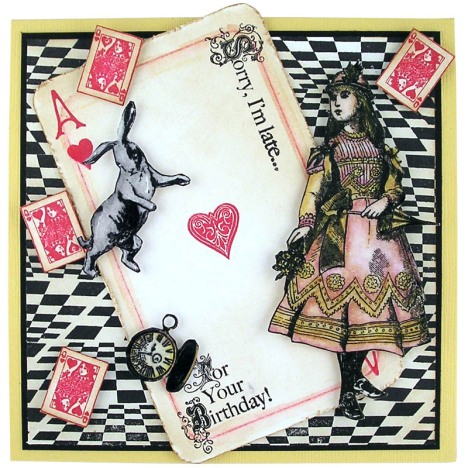
I'm Late........

All April the Stampendous team is  celebrating with the folks over at the Altered Alice Blog as their Design Team and ours use the Stampendous Wonderland Perfectly Clear Stamp Set to create some fantastic adventures based on the following quote from Alice’s Adventures in Wonderland -
“After a time she heard a little pattering of feet in the distance, and she hastily dried her eyes to see what was coming. It was the White Rabbit returning, splendidly dressed, with a pair of white kid gloves in one hand and a large fan in the other: he came trotting along in a great hurry, muttering to himself as he came, `Oh! the Duchess, the Duchess! Oh! won’t she be savage if I’ve kept her waiting!’”– Chapter 2; Alice’s Adventures in Wonderland


Today I am sharing one of my projects for the Altered Alice challenge:


I took the really fun checkerboard image in the set and repeated it over the background to create a backdrop for Alice.  I used the colors of red and yellow for Alice instead of her traditional blue and white outfit. :)

The card was created by cutting white cardstock to size and using the stamp to create the Ace. 

I thought it would be fun to create a belated birthday card, for one of those times when I was late in sending out my birthday wishes.

Thanks for stopping by!

Suzz

Wednesday, April 11, 2012

Dreamweaver & Stampendous - Time Flies

Welcome to today's fun Dreamweaver Stencils' Dream Team and Stampendous Design Teams hop.  There are multiple opportunities to win some fabulous prizes from both companies. Each day this week, both the Stampendous Impressions' blog or the Dream It Up! blog are sharing wonderful projects which pair up fabulous products from both companies. Everyone will be playing on Saturday, the 14th with the final hop for the week.

For my project today  I created a wall hanging and then a card:

On this project I took a piece of slate and applied some of the wonderful Embossing paste - White using the wonderful Paste Spreader and the beautiful LJ896 Flourish stencil and applied it to the slate.  I then sprinkled some ultra fine Stampendous Blue Ultra Fine Pastel Glitter to the surface and let dry. I finished off the edges of the slate by smearing Versamark Watermark Ink around the edges and embossing with Aged Bronze Embossing Enamel

The main panel was created by laying the stencil LL3012 onto white cardstock and spraying it with a blue green chalkboard glimmer mist.  I didn't want to lose the mist on the top of the stencil, so I carefully moved the stencil into a clean area with the mist still on the stencil and laid a new piece of white cardstock onto the stencil and pressed down to pick up the excess glimmer mist.  This became my image.

I stamped the Dream Text using brown ink over the stencil image.  I cut my image to size.  I then waited for it to completely dry before the next step.  Stamp the beautiful damask using versamark in the right hand corner. Heat emboss using Aged Bronze Embossing Enamel.   Stamp the lovely rose hips on the top left corner using Versamark.  Heat emboss using Aged Bronze Embossing Enamel. 

Stamp Time Flies along the top using brown ink.  Stamp the Lone Bird using Versamark on white cardstock. Heat emboss using Aged Bronze Embossing Enamel. Cut out. Layer bird onto corner of background. Mount on brown cardstock and assemble onto slate background. 

After I finished my wall hanging I thought how it would look lovely on a card and I made a card using the panel:


The background is glimmer misted to coordinate with the main panel. 

Be sure to leave comments as you tour the blogs (with your email addy!) for a chance to win* one of three combined sets of these Dreamweaver and Stampendous goodies:


Here is the complete list of people playing along today:

*For shipping and handling purposes, USA/APO/FPO/Canada winners only.

Thanks for stopping by!  

Suzz

Tuesday, April 10, 2012

Trinket Box

Simon Says Stamp and Show this week is to show a Tim Holtz technique.  I am sharing a trinket box I created from a box purchased from the clearance bin. 

 My trinket box using a few different Tim Holtz techniques:
This project uses all new stamps from Stampendous being released this month!  The box is covered in tissue tape which has alcohol ink applied over it to tint it to a nice rust color.  The edges of the box were inked up with versamark and heat embossed using black chunky embossing enamel and Aged Bronze embossing enamel. The gears are all stamped on acetate using versamark and heat embossed using black embossing powder.  The image is stamped onto a fragment and heat embossed using black embossing powder. 

Happy Tuesday!

Suzz

Monday, April 9, 2012

Sail My Ship

The Fashionable Stamping Challenge is all about nautical.  I knew the new Artistic Outpost quotable from Louisa May Alcott was the perfect quote to use for this challenge.

I spent many a day reading Louisa May Alcott and the same books over and over.  I was very pleased that a quote from her was included on the Quote and Quotables plate.

I pulled out the lovely Beyond the Sea plate and some fishnet to coordinate with the sentiment.  The background is a glimmer misted sprayed over fishnet on white cardstock.  Stamp the music using brown ink over the misted background. Sponge edges with brown dye ink.

The lighthouse was stamped using black ink and colored with watercolor pencils and an aqua brush.  There was sponging of the dye ink over the background. I added the ship in the background from the Huck Finn plate. 

I do think I went a little overboard with the birds. LOL!  But once I started I had to balance them out! :)

I also wanted to share that Stampendous and Dreamweaver will be sharing fantastic projects all week.  Go and visit the Stampendous and Dreamweaver blogs to find out which design team members will be sharing projects each day this week finishing up with a big blog hop on Saturday! Of course there are fun prizes in addition to inspiration!  I will be sharing my creations later this week and during the wonderful blog hop.  I haven't tried the stencils & paste before and had a lot of fun playing with them.

Have a lovely day!

Suzz

Winner of the Stampendous Stamps!

Thanks everyone for the lovely comments and stopping by during the Lily Pad Blog Hop!  I used the random org number generator to select the winner.  The winner of the stamps from the Lily Pad Blog Hop is:

judy said... 
 
I love the pretty rose tag!! Your coloring on the second card is awesome. 
 
Judy you have until April 15th 2012,  to contact me with your info and I will get your stamps mailed out to you! 
Thanks again everyone! 
Suzz

Saturday, April 7, 2012

Never More than a Thought Away

Happy Easter! Welcome back to week II of the CR84FN challenge.I was inspired to create a card using watercolors for the Inspiration Journal challenge of watercolor.

I started with a water colored  background with smears of the beautiful pastels: 

The background was created by smearing distress inks on the craft map and picked up with waterbrush across the surface.

The flowers were stamped and colored with watercolor pencils. All the stamps are Hero Arts.


Here are the lovely colors:
For all the details on the challenge this week go to the CR84FN blog. 

Please visit the wonderful CR84FN Design Team:
Deborah Frings * Sue Lelli  * Andrea Matthews *  Suzanne Czosek (me)  *  Heather Jensen * Mona Pendleton  * Lisa Somerville * Shannon White * Pauline Pollington

Thanks for stopping by!

Suzz