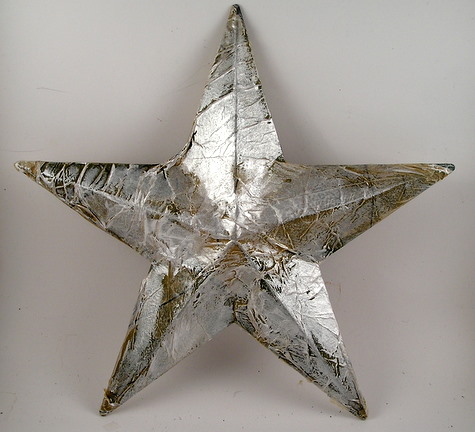
I started with a metal star that I had in my alterable pile. I think that the new Tim Holtz Sizzix 3D Star would be perfect for this as well.
I covered the star with an old sewing pattern to get a thin tissue paper effect on the surface. I mixed the glue with water and painted the surface of the star. I then tore pieces of the pattern and applied it to the surface. After I applied a layer I painted more glue/water mixture over the surface. I repeated until the surface was covered with multiple layers.
This is the first piece applied with leaving the paper hanging over the edges.
I folded over the edges and turned them under when I finished applying all the layers.
After the glue dried on the pieces. I added a layer of green dye ink onto the paper. I then smeared Adirondack Pearl acrylic paint onto the surface. It gave it a beautiful sheen.
I added buttons around the edges of the circle and layered in shimmery green leaves from a branch of faux silk leaves.
To finish off my shimmer I used the same score tape around the edges of the star and sprinkled Stampendous Green Crushed Glass Glitter to the edges.
and a final close up of the Santa with the buttons and shimmery leaves.
Products: La Blanche Smiling Santa, Stampendous Fresh Green Crushed Glass Glitter, Adirondack Pearl Metallic Paint Dabber , Ranger Archival Ink Black, Ranger Distress Ink - Crushed Olive, Buttons, Score-Tape
Come join in on the fun and create something with a little sparkle and you also have an opportunity to win a $50.00 Gift Voucher to Simon Says Stamp.
Thanks for stopping by!
Suzz


Stunning Sue. A lovely tribute to your mom too.
ReplyDeleteSuzz, I am so glad you shared the tutorial - it was awesome to see how you took that plain, metal star and totally transformed it into this gorgeous decoration! Absolutely amazing!
ReplyDeleteWonderful star!!!
ReplyDeleteWOW!!!!!!So cool!!!
ReplyDeleteBeaautiful vintage feel to this lovely project. Grogrous soft colour, cant believe how silvery that pearl dabber looked! Elaine
ReplyDeleteThis is wonderful Sue. Love the idea behind it and how you altered that star. Just gorgeous. The shades of green are so pretty and I love that santa stamp you used. TFS!!
ReplyDeleteSuzz...the minute I saw this, I was in love! Your Christmas start has such a wonderful vintage feeling. I love vintage Santa images and you have really done such a beautiful job with La Blanche's Santa on this. Love the shimmering green; from the leaves to the glass glitter outline on the star. It's a gorgeous piece! <3 Candy
ReplyDeleteAbsolutely stunning Suzz, love the transformation. The glass glitter really does add wonderful sparkle and the Santa is fantastic showcased in the centre. Love your colouring of the star, the sheen is gorgeous. Tracy x
ReplyDeleteYou never cease to amaze me...this is gorgeous!
ReplyDeleteLOVE the difference those shimmery leaves made, and the buttons are adorable! Love this, Sue!
ReplyDeletewonderfully understated sparkle Sue
ReplyDeleteFABULOUS!!! This is just amazing! Hugs, Robin
ReplyDeletewhat a gorgeous vintage looking christmas piece! How fun and sparkly! Hugs, Sandra
ReplyDeleteStunning star, Suzz! I love the shade of green you chose for this holiday piece...it's unexpected & beautiful!
ReplyDelete*mwah*
Steph
Simon Says Stamp!
I think this is just so beautiful Suzz. It is the sort of ornament that can be on show all year. Totally stunning.
ReplyDeleteI think this is so gorgeous and I love seeing the steps!
ReplyDeleteYou are a rockstar!
ReplyDeletePS That comment was from your sister (Lisa). ;-)
ReplyDeleteSuch a clever person you are Suzanne. I love it. It's just beautiful!
ReplyDeleteHow beautiful. I just love it.
ReplyDeleteHow beautiful. I just love it.
ReplyDeleteExtremely gorgeous Suzanne!!! Sparkle city and would make any tree proud!
ReplyDeleteYour Mum would be proud Sue! This is lovely and such wonderful shades of green (my favourite colour). Love the Santa image too .....a proper jolly old Santa face!
ReplyDeleteHugs
Lesley Xx
Oh my goodness this is so awesome!!! I am so going to try this!!
ReplyDeleteOhhh Suzz I totally LOVEEEE your Santa decoration, wowzersss really awesome thank you for the tutorial and sharing your fabulous and AMAZING project wowww
ReplyDeleteHugs Terry xxxx
Thank you for the very kind comments Suzanne. Carole
ReplyDeleteWhat a wonderful transformation - and wonderful to see all the preparatory stages up close, thank you for sharing it with us!
ReplyDeleteAlison x
Stunning way to alter the star into a beautiful holiday decoration!
ReplyDelete