

Hi! I am sharing another project for the Funkie Junkie Boutique. We were challenged to use alcohol inks this time. I tried something new for me with the alcohol links and tried coloring an image!
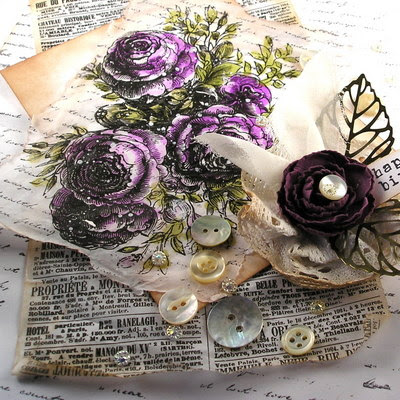
I used the beautiful Idea-Ology Tissue paper prints and used a mix of Alcohol Blending Solution with the Purple Twilight alcohol ink to color the flower petals. I layered the color into the petals by mixing on my craft mat the blending solution with the purple ink.

For the leaves I repeated the process using a green alcohol ink along with a hint of brown. After the ink was dry, a splattering of white acrylic paint added a highlight over the background.
The edges were torn and sponged with distress ink and a stamping of a script was added across the background.


I pulled out some additional embellishments to add a focal point with the sweet birthday sentiment.
I enjoyed using the alcohol inks to color the images and have ideas floating on how to use them on different surfaces with stamped images.
Thanks for stopping by!
Suzz
Products:
- Ranger Tim Holtz Alcohol Blending Solution
- Ranger Tim Holtz Purple Twilight Alcohol Ink
- Ranger Tim Holtz Pistachio Alcohol Ink
- Ranger Distress Ink Brushed Corduroy
- Stampers Anonymous Curiosity Shop Rubber Stamp
- Tim Holtz Idea-Ology Serendipity Collage Paper
- Waterbrush
- Bronze Metallic Leaves
- Stampers Anonymous Tim Holtz Exquisite
- Rhinestone Embellishment


