Showing posts with label Fall. Show all posts

Wednesday, October 23, 2019

It Looks Real


Hi... I'm back.... In time for the new Funkie Junkie Boutique Challenge "It Looks Real" hosted by the talented Cec!

Here is how she describes the challenge:

"There are so many ways to make something look real when it isn't.  For this challenge, make a vintage or shabby chic project with one or more faux elements.  Those elements could be faux rust, leather, stitching - to name a few.  Make sure you tell us what the faux element is and how you made it because it will look real."

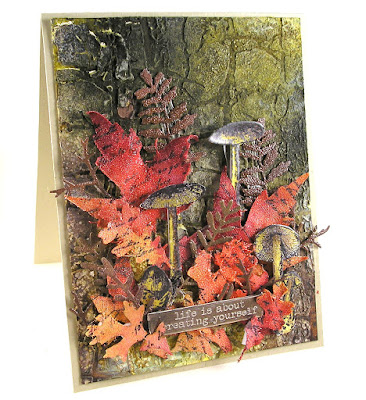
Sizzix Fall Foliage Stampers Anonymous Tiny Toadstools Stampers Anonymous Layering Stencil Decayed For The Funkie Junkie Boutique

You may remember my post from a few weeks ago where I was playing the Decayed stencil, some texture paste and salt.   That immediately came to mind when I saw the challenge.  We have this bench in our yard that we don't use except for decor. 

The moss on here reminds me of the decayed pattern and ended up being my inspiration for my faux lichen.
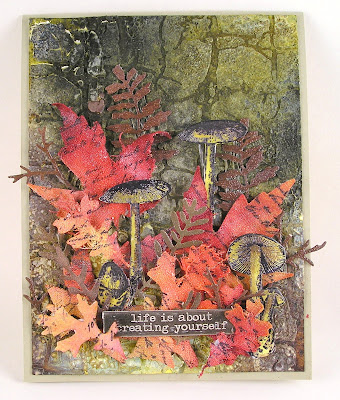
Sizzix Fall Foliage Stampers Anonymous Tiny Toadstools Stampers Anonymous Layering Stencil Decayed For The Funkie Junkie Boutique

I started by trying to replicate the colors on the mossy bench:

Unfortunately I realized when I sat down to work on my post that my Hickory Smoke Distress Stain Spray was empty.   I decided to mix up a bunch of different colors to get this:
Stampers Anonymous Layering Stencil Decayed For The Funkie Junkie Boutique

I took a mix of greens, black, brown, white, to get a variagated color.  I ended up with two backgrounds.  This is the partial decayed stenciled background.  I used the other on my card.

Stampers Anonymous Layering Stencil Decayed For The Funkie Junkie Boutique
Here are the steps to get to this point:

1.  Spread texture crackle embossing paste over a mixed media cardstock with the decayed stencil.
2.  While it is still wet spray distress inks and oxide sprays over the surface mixing the colors as desired.
3.  While the ink is still wet pour the salt over the surface.  I moved up to sea salt from regular salt. :)
4.  Now the hard part you have to wait until everything dries.  You can speed up the process by using a heat gun but it will still take awhile.  Best to let it dry overnight.
5.  When it is completely dry you shake off the salt and rub it off.  Normally I use my plastic ruler to scrap off the salt.  With the textured paste it might pull off your paste.  (I put my paste on unevenly and didn't scrape off the excess while the stencil was on which left a very cool surface but limited my scraping.)  I used my fingures to rub off the salt bits. 
6.  After that your surface is ready.  I had a few chunks of my embossing paste break off of my background.  I just added a few drops of inks into those areas and they blended beautifully.

When you are done you can choose to leave it muted or you can cover the entire surface with clear embossing powders to give it a geode effect.

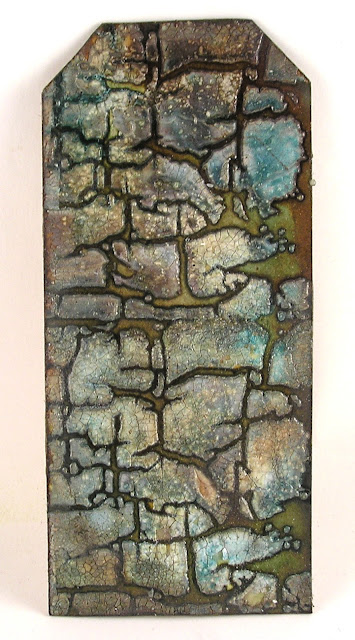
My tag was embossed with clear embossing powder which makes the colors really shine.
Stampers Anonymous Layering Stencil Decayed For The Funkie Junkie Boutique
For this base I splattered with white paint at the end to highlight areas. 
Stampers Anonymous Layering Stencil Decayed For The Funkie Junkie Boutique
A close up of the clear embossed background and the texture:

Stampers Anonymous Layering Stencil Decayed For The Funkie Junkie Boutique
Next I painted linen cloth with gesso.  After it dried I cut a series of leaves from the painted cloth.
Sizzix Fall Foliage Stampers Anonymous Tiny Toadstools Stampers Anonymous Layering Stencil Decayed For The Funkie Junkie Boutique

After that I sprayed with a mist of yellow, orange and red distress inks.  After they dried I stamped some script onto the leaves.  I then versamarked the surface of the leaves and embossed with Frosted Antiquities.

The leaves were cut form cardstock and sponged with brown dye inks.  Then they were also embossed with the Frosted Antiquities.  I finished the forest scene with a mix of tiny toadstools.

Sizzix Fall Foliage Stampers Anonymous Tiny Toadstools Stampers Anonymous Layering Stencil Decayed For The Funkie Junkie Boutique

I hope this has you inspired to come play along in the It looks Real Challenge at the Funkie Junkie Boutique Challenge.

The winner will earn a chance to be a Guest Designer at a future date here at The Funkie Junkie Boutique blog, and everyone who enters and follows the rules will go into the draw for the chance to win a $25 spending spree at The Funkie Junkie Boutique. There are also Top 3 Badges for three additional outstanding entries, chosen by the Design Team.


Thanks for stopping by!

Suzz


Products: (The Funkie Junkie Boutique)
Sizzix Thinlits Fall Foliage
Stampers Anonymous - Tiny Toadstools
Tim Holtz Layering Stencil - Decayed
Ranger Distress Stain Sprays - Fired Brick, Spiced Marmalade, Ground Espresso, Crushed Olive, Black Soot, Hickory Smoke, Peacock Feathers, Iced Spruce, Pumice Stone
Ranger Distress Oxide Sprays - Fossilized Amber, Ground Espresso
Ranger Distress Oxide Ink - Ground Espresso
Ranger Distress Inks - Crushed Olive
Prima Art Basics - White Gesso
Wendy Vecchi Texture Crackle Paste
Frosted Crystal Antiquities Embossing Powder
Versamark Watermark Ink Pad
Sizzix Funky Foliage
Sizzix Funky Floral 3 Die 
Salt
Idea-Ology Tim Holtz Word Bands

Wednesday, October 4, 2017

Show us Your Stamps


The current Frilly and Funkie Challenge is "Show us Your Stamps" hosted by the super creative and talented Autumn.  She describes the challenge as:

"Our challenge this round can be summed up with one word - STAMPS! We want to see you break out those stamps and get inky. There are so many ways to use stamps, and you probably have a few you have never even used - so come play along! We cannot wait to see your stamped vintage or shabby chic creations."

I was thrilled as my favorite part of crafting is the stamps!  I love images and layering them together and this gave me a chance to ink it up!

 I created two projects with the same concept. I started playing around with the fall leaves and created a tag.  The tag inspired a card using the same elements.


I started with a mix of distress oxides on my craft mat spritzed with water.  I then dragged a few pieces of cardstock through the colors.

Next I dried the cardstock to make sure I could stamp my leaves and heat emboss them.  I stamped the leaves using brown ink and sprinkled them with gold embossing powder.  Some of the leaves dried a bit which I liked as it gave a partially embossed effect.

After that was complete I used gold embossing paste and a stencil to add a smattering of small dots of gold.  I let that dry completely.

I then took a scrap of tissue paper with a gold spray over top and used it to stamp the sentiment with brown ink and heat embossed with brown embossing powder.  I then decoupaged it over the top half of the tag.

I needed one more touch and found the charming dragonflies in a gray metal and I inked them up with versamark and and sprinkled them with the same gold embossing powder and heated them up.

The card was a variation of the tag but I swapped out stencils and the bird stamped with some text.

Come join in and share your stamping with us!

The team will choose their top four picks with the winner being invited to join us in a Guest DT spot here at Frilly and Funkie and the next three will receive badges to display on their blogs. Everyone who enters and follows the rules will be entered into the draw to have the chance to win a $25 spending spree at The Funkie Junkie Boutique.


Get inky!

Suzz


Wednesday, September 20, 2017

Fall Splendor

Hello!  I am back with some pretty fall colors for the To Everything There is a Season   challenge at Frilly and Funkie!


The very creative and talented Kathy is the host of the latest challenge on the Frilly and Funkie Blog. She describes the challenge as:  "To Everything There Is a Season." Fall is one of the most beautiful seasons of the year. Brilliant leaves, fall flowers, crisp blue skies, and migrating geese fill the season with a sense of wonder and anticipation. You're invited to create a vintage or shabby chic project that captures the beauty of fall. You can make a card, a tag, share a journal entry or any kind of project you desire. Just be sure to create it in the shabby chic or vintage style and be sure to use fall (not Halloween) images and colors.

I am a big fan of fall and I love playing with leaves and the colors of the fall leaves.  It had me creating a layered canvas full of yellow, red, burgandy, and orange. 

The canvas started with a coat of gesso on the bottom.  After that dried I came back in with the leaf stencil and embossing paste and randomly added areas of white embossing paste. While that was wet I added color with sprays misted and dripped all over the embossed backgorund to add variation in the colors. I even placed the die cut leaves on the canvas while misting to spray my leaves and leave shadows on the canvas. 

After that dried I stamped and stenciled die cut leaves using various stamps and and colors.  I then layered them into the background using decoupage (I used fast finish) but you could use watered down glue. 

I then stamped and misted on tissue paper which was also layered onto the background to give another dimension of texture.  After all that was done and dried the canvas sat for awhile as I contemplated what next.  

I decided to create another layer of bigger leaves died and embossed to coordinate behind a few paper dolls and their dog as the focal point.  I added the fun key and sentiment and then I was done. 

I hope this inspires you to get out your fall leaves, colors and images and join us in the fun! 

The team will choose their top four picks with the winner being invited to join us in a Guest DT spot here at Frilly and Funkie and the next three will receive badges to display on their blogs. Everyone who enters and follows the rules will be entered into the draw to have the chance to win a $25 spending spree at The Funkie Junkie Boutique

Suzz