The Funkie Junkie Inspiration Ave is blooming with inspiration! The team is highlighting flowers in anticipation of the flowers bursting open for spring!
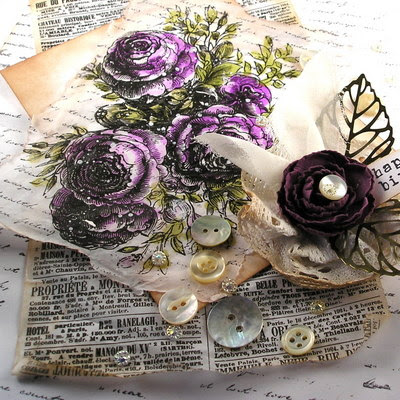
I wanted to play with my new watercolor pencils in Scorched Timber, Jet Black and White. I decided to play around with limited color and just highlight the neutrals with the flowery images.
I love the Stampers Anonymous Tim Holtz set Floral Trims. They let you color away with the beautiful lined flowers.
My goal was to see if I could use the brown, black and white watercolor to highlight the flowers and just use accent colors in the background and leaves.
For my circular image I stamped the image using a distress ink in soft gray. I was hoping to highlight the image using watercolor pencils and shading.
After stamping the image I used the scorched timber to add a touch of color around the petals of the flower and the green watercolor pencil in the leaves. I then used a water brush to soften the edges of coloring. I came back with a yellow watercolor pencil to add a touch of yellow to the center of the flowers. I used the water brush to blend that and soften the edges.
After I finished with my coloring and blending I decided to come back with the black watercolor pencil and add the lines again to the image to really make it pop. I also shaded around the outside edges of the images with a hint of gray and blended with the water brush.
Sometimes when I finish a project and the colors are softer and don't really pop out at me I will clear emboss the entire image. This will make the colors richer and more intense. I did that with this image. I sponged the entire surface after it was completely colored and covered it with clear embossing powder. I then heat set the embossing powder. Sometimes this takes two coats to get a clear finish.
I then mounted the circle image on several circles before placing it on a black cardstock base and adding the coordinating butterfly and stamped sentiment.
For my next experiment, I stamped the floral image with black archival ink on white cardstock.
Then I shaded and blended with the watercolor brush inside the flowers using the black watercolor pencil. I added a bit more shading with the brown watercolor pencil. Blending each time with the water brush. I came back and added a heavier shading of black around the inside of the image.
For the leaves I used the green watercolor pencils and colored around the inside and blended with the water brush.
Next I decided to bring in pink around the outside of the flowers and a golden brown around the leaves. I colored on the outside of the lines and then used a water brush to soften the edges and blend the color out.
I finished the image with a black cardstock base and a stamped sentiment.
I really wanted to use the white watercolor pencil and I tried a few different ideas and this was the one that worked most successfully. I started with stamping the image using versamark and clear embossing powder to create an outline of the image on black cardstock.
After that I took the white watercolor pencil and shaded and blended the white inside the flower. This made the white disappear into the black cardstock. I came back and colored again with more pressure and further out to add more shading. I didn't use the water brush as I wanted the white to pop off the black background in my second round of coloring.
To make the flowers really pop from the background I came back with a white gel pen and outlined the image to make is move and stand out.
Then the sentiment was stamped with Versamark watermark and heat embossed with white embossing powder. I mounted the image on white and then a black card base.
Not your typical spring flowers but I had fun exploring the use of white, black and browns with the flowers.
Suzz
Products: