Showing posts with label Midwinter. Show all posts

Friday, October 25, 2013

Beauty of the Season

Happy Friday!  It took me all week to create two tags. Slow creative process. :)  I am playing along with Linda's Funkie Junkie Tags sponsored by her Funkie Junkie Boutique.  I also mixed in the colors from the Mixed Media Color Challenge #10 into one of my tags.  I am going to share that tag today and share my other tag later this week. 


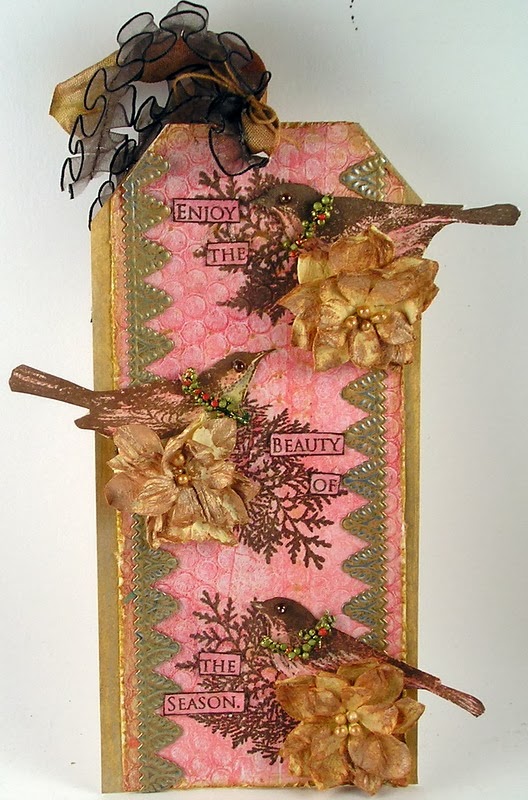
I didn't have some of the elements found in Linda's  tag, so I decided to focus on the layout and the design.    The background was created using a gelli plate, sequin waste and pearlized paint.  After it had dried I smeared a dye ink over the surface to capture the pattern and the coral color found in the challenge. I added birds from Artistic Outpost and colored them with STAEDTLER Karat Aquarell pencils.  The flowers were dabbed with gold paint.  The trim is metallic and from Ranger / Tim Holtz smeared with the same gold paint.  The background is painted with Ranger Metallic Stains.

Products: Artistic Outpost - Snowy Woods, Artistic Outpost - Midwinter, Birds of a Feather, Ranger Distress Paint - Gold, Ranger Distress Stains - Gold, Brass, Pewter,  Ranger Archival Ink - Coffee, STAETDLER - Karat Aquarell Watercolor Pencils

My inspiration:

Thanks for stopping by!

Suzz

Wednesday, July 17, 2013

Holiday Hop

Welcome to the Artistic Outpost Christmas in July Blog Hop. The team is sharing a variety of winter holiday inspired projects on the hop this month.

I spied this old paintbrush at the Flea Market about 2 months ago and I have been holding onto it for a special project. 


I decided my old paintbrush would be the perfect surface to create a rustic Christmas decoration to be hung on the wall during the holiday.

I painted the handle with white acrylic paint to make the images pop.  I stamped the images onto tissue paper using Ranger Archival ink. I tore out the images.  I then applied watered down glue to the back of the tissue paper. I placed it onto the painted background and brushed glue water over the surface.  I started with Father Christmas first and then added the house and trees on the right and the trees on the left.  I added the snowflakes up the brush handle.

I added a piece of lace trim across the bottom with twine and several glittery silver bells.  I then tied on a bow to the handle with a stamped Joyeux Noel using black ink on white cardstock. I cut the tag and attached with twine to the bow.

The sets used include: Midwinter, Snowy Woods, and Sleigh Ride.

Hop over to check out the rest of the cool holiday projects by the design team:

Thanks for stopping by! 

Suzz


Friday, August 3, 2012

Midwinter Snow

Bring on the cold!  Our weather has been really hot this July!  Working with the new Artistic Outpost set Midwinter definitely helped me think cool thoughts!

I went with a simple white card with just a hint of icy blue and a touch of glitter. 

When I finished my main scene I decided to emboss the background with a Stampin Up embossing folder and then cambe back in with a touch of the blue around the edges.

A pretty CAS card for me!  I loved the serenity of the scene and the matching sentiment!

Happy Friday!

Suzz

Wednesday, July 25, 2012

Yuletide Greetings

Today is the new release of Artistic Outpost stamps.  The sweet MidWinter plate  is the newest release featuring scenic snow drifts and seasonal flora and fauna. This collection was inspired by a favorite Christmas hymn,"In the Bleak Midwinter".
Images in the collection include:  a frozen creek scene, a cabin in the woods, a strong reindeer, a forest hare, a royal cardinal, and appropriate sentiments. 

This was my last project and I really like how it turned out:


I used the Snowy Woods Santa stamped in Ranger Archival Ink - Coffee on white cardstock. I placed the lovely cabin in the distance behind the Santa image.  The sentiment was stamped in Crimson Red. I added accents of red, white and brown ribbons.  I added embellishments to the tag for a few more little details. 

In my next card I created a scene on a postcard:


I stamped the postcard heading from the Ephemera Backgrounds and stamped across the top.  I split up the bottom half and used the beautiful scenery from Midwinter across the back and added the lovely verse in the center.  I finished the scene off with the Elk pop dotted to add depth.  The background is highlighted with a touch of light blue dye ink and glitter.

The other DT members have created some beautiful samples with the new plate:

Thanks for stopping by! 

Suzz