Tuesday, March 31, 2009

Happy Blog Birthday Hero Arts...

Hero Arts Challenge http://heroarts.com/blogs/club/2009/03/30/its-a-one-derful-day/ this week is single layer cards and they are celebrating their anniversary of their blog this week. Lot's of fun activities on their blog this week.

Kiara is also hosting a challenge on her blog http://http//stampingcafe.blogspot.com/2009/03/one-layer-monday.html for a single layer card.

The Hero Arts flickr group had a thread about single layer cards and we mostly agreed that we start with single layer card when you first stamp and move up to the multiple layers and fix things by adding layers when we make a mistake. :) So this week will be interesting to see what people come up with.


So here is my single layer card. Two things about this card...

One: it is for my eleven going on twelve year old daughter's birthday which is next week.

Two: Her room is painted in purple, green, and orange with circles... We used the same techniques as applied on this card in her room.


This take a little planning and laying out before starting. This was my template:
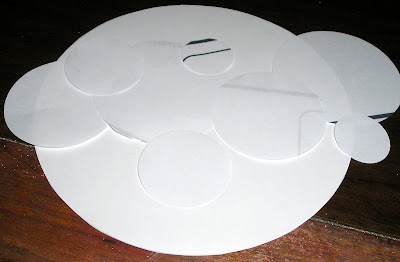


Recipe:
  1. Punch out all circles from a piece of copy paper. You need to use thin paper to help with the masking and reverse masking. I cut multiple circles in each size to allow me to play with placement.
  2. Keep the circles and the sheet you used to punch them from.
  3. Lay out your circles with overlaps where you think you want them. After you position them where you would like them and how you would like to overlap them...
  4. If you can keep your template with circles laying there as a guide and use another circle to work on.
  5. Start with your full circles and where you want them placed. Lay the piece of paper with the punched out circles and lay it on your card where you would like the circle positioned. Sponge or brayer the color for that full circle. Do this for each top circle/full circle on your card.
  6. Partial circles or underlapping circles. Lay the circles scraps on already sponged circles to protect them. (If you have repositionable tape you can lightly tack them in position.) Postion them exactly on top of the sponged in circle. Now take your sheet with the punched out circles and lay where you want the next circle to be sponged. Sponge the next color in the circle.
  7. Continue this until all your colors are sponged on.
  8. Repeat the same process but now stamp your images in using the same methods. Cover the circles you don't want to be stamped on and use the sheet with the punched out circles to mask surrounding areas.

Thanks for stopping by...

Suzz

Monday, March 30, 2009

Teal, Brown, Light Green...

These cards all started from a color challenge and veered off to a little darker palette. I ended up making two cards as I was playing around. This happens to me a lot when I am creating, I end up with major scraps and this time I decided to create two cards that look very similar but with two different layouts.

Card # 1
Card # 2


Unfortunately the vintage paper photographs so much darker and the stamping is really a lovely layer ontop of it.

Products:

  • Tim Holtz - Stampers Anonymous - Flights of Fancy
  • Cornish Heritage Farms - Silhouette Blooms I
  • Hero Arts - Heart Winged Butterfly
  • Impression Obsession - Inspire
  • Versafine - Vintage Sepia, Deep Lagoon
  • Ranger Distress Inks - Shabby Shutters, Broken China
  • B Line Lace Background
  • Fiskars - Border Punch
  • Martha Stewart Edger
  • Marvy Uchida Scalloped Circle, Circle Punch

Thanks for stopping by...

Suzz


Sunday, March 29, 2009

Spring really?

We decided to not take our usual trip to Arizona for spring break.... Looks like we were in for a surprise. We are doing staycation and hanging out at home for a week and the first day of our spring break we are in a snow storm. It was hard to envision 4 - 7 inches of snow after all the beautiful spring like weather we have been having. But here are the pictures to show that it did happen. My husband and my youngest went out and did some sledding in the yard and made this cute little snow reindeer?
I then went out in thier footsteps / sled path and took a few pictures.


I do have to say it is absolutely beautiful outside right now. The trees are all painted with snow and it is absolutely gorgeous.
Thanks for stopping by...

Suzz


Friday, March 27, 2009

Kwerner Challenge # 47

Kristina's Color Challenge this week: http://www.kwernerdesign.com/blog/?p=1122 contains colors I used earlier this week to make several cards. I actually felt like I was stuck in a rut using the orange, brown, yellow and white. :) So when I saw her colors it gave me a chuckle..

I went a different path with this card and tried to incorporate more white, different shape and look and feel from my earlier cards.

I am addicted to my new Cornish Heritage Farms stamp (lined paper). I also just purchased a grid paper stamp of theirs which I have been playing with as well and I love for a background effect.

Products:

  • Cornish Heritage Farms - Lined Paper
  • Hero Arts - Heart Winged Butterfly
  • Stampabilities - Tapestry Pattern
  • Hero Arts - Happy Birthday To You
  • Memories - Honey
  • Martha Stewart - Cornice Edger Punch
  • Gems, Ribbon, Buttons - Unknown
  • Versafine - Vintage Sepia
  • Prisma Color Pencils

Thanks for stopping by...

Suzz

Thursday, March 26, 2009

Smiling Faces

Another entry in the Hero Arts Windows Challenge... I kept thinking of flowers with the little faces in the center..

The little dolls are stamped on the inside and I cut out the holes in the card where the punch wouldn't reach. :) The center of the flowers was created using a 3/4" circle punch.

I drew in pencil (very lightly) the circle on the inside of the card by closing the card and tracing the opening. This gave me the positioning for the little girls face. The stamps are clear for the girl so it helped me line up the face perfectly. I erased the lines after I stamped if they were visible.

Everything else is very simple. I stamped the houndstooth on white cardstock and then stamped the flowers and cut them out.

Products:

  • Hero Arts - Houndstooth
  • Hero Arts - Sparkle Clear - Arigato
  • Hero Arts - DesignBlock - Outline Flowers
  • Versafine - Vintage Sepia
  • Adirondack Brights - Pool
  • Cuttlebug Embossing Folder - Swiss Dots
  • Martha Stewart - Cornice Edger
  • Hero Arts - Petite Birthday

Thanks for stopping by...

Suzz

Wednesday, March 25, 2009

Window Cards...

The challenge on the Hero Arts Blog this week is window cards... I spent a little time today putting together a little book/card. This has 4 pages and the die cut was put through 3 of the pages to create 3 windows with acetate attached to the three pages. This gives you a window to the back of the card. This card was difficult to get a good picture of which wasn't helped by the gusts of wind we had today in addition to the clouds. :)

The middle and back of card looks like this:


Recipe:
  1. Cut 2 rectangles from tan carsdtock 4" x 8". Score to form to mini cards 4" x 4"
  2. Lay the 3 front pages centered on the diecut shape and cut out window.
  3. Cut 3 pieces of transperancy 3 3/4" x 3 3/4".
  4. Cut 3 pieces of tan cardstock 3 3/4" x 3 3/4". Cut out the center of the tan cardstock using the same diecut. This is to cover up the back of each page where the acetate is attached.
  5. Stamp the front of the pages with wood grain using brown ink.
  6. Attach the acetate to the pages.
  7. Stamp the branches on each page using StazOn ink across the frame and acetate. (Tips: Start with Image on back and work forward by laying acetate over stamped image on back. This will help prevent too much overlap on images seen through acetate.)
  8. Die-cut a white piece of cardstock in the same shape slightly larger for the back page.
  9. Cut a piece of orange cardstock 3 3/4" x 3 3/4" to attach to the last page of the card.
  10. Attach the two scored cards using glue dots.
  11. Stamp owls and color and cut out to attach to the various pages on acetate.
  12. Accent flowers on the stamped images with prima flowers.
  13. Add color to stamped image using color pencils.

Products:

  • Hero Arts - Sparkle Design - You Hoo Owls
  • Hero Arts - Flower and Leaf Branch
  • Hero Arts - Wood Finish
  • StazOn - Timber Brown
  • Versafine - Vintage Sepia
  • Prima Flowers
  • Primsa Color Pencils
  • Nestabilities - Spellbinders Labels
  • Gems

Thanks for stopping by...

Suzz

Sunday, March 22, 2009

Spring Flowers

The weather is beautiful today. Very spring-like. I even see tulips leaves starting to poke through the ground.


I worked on several cards for a chalk class and a few to send off for publication this weekend and had nothing to share on the blog. I made this card late today for the Hero Arts challenge this week.


The recipe is fairly simple. The flourish stamp makes up the stem of the flowers. The flowers are cut from white cardstock and stamped with the same Hero Arts stamp that I used on the background of the card.

The buttons are stamped with a script from Hero Arts.

Products:

  • Hero Arts Clear Design - Thank You Flourishes
  • Hero Arts - Artistic Windows
  • Ranger Distress Ink - Peeled Paint
  • Memento - Lilac Posies
  • StazOn - Fuschia
  • Pearls, Ribbon, Buttons - unknown
  • Stampendous - Simple Mothers Day

Thanks for stopping by...

Suzz

Friday, March 20, 2009

Over the top...

This card was inspired by the HA Blog challenge of spring. The background is made from masking the center with a nestabilities diecut and stamping the houndstooth multiple times over and around in pink pigment ink. After the background was made the tree was stamped in the center using a green pigment ink.

Then things got a little out of hand..
I decided my tree needed some spring flowers...
the flower gems went on...
the flower gems came off
the buttons went on....
the flower gems went on top
and why not add some pearls to the flowers...


After I stepped back and looked at all the bling & accents I knew my mom would love it. So this is going to her for mother's day.


Products:

  • Hero Arts Design Block - Tree
  • Hero Arts Houndstooth
  • Stampendous - Simple Mother's Day
  • Hero Arts Gems
  • Versacolor - Opera Pink
  • StazOn Royal Purple
  • Versafine - Olympia Green
  • Spellbinders Nestabilities - Labels
  • Ribbon - Unknown
  • Crystal Stickers - Pearls

Thanks for stopping by...

Suzz

Thursday, March 19, 2009

Blooming Spring

This card started with a glimmer mist yellow background with the intention of a spring card. I think the colors may be a little more summery but the thought is of warmer days.

Recipe:
  1. Spray glimmer mist across white cardstock. (Yellow, Tuscany Sun)
  2. After dry stamp woodgrain image with gold dye ink.
  3. Stamp Tree half on the background using brown pigment ink.
  4. Stamp flourish and birds using green pigment ink.
  5. Accent tree with flowers & gems.
  6. Stamp sentiment with brown pigment ink.
  7. Sponge orange dye ink around edges. Sponge edges with brown dye ink.
  8. Mount stamped image on brown cardstock and attach to orange cardbase.
  9. Tie ribbon around mounted picture.
  10. Accent bird eyes with white gel pen.

Products:

  • Hero Arts DesignBlock Tree
  • Inkadinkado - Flourishes
  • Impression Obsession - Sentiment
  • Prima Flowers
  • Versafine - Vintage Sepia, Olympia Green
  • Adirondacks - Bright Orange
  • Memento - Rich Cocoa
  • Memories -Honey
  • Gems, Ribbon - Unkown

Thanks for stopping by...

Suzz

Monday, March 16, 2009

Spring is in the air...

Okay... Just today. We had a beautiful day today of around 65 degrees and the sun is out and you definitely can feel spring. The Hero Arts blog challenge this week is spring.. So I made a card which I felt resembled spring.


I reverse masked the circles to create the background and the flowers in the cricles. The colors are light green and dark purple.

Products:
  • Hero Arts - Heart Flower Blossoms
  • Hero Arts - Screen Shadow
  • CuttleBug Embossing Folder - Borders, Swiss Dot
  • Martha Stewart - Border Punch
  • Memento - New Sprout (How appropriate)
  • Zig Watercolor Markers
  • Tombo Watercolor Markers
  • Hero Arts Gems

Thanks for stopping by...

Suzz

Sunday, March 15, 2009

ACF Challenge #17

I thought I would try to do anothe ACF Challenge: http://artcreationsfriday.blogspot.com/2009/03/challenge-17.html. They provided a picture of a lovely lady looking off into the distance.


I incorporated her with some of my scraps from the take it off challenge on WF09 at 2Peas. I also used some new Basic Grey paper from the Porcelein Collection. (Love that collection)

Products:

  • Inkadinkado - 98165, 98162
  • Light Yellow Embossing Powder
  • Kaisers - Pearls
  • Basic Grey - Porcelein
  • Hero Arts - Old French Writing
  • Versamark
  • Ranger Distress Inks - Antique Linen
  • Fiskars Corner Punch

Thanks for stopping by...

Suzz

Saturday, March 14, 2009

KWerner Color Challenge #45

Kristina's Color Challenge this week: http://www.kwernerdesign.com/blog/?p=954 are black, grey, and white. Lovely elegant colors. They are wonderful for graphic designs or wedding cards.

Here is my interpretation of the colors:

Love these new stamps from Inkadinkado. After I took the picture I realized that the middle background piece looks like vellum. It is actually white cardstock stamped with grey ink.

Products:
  • Inkadinkado - 99263, 99257
  • Versafine - Black Onyx, Smokey Grey
  • Spellbinders Nestabilities - Scallop Circle
  • Martha Stewart Cornice Border Punch
  • Marvy Uchida Circle Punch

Thanks for stopping by...

Suzz

Monday, March 9, 2009

Weathered Wax Resist Challenge

I am preparing for my 2 classes this week over at Stamp Scrap and More. (Link on my Favorites tab). I am teaching a wax paper class on Wednesday(2 spots open) and Sunday(Class Full). As I was working on putting my kits together I decided I should use some of the supplies to do a few of the challenges going on at 2 Peas Winterfest and Hero Arts weekly blog challenge.

This card actually fits in with three challenges...

This was fun as it uses some of the wax paper resist technique, masking, glimmer mist...


Recipe:

  1. Cut out 2 5" circle from plain white cardstock.
  2. Crumple plain wax paper and spread flat.
  3. Heat iron on medium setting.
  4. Place wax paper between the 2 circles.
  5. Iron for 1 minute flip the 2 pieces of cardstock with the wax paper in between and iron other side for 1 minute.
  6. Using yellow glimmer mist spray on the wax resist white cardstock circles and dab off excess with paper towel.
  7. Place mask on dry yellow cardstock. Sponge on weathered wood and broken china over entire surface.
  8. Place wax resist circle after sponging between two pieces of white cardstock and iron again for 2 minutes to remove the wax.
  9. Stamp flowers and sentiment using Stazon Solvent Ink.
  10. Pierce holes around the edge of the card. (I used a template I just purchased)
  11. Tie twine. (Didn't have any so I used needlepoint thread.)
  12. Stamp butterflies on scraps on other circle and cut out. Color in using color pencils (Blue and green)
  13. Attach butterflies using pop dots.

Products:

  • Tattered Angels - Glimmer Mist - Daffodil Yellow
  • StazOn - Timber Brown
  • Hero Arts - Wild Fairy Lily
  • Hero Arts - Lupine
  • Hero Arts - Artistic Butterflies
  • Hero Arts - Clear Design - Anytime Messages
  • Ranger Distress Inks - Broken China, Weathered Wood
  • Prisma Color Pencils
  • Ranger Stickles -Yellow
  • DMC - Thread
  • The CraftersWorkshop.Com - Mini Dots All Around (Template)
  • Fiskars Circle Cutter / Templates

Thanks for stopping by...

Suzz

Saturday, March 7, 2009

Kwerner Challenge #44

Here is Kristina's latest color challenge: http://www.kwernerdesign.com/blog/?p=887


She posted her colors after I had just finished my pink and brown card. So I created another card using a lighter pink.

The background is made using the new alcohol inks from Ranger - Pink Sherbert and embossed with the houndstooth and white embossing powder.

Products:

  • Hero Arts - Houndstooth
  • Hero Arts - Petite Birthday
  • B Line Designs - Cherry Blossoms
  • Ranger Stickles
  • Ranger Alcohol Ink - Pink Sherbert
  • Ranger Alcohol Blending Solution
  • White Embossing Powder
  • Versafine - Vintage Sepia
  • Versamark Watermark Ink
  • EK Success - Border Punch

Thanks for stopping by...

Suzz


Winterfest 2009 - Multiple Challenges


I love Godelieve's short cards. She takes a 5 x 7 piece of card stock and folds it in half to make the card but you send it flat. Her challenge is to create one of these. I have tried this once before and wasn't too happy with my results. This card still doesn't achieve the effect she has with her lovely cards.

The second challenge for the little house challenge is from Andi. She said to use as many houses as we could on our challenge, so I tried to make a tree full of houses. :)

The third was to use birds which fit right into this card.
Products:
  • Hero Arts - Sparkle Clear - Home II
  • Hero Arts - Designblock - Tree
  • Versafine - Vintage Sepia, Crimson Red, Majestic Blue
  • Adirondacks - Earthtones, Stonewashed
  • Cuttlebug Embossing Folder - Distressed Stripes

Thanks for stopping by..

Suzz


Thursday, March 5, 2009

Winterfest 2009 - Challenges

Winterfest 2009 - Stamping, Challenges, RAKS starts Friday and goes through Sunday March 15th.

The link for the thread at 2 Pea's is here: http://www.twopeasinabucket.com/mb.asp?cmd=display&thread_id=2755657.

I am hosting 2 challenges at Winterfest:
  • Colored embossing powder
  • Color Inspiration

The color inspiration challenge has 3 different color palettes for you to choose from. Here is one of the pictures and my sample for the challenge.


This picture was from a Travel magazine and unfortnately I don't have the credits of who took the picture.

My card was inspired by the greens, black and white in the picture:


This is actually a card for my niece who is turning 13. (I got 2 thumbs up from all of my children (14, 12, and 7). So I am thinking I hit the right look for my niece.

Products:
  • StazOn - Cactus Green
  • Inkadinkado - Clear Stamps - Rock Star
  • Ranger Stickles - Eucalyptus
  • Crystal Stickers - Gems

Thanks for stopping by.. Hope you will come play in Winterfest at 2 Peas!

Suzz


Wednesday, March 4, 2009

Pink and Brown Houndstooth

I was inspired by some pretty pink and brown houndstooth ribbon that I have. I thought of the houndstooth stamp from Hero Arts and decided to put together several different backgrounds that were based off the original pink and brown houndstooth.

I started with some brown cardstock and embossed with pink EP. I also had this pretty little scrap of the lace flowers stamped using brown ink on pink cardstock.

Products:
  • Hero Arts - Houndstooth
  • Hero Arts - Delicate Leaves
  • Hero Arts - Daisy Lace
  • Hero Arts - Two Flourish Flowers
  • Versafine - Vintage Sepia
  • Versamark Watermark Ink
  • Creative Beginnings - Pastel Pink Embossing Powder
  • Penny Black - Wish Big
  • Ribbon, Pearls
  • Rangers Stickles

Thanks for stopping by...

Suzz

Tuesday, March 3, 2009

Little Things Challenge

This weeks challenge over on the HA blog is little things. Meaning their little stamps. I don't have any of their tubs of little stamps but I do have a little owl stamp.


I stamped the background of the wood grain previously and it was a scrap. I pulled out my little owl and repeatedly stamped him on the wood grain. I then colored them up a little bit.

To finish it off I created my scalloped circle and added a few more owl friends. That little guy hanging out at the bottom was added because I wanted to make him popping out and saying you hoo!

Hope you enjoyed my little owls.

Products:

  • Hero Arts - Sparkle Clear - You Hoo
  • Hero Arts - Sparkle Clear - Halloween Wishes
  • Hero Arts - Wood Grain
  • Hero Arts - Designblock - Tree
  • Versafine - Vintage Sepia, Olympia Green
  • Cuttlebug Embossing Folder
  • Memento - Rich Cocoa
  • Marvy Uchida - Circle Punch
  • Paper Shapers - Circle Punch

Thanks for stopping by...

Suzz

Monday, March 2, 2009

Scraps Sunday...

Godelieve http://stampingmathilda.blogspot.com/has initiated a challenge at 2 Peas to use up scraps on Sunday http://www.twopeasinabucket.com/mb.asp?cmd=display&thread_id=2761796.

I am going to keep with this because usually by Sunday night I am toast... Ready to wind down get the kids geared up for school the next day and myself ready for work. That's the perfect time to take some left-overs and use them up. In addition to the fact that I have way too many scraps..

I started with the center picture which already was complete from a previous challenge (Kwerner color challenge) which never made it onto a card. I find the labels shape hard to place on a card but I love it whenever I see it used in other cards. :)


Products:

  • Hero Arts - Silhouette
  • Hero Arts - Sparkle Design - Mini Messages
  • Hero Arts - Clear Design - Designer Butterflies
  • Adirondacks, - Sunset Orange, Sunshine Yellow
  • Memento - Rich Cocoa
  • Versafine - Vintage Sepia, Black Onyx
  • Clear Embossing Powder
  • Spellbinders Nestabilities - Labels

Thanks for stopping by...

Suzz

Sunday, March 1, 2009

Roses, Stripes and Flourishes

Jacqueline http://myscrapbasket.blogspot.com/had sent me some of her scraps and in those scraps there is some wonderful patterned paper. I have been wanting to use some of those scraps and the HA challenge allowed me to do that.
This card is still inspired by one of the bloggers on the win a day at HA blog. Sarah M was one of the winners. She has a card in the Flickr group with 3 panelshttp://www.flickr.com/photos/25252212@N04/2495427518/. I cased her card and use the patterned paper to come up with this:

Her card had stitching which I have no talent for and really don't like to do. :) So there will be no stitching on any of my cards.

Products:

  • Pattern Paper - Unknown (Center piece is Basic Grey)
  • Hero Arts - Artistic Butterflies
  • Hero Arts Sparkle Clear - Mini Messages
  • Hero Arts - Two Flourish Flower
  • Versafine - Vintage Sepia
  • Ribbon - Unknown

Thanks for stopping by... I appreciate it and thanks for leaving comments. I look forward to hearing from everyone.

Suzz