Showing posts with label Wedding. Show all posts

Wednesday, July 22, 2020

With This Ring

Hi!  I am hosting the challenge this time at The Funkie Junkie Boutique.  The challenge is "With This Ring".   Here is what inspired the challenge:

"Summer is a traditional time for weddings. This year we have seen many of the celebrations become virtual, rescheduled or limited to few people participating. We as craft makers can still share our art with the happy couples by creating something beautiful to celebrate their special occasion. I challenge you to create something celebrating a wedding, it can be anything including: layout, card, decor, or gift."

I created a series of wedding cards for my daughter to pick from for friends of hers that are getting married in the next few weeks.  I am sharing those cards on Saturday at the Funkie Junkie Boutique for the Saturday Showcase.  I decided to add a few more with a few different styles.

I used some scraps and other bits left out on the table from my previous card making session and created this soft lacy wedding card:
A very traditional card with an embossed background accented with a crochet trim die cut from wax paper.

Layered the flowers with seam binding and added a lovely sentiment along the side. 

Then I decided I wanted something much more mixed media and funky for a different type of wedding. :)

This was made with multiple sprayed backgrounds.  I tore strips of different backgrounds and taped them together onto another sheet of cardstock.  The hearts were die cut from those taped together backgrounds. 

I placed it on a stenciled background with embossing paste and splatters of coordinating spray inks.

I hope this has you inspired to create a wedding based project and you can join us in the fun. The winner will earn a chance to be a Guest Designer at a future date at The Funkie Junkie Boutique Blog, and everyone who enters and follows the rules will go into the draw for the chance to win a gift certificate for a spending spree at The Funkie Junkie Boutique. There are also Top 3 Badges for three additional outstanding entries, chosen by the Design Team.

Thanks for stopping by!

Suzz

Products:
Stampers Anonymous - Tiny Text
Ranger Archival Ink - Vibrant Fuchsia, Pink Peony
Wendy Vecchi White embossing Paste 
Ranger Layering Stencil - Bouquet
Ranger Layering Stencil - Splatters
Prima Marketing Flowers Coastal Surf 
Prima Marketing Pretty Mosaic Susie
Rayon Seam Binding
Ranger Dylusions Shimmer Spray - Peony Blush
Ranger Distress Stain Spray - Spiced Marmalade 
Sizzix Tim Holtz Crochet Die

Wednesday, August 8, 2018

August

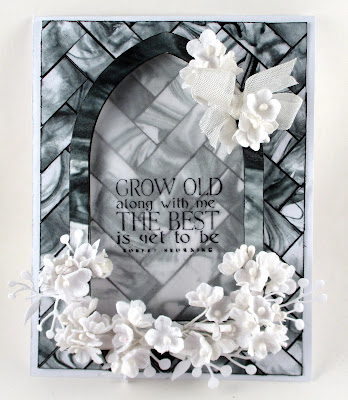
Hi! Suzz here. I am hosting the current challenge at Frilly and Funkie Challenge called "August".  No surpise that it is inspired by the month of August. :) In doing a little online research I learned that the month of August was re-named for Augustus Caesar. He was the first Roman Emperor and was very proud of the influence he had on the architecture of the country. For this challenge I am asking you to be inspired by marble, arches or columns. You will need to create a vintage or shabby chic project using some type of marble effect, arches or columns.

Ranger Distress Re-Inker Black Soot Idea-Ology Bouquet Findings Sizzix Holiday Greens Marbling Arches For The Funkie Junkie Boutique


I really wanted to do some marbling and so I created a huge pile of marbled backgrounds.  I tried shaving cream, alcohol inks, water, etc.  I liked the shaving cream the best and ended up doing multiple backgrounds just for this card:

Ranger Distress Re-Inker Black Soot Idea-Ology Bouquet Findings Sizzix Holiday Greens Marbling Arches For The Funkie Junkie Boutique

To create the marble background I did the following:

1. Spray a mount of shaving cream (Cream not gel)  onto your craft mat or a sheet of acetate. Basically anything that won't hold the color after you are done and is easy to clean up or throw away.
2. Drip re-inker or spray inks into the shaving cream.
3. Now you can try alot of different ways to marble. You can swirl the ink into the shaving cream with a plastic knife.  You can just smoosh it into the shaving cream with an acetate sheet on top and pushing and moving the shaving cream and ink around.  You decide.  This is the fun part and my shaving cream smelled good and conditions your paper!
4. After you get your ink and cream mixed you lay your paper ontop and smoosh it around until it is covered in inky shaving cream.
5. Pull back the paper and lay flat.  Using a flat edge scrape off the excess shaving cream.  I use my plastic rulers and shave off the cream.
6.  Let dry.

I ended up with so many pretty backgrounds it made it difficult to decide what to do next.  I spent a few days trying some ideas.  (I cut out some arches as I knew I wanted to incorporate arches into my project)  I think it was my husband laying bricks outside in a pattern that triggered the idea of creating a herringbone tile effect.

Ranger Distress Re-Inker Black Soot Shaving Cream Marbling Herringbone For the Funkie Junkie Boutique
 I love how this turned out and my family wandered in and out while I was laying my faux tile and were very impressed. :)

I googled an image of herringbone to get me started.

1. Cut your tiles to the size you want.  I cut mine 1/2" by 1 1/2".
2. Cut the background to the size you want before laying down the pattern. 
3. Sponge the edges of your tiles with a grout color.  I chose black.
4. Start in the middle with one of your tiles and start taping and laying them.

Ranger Distress Re-Inker Black Soot Shaving Cream Marbling Herringbone For the Funkie Junkie Boutique

5. Tape down the first on in the middle of you paper.
6.  Lay down the next one and line up to the edge.
7.  Repeat... Repeat.. Repeat..

A couple of tips:
  • I first laid this without sponging the edges. They didn't pop enough because of the marbling. They needed a grout effect.  You could do this by leaving space between the faux tiles but would need your space to be even. 
  • I had a few faux tiles that were slightly wider or longer.  Your pattern wont' work if that happens. :) I had to pull mine up and re-cut a few more. 
  • When you get to the edge of the page attach them as a full piece.  When you get done you can cut the pieces off to use as filler for the areas where you don't need a full piece. 
After that it was deciding how to incorporate my arches with the background. I decided it reminded me of the church and what a lovely wedding card it would make.

Ranger Distress Re-Inker Black Soot Idea-Ology Bouquet Findings Sizzix Holiday Greens Marbling Arches For The Funkie Junkie Boutique

I hope this has you inspired of playing with the marbling or the arches!  Come join us in the challenge.


The winner will earn the chance of a Guest Designer spot at Frilly and Funkie, and everyone who enters and follows the rules will go into the draw for the chance to win a $25 spending spree at The Funkie Junkie Boutique. In addition, the Design Team will select three further outstanding entries and those creators will receive a Top Pick badge to display on their blogs!
Thanks for stopping by!
Suzz


Wednesday, May 30, 2018

Handle With Care

Hi!  Today I am back with my lacy art for the Frilly and Funkie's current challenge "Layers of Lace".  The challenge is hosted by the extremely talented Autumn.  Here is how she describes the challenge:

"Lace, oh so lovely lace! Whether you add delicate layers of fine lace, or tattered and torn crocheted lace, we'd love to see you add dimension and depth to your vintage or shabby chic project with lace. Perhaps you have a favorite lace stamp or will choose to lace something up, we'd love to see your creations inspired by this topic."


 This actually turned out to be the perfect timing for me as I had a wedding shower to go to and wanted to try creating a few things for the shower.

This tag was made after my other project with the scraps laying on my desk. I love when a project falls together with what you have laying out.  I had previously embossed a few pieces of cardstock for my tag below.  I also had the lace out on the table as well as the pearls.  I ended up giving it all a good mix of antique linen and a hint of espresso brown die ink.

I accented the flowers on the paper dolls with the gold paste which was perfect as it left tiny pieces of gold flecks on the flowers.  I colored the flowers with a pink copic marker which made them pop as if they were real. 

But what I really started with, was  this idea of making a little wedding cake that you could set onto the table or attach to the gift.

This took a lot more thought and precision than I anticipated.  I started with 4 sizes of circles.  Each one slightly larger than the previous one. I then used the slightly smaller circle and placed it in the middle of the slightly bigger circle. I traced the smaller circle in the center.  I then cut slits to the point of the traced circle edge all the way around to create a series of tabs.  This looks like a push pop top if you ever had one of those. :)

I then cut a strip of cardstock 3/4" by 6" for the top circle.  I folded the tabs down and ran a piece of tape along the top of the strip.  I slowly turned the circle and attached the tabs to the top edge of the strip.  When it overlapped I added a strip of tape to hold the strip together. (This came undone over night and I ended up using mini staples to hold it in place.  I think I would retry with glue if I were to do it again.)

I repeated this process with longer strips and a wider strip for the bottom layer.  After I had my layers of cake I then used die cut lace from cardstock to decorate the layers.  With various leaves and flowers to decorate. I placed it on a die cut doily and glued it onto the bottom.

Then I needed a tag to go onto the gift basket.


The tag uses a embossing folder, some die cut lace and a lovely sentiment (Verses Rubber Stamps)  stamped in blue.  The colors of the wedding are a soft salmon and navy blue and I tried to incorporate that in the tag.  The flowers ended up a bit brighter than I had anticipated.

I hope you have time to play along with us in the challenge this week.  The winner will earn the chance of a Guest Designer spot here at Frilly and Funkie, and everyone who enters and follows the rules will go into the draw for the chance to win a $25 spending spree at The Funkie Junkie Boutique. And there are Top 3 Badges for three further outstanding entries, chosen by the Design Team, because choosing just one winner is so hard!

Thanks for stopping by!

Suzz


Wednesday, June 28, 2017

Golden Dreams

Hi!  Long time no see...  Time just keeps slipping by... I am back to share a card for the current Frilly and Funkie Challenge - "With this Ring".

Cec is hosting the challenge and here is how she describes it:  "It is wedding season so let's create vintage or shabby chic projects that celebrate the big day. Your creation might be a card, a gift, a decor item or something to keep the memories of the special occasion."

I originally was going to create a groom's card with rich textures and vintage images but just got my order from Frilly and Funkie and couldn't wait to play with some of the goodies.  I decided to create a card for the Flower Girl as a thank you.

I ordered this fun stamp from Carabelle called Celine and I love her attitude and I thought she would be the perfect addition to a Flower girl's card.

 I started with this beautiful new paint from Art Alchemy called Unicorn's Hair and painted through the stencil a smattering of gold.  I then continued on and painted Wendy's circle stamp and stamped that over the dots.

I stamped on some script and the word dream using black archival ink after the paint had dried.  I die cut a butterfly and painted it gold.  I waited for that to dry and stamped over that as well with some text. 


The girl was stamped on white cardstock using black archival ink. I then cut her out using my detail scissors. I added touches of glitter to her using a fine tip glue pen and then sprinkling her with the glitter. The butterfly and the word dream also received a glittery finish.

I had so much fun playing with my new toys. I hope you are inspired to play along with us in the challenge!

At the end of the challenge the team will choose their top four picks. Our first place winner will be invited to join us for a Guest Designer spot here at Frilly and Funkie. Three additional talented participants will receive badges to display on their blogs. Everyone who enters and adheres to the challenge guidelines will be entered into a drawing to win a $25 spending spree at The Funkie Junkie Boutique!


Thanks for stopping by!

Suzz