Showing posts with label The Funkie Junkie Boutique. Show all posts

Friday, July 5, 2024

It's out of this world!

 The Funkie Junkie Inspiration Ave had us being inspired by pastes and paints this time around!  I used those mediums to create a fun picture for a special birthday boy featuring the planets! 

The background started with stenciling stars randomly using distress texture grit paste. Then a splatter of watered down white acrylic paint was applied randomly over the surface.  After the paint dried the next step was to spritz a variety of sprays over the surface.  Water was applied to blend the sprays and allow pooling of colors around the stars.   

After the background was complete, the planets were cut out using various die cuts.  I did some research on the various sizes of the planets and colors inspired form some online images.

The planets were all painted with various distress paints with a base coat of color and then different patterns were applied with coordinating colors. 


I then applied the planets on the background and mixed in a few different sentiments to inspire the birthday boy! 

Happy inking! 

Suzz

Products: 

Friday, November 10, 2023

A Season of Gratitude

 Hi!  The seasons are changing rapidly here as is the weather.  Thanksgiving is just around the corner.  It is this time of year we count our blessings and express our gratitude.  I decided to play around with the Stampers Anonymous Tim Holtz Sketchy leaves to capture the fall feeling and then paired it with a simple sentiment around the sweet life. 

I started with a series of leaves stamped in various styles.  I used one of the leaves as my focal point on this card.  I love the idea of showing gratitude in recognizing how sweet life can be.  This card used a spritzed background layered with some mummy cloth (died to coordinate) with a leaf cut out along with a few simple embellishments. 

I created a few other card bases using the sketchy leaves.

They were stamped using versamark watermark ink on the white background.  Then they were clear embossed.  After that then a mix of red, orange, and yellow dye inks were sponged over the embossed surface.
Then to finish them off a dry piece of paper towel was used to buff off the excess ink from the images.  This made them shine brightly against the beautiful fall colors.
I actually stamped and embossed the leaves on a variety of surfaces including an alcohol ink background.

I hope you season of gratitude is full of love and joy. 

Suzz

Products: 


Friday, November 11, 2022

Gift Here and Gift There!

 Hi!  Posting some inspiration for inspiration Ave over at The Funkie Junkie Boutique Blog.  

We are highlighting the beautiful Distress Colors from Tim Holtz this season.

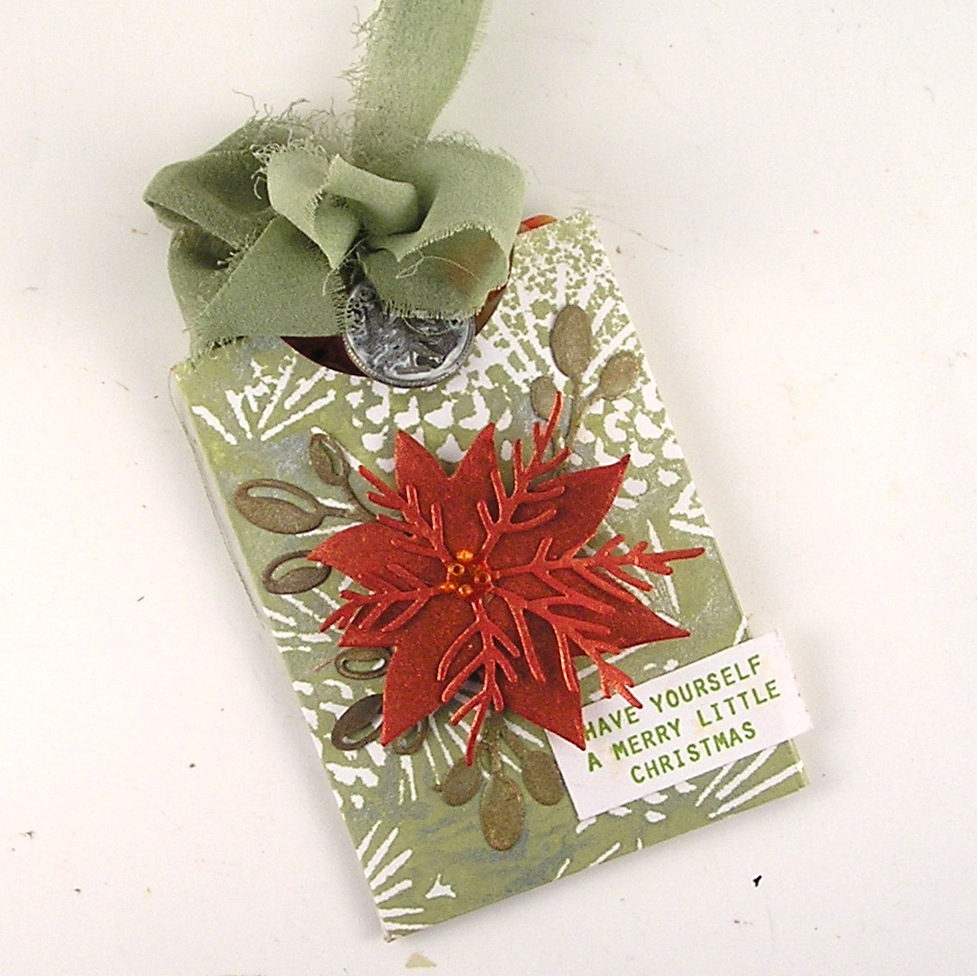
I decided to create a series of envelopes to hold gift cards as they are a popular gift for us to give over the holidays! 

Here are the variety of envelopes created with the beautiful seasonal mica stain sprays and stencils.


I used a variety of mini layering stencils to cover my gift card holders both on the front and back of the envelope.  

I made my own template by starting with a gift card and measuring around it.  Here is my template and measurements. 

 The full measurement is 5 1/4" x 3 3/4".  After you cut this you will score along the one side 1/4" and do the same along the bottom.  starting from the side with no score go in 2 1/2" and score in the middle.

I then cut out the corner piece and on the right side the bottom 1/4".  This is to allow you to fold the pieces inwards and put tape along them to close the holder and have a pocket to hold the gift card.  

I also died ribbon to match my envelopes and tied them around my gift card to give them fancy toppers and to pull the card in and out of the envelope.  (With that addition it doesn't even require the bottom to be taped closed. :) 

I then took a hold punch and cut out the circles on the top.  If you don't have a punch big enough you can use circle dies and position them to cut half a circle. 

Next up was to come up with some bits and bobs to use for embellishments.  Does this look familiar to anyone?  I hope other people's crafty space looks like this while they are creating. :) 


 I die cut, sprayed and stamped a few different images and pieces of cardstock in different color palettes to coordinate. 


 Then it was a matter of assembling a design.  On this one I used a layered poinsettia and some of the sweet stamped sentiments.  The topper included the died ribbon and a holiday token.

When pulled out you can see how the ribbon was tied around the gift card to make it easy to pull in and out.


The background was the revers of the stencil.  After I had sprayed another piece of cardstock with the stencil I took the stencil saturated in ink and laid a piece of white cardstock and got a beautiful reverse image on the paper.  I cut it up to create the holder shown above. 

Up next is my ugly sweater card holder.  For this one the background is opaque crackle distress paste.  After it dried it was sprayed with the pretty tart cranberry mica stain spray.

I stamped the fun puppy image and gave him a sweet twine bow and bell and tag!  I color coordinated the ribbon with a silver bell.  

Then I wanted a holiday plaid and used the cocktail party mica stain with the plaid stencil.  I decided to pair the Shiny bauble colors with the pretty pink.

The Santa image was stamped with the archival ink and surrounded with the cool Tim Holtz ideology tinsel. 

Next up continuing with the same color scheme I reversed the background and accent colors.

I stamped the images and sentiment with a pretty pink raspberry ink and added a star to the mix. The background was a mini stencil with the mica stain spray spritzed over it. 

I hope this has you inspired to make a few gift card holders and get out the fabulous mica stain sprays.  The shimmer is fabulous! 


Suzz

Products: 

Saturday, April 9, 2022

Saturday Showcase - 3D embossing folders

 Hi!  I am sharing a long post on The Funkie Junkie Boutique Saturday Showcase using the 3D embossing folders. 


I had a lot of fun embossing, inking, spraying, and layering up!  Pop over to check it out! 


Suzz

Saturday, January 29, 2022

Saturday Showcase at The Funkie Junkie Boutique

Hi!  Just popping in to mention I am sharing a long Saturday Showcase post over at The Funkie Junkie Boutique Challenge Blog highlighting Dina Wakley Chipboard Shapes. 


Pop over if you get a chance to see all the projects I created using the chipboard as inspiration! 

Suzz

Saturday, August 14, 2021

Saturday Showcase - The Funkie Junkie Boutique

 Hi! Happy Saturday!  I am sharing on The Funkie Junkie Boutique a post today featuring the new Stampers Anonymous Floral Outlines Stamps. 


Pop over if you want to see the other cards I made while playing with my new stamps! 

Suzz

Wednesday, August 11, 2021

Triple the Heat

Welcome back to another fun challenge at The Funkie Junkie Boutique!  I am hosting this time and I called the challenge Triple the Heat.  

Here is the challenge description: 

"August is always very hot for us in the Midwest. Our temperature can raise into the three digit numbers. I decided to use the number 3 as the inspiration for this challenge. I challenge you to use 3 of a kind.  You could use just three colors (white and black excluded), three of the same type of embellishment, three of the same images...  you decide how to incorporate the three of a kind in your project.  Make sure to mention what your three of a kind is in your post."


If you love something why not triple it up!  I got the new Sizzix Impresslit Butterfly and fell in love with them.  I started cutting multiple versions of the butterfly.  Perfect for a triple display of these beauties!


I love building a triptych especially when you have something you love like these beautiful butterflies!  

I started by cutting three house shapes.  I then cut out a series of butterflies from an old music book for beginning clarinet. 


The sheets of music were cut to fit onto the fronts and backs of the little houses.  I then added a design tape along the top and bottom to trim out the music. The panels were brought together with clear design tape.   I cut out the different butterflies and were edged in gold and accented with gold embossed buttons and twine.


Then an old broken chain from a necklace was highlighted with gold along with some safety pins to drape between the houses. The mini flair were edged in gold and attached to the topic.  The sentiments were stamped and embossed in gold. 

I hope you are inspired to triple it  up and join us in the fun!

The overall winner will be offered the chance to be a guest designer at a future date at The Funkie Junkie Boutique Blog, and everyone who enters and follows the rules will be entered into the drawing for the chance to win a $25 spending spree at The Funkie Junkie Boutique. There are also Top 3 Badges for three additional outstanding entries, chosen by the Design Team.
 
Thanks for stopping by!
 
Suzz
 
Products: 

Wednesday, December 9, 2020

Deck The Halls

 Happy December to you all!  We are celebrating the holidays at The Funkie Junkie Boutique Challenge Blog!  Sara Emily is challenging us to Deck the Halls! 

Here is how she describes the challenge: 

"For this challenge, we would like to see those vintage or shabby chic Christmas decorations! This is not about Christmas cards this time, but think about tree ornaments, wreathes, vignettes, mantle or table decorations, etc. with a Christmas theme."

 I am currently in the midst of a little home renovation which put my supplies in quite a disarray so I was limited in what I could get my hands on! :) 

It involved a few pads of pattern paper, my big shot and the beautiful elegant poinsettia die.  I sat and cut many many rounds of flowers to create this shabby chic Christmas tree. 


Here is a close up of a few of the flowers.  What you can't see very well is that they are all frosted around the edges with glitter.
The centers are all white buttons from a very big jar of vintage and current buttons.

 The tree was too tall for my regular photo box so outside we went to try to get a picture that showed the tree in it's full glory. 

Please come join in and share your crafted decorations with us in the challenge!  The winner will earn a chance to be a Guest Designer at a future date at The Funkie Junkie Boutique blog, and everyone who enters and follows the rules will go into the draw for the chance to win a $25 spending spree at The Funkie Junkie Boutique. There are also Top 3 Badges for three additional outstanding entries, chosen by the Design Team.

Thanks for stopping by!


Suzz

Products: 

Saturday, January 11, 2020

Saturday Showcase - Stamperia Wedding Paper Pack

Happy Saturday!  I am hosting a showcase over on the Funkie Junkie Challenge Blog today with a few projects featuring the lovely Stamperia Wedding Paper Pack. 


The papers are so beautiful they design themselves!  :)  Hop over to The Funkie Junkie Blog if you would like to see the other projects!  
 
Thanks for stopping by!

Suzz

Saturday, September 21, 2019

Saturday Showcase - Tiny Toadstools

Hi!  Just popping in to share a few toadstools!  The full post is over on The Funkie Junkie Boutique!

Happy Saturday!

Suzz