Showing posts with label Chipboard. Show all posts

Saturday, January 29, 2022

Saturday Showcase at The Funkie Junkie Boutique

Hi!  Just popping in to mention I am sharing a long Saturday Showcase post over at The Funkie Junkie Boutique Challenge Blog highlighting Dina Wakley Chipboard Shapes. 


Pop over if you get a chance to see all the projects I created using the chipboard as inspiration! 

Suzz

Wednesday, January 12, 2022

Out With the Old, In With the New

 Happy to be back in the new year sharing a new challenge at The Funkie Junkie Boutique!  We have some new design team members and said goodbye to some old team members.  The new challenge celebrates the new year with the theme of Out with the Old and in with the New.  

All you have to do is create something using something new and something old.  

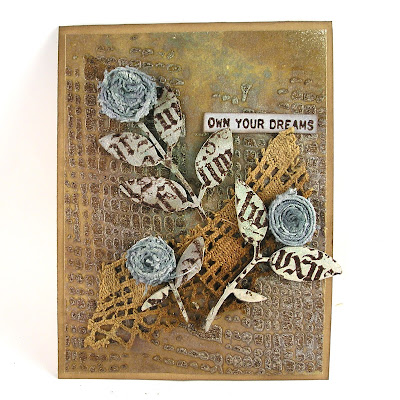
I have these new chipboard sprigs from Ranger that I have been wanting to play with. I decided to pull them out and use them! 

I also had my old Stampers Anonymous stamps Faded Text that I wanted to use in the design as well. I also mixed in some old lace from my lace collection. 

The background is embossed with the burlap texture from an layering stencil.  I used lots of sprays and inks to add colors and shine!  

Come check out the new challenge and inspiration from the new design team! 

The overall winner will be offered the chance to be a Guest Designer at a future date at The Funkie Junkie Boutique Blog, and everyone who enters and follows the rules will go into the drawing for the chance to win a $25.00 spending spree at The Funkie Junkie Boutique. There are also Top 3 Badges for three additional outstanding entries, chosen by the Design Team.
 
Thanks for stopping by! 
 
Suzz
 
Products: (Available at The Funkie Junkie Boutique) 

Wednesday, February 5, 2014

Stack Art

Stampendous latest release is all about  Mixed Media!  They have a new Creative Palette which you can create all kinds of fun backgrounds, mono prints and painted textures.  The other awesome new product they released is called Stack Art.  The Stack Art kits come with a variety of chipboard shapes, tags, and coordinating double sided stickers.  There are sentiments already printed up and in the kits. In addition there are rubber cling stamps Stack Art sets. They also have these beautiful Stack Art Element kits with a combination of glitters, mica flakes and color pigments.  I mixed all of these together to create a few different tags:

My first mixed a few chipboard elements along with the stamps and glitters.
For this tag I coated the chipboard with white paint. I let that dry and then I dragged a few different dye inks down across the surface to give the effect of wood grain.  After that dried I stamped the text using brown ink.  I then added the flourish stamp along the top of the tag with the same brown ink.  I then painted the bird with white paint.  After it dried I added blue dye ink over the surface. For his crown I used the double sided sticker and placed it on the crown and dipped it in the red crystal.  I added a little bronze tinsel to the top.

Products: Stack Art Cling Rubber Stamps - Regal  Bird Kit, Stack Art Cling Rubber Stamps - Royal Heart,  Stack Art Kraftboard Regal Bird Kit, Stack Art Kraftboard Angel Wings Kit, Stack Art Elements - Survival,    Ranger Distress Stain - Gold, Vintage Photo, Ranger Archival Ink - Coffee

For my second tag I was inspired by the Angel themed kit.


I pulled the tag and added the double sided sticker and put the beautiful white mica flakes over the surface.  I took the chipboard heart and painted it with white acrylic paint. After it dried I stamped the flourish using pink ink.  I then used feathers behind the heart and added the sentiment from the set along with a pearl drop.

Products: Stack Art Elements - Silence,  Stack Art Kraftboard Angel Wings Kit, Stack Art Angel Wings Rubber Stamp Kit,     Pink Ink, Feathers, Tulle, Pearls

I wanted to share a few of the backgrounds created using the new Creative Palette: 

 And there are stencils in the new jumbo stamps which I used to create some of the backgrounds.
 This one features the new Jumbo Cling - Spider Mum stamp.

Thanks for stopping by!

Suzz

Saturday, September 13, 2008

Away for awhile...

I have been in meetings every day which takes me 1 1/2 hours each way and then get home and run to student curriculum nights, baseball, gymnastics... you name it... So I am very deprived of my stamping. I am going to stock up this weekend with my projects (hopefully) so next week won't be as bad.. (Although, I am going to be in meetings every day again all week)... (Boo Hoo)


Hero Arts weekly challenge this week is all about yourself. http://heroarts.com/blogs/club/2008/09/08/a-day-in-the-life/ Either to scrap a page about yourself or make a journal... I decided to make a few journals.


I made one for a girl who is going to be in the hospital for an extended stay. I am going to send this with some colored pencils. Her name is Breanna.


Recipe:
  1. Spritz randomly across a piece of white cardstock Lemon Zest Glimmer Mist. Spritz in the white areas Patina Glimmer Mist. Using a white paper towel smear together the colors.
  2. Ink the flourish stamp with versafine deep lagoon and stamp randomly across the dried yellow/teal background.
  3. Ink the flower stamp with deep lagoon pigment ink and stamp randomly across the background.
  4. Using a white gel pen trace around the edges of the flourishes. Add dots around the edge of the flourishes on the other sides. Accent all areas of the flourish with gel pen. (Either dots or lines) Outline or dot white gel pen around the flowers.
  5. Tie the ribbon around the patterned paper into a knot.
  6. Cut scalloped circle from Marvy Uchida Blue Scalloped cirlce punch using teal cardstock.
  7. Cut a scrap from the patterned paper using the smallest nestibilities scalloped circle punch.
  8. Cut a teal circle from the 1 1/4" circle punch and cut a 1" circle from the leftover paper from the patterned paper. Cut a teal circle from a 3/4" circle bunch.
  9. Cover the chipboard B with Light Green Stickles.
  10. Mount all circles and scallops together and accent with dots of teal / light green stickles.
  11. Attach horseshoe charm to the knot.
  12. Pull a sheet of the paper including the circles/perforated edges from inside of the notebook. This is the template for the measurments for the cover of the book as well as where you need to cut the slits in the cover to be able to put it in between the rings of the notebook.
  13. Cut your background paper to the full size. Cut the patterned background 1/4" smaller all around. Mount the patterened paper to the teal cardstock. Lay the sheet of paper from inside the notebook on the two papers together and cut slits into the patterned paper mounted on the teal paper where the holes were in the paper.
  14. Glue down the paper to the front cover from the bottom to the rings. Push the pieces that are slit between the rings.

Products:

  • Ranger Stickles
  • Hero Arts Clear Designs - CL233 Flower Blossom Borders
  • Hero Arts E4813 - Flourish Flower
  • Chipboard Letters - Unknown
  • Ribbon - Michaels, Hobby Lobby
  • Charm - Blue Moon - Lost & Found
  • Signo Uni-Ball White Gel Pen
  • Hero Arts Gemstones
  • Kaiser Gemstones
  • Spellbinders Nestabilities Scallop Circle
  • Marvy Uchida Scallop Punch
  • EK Success Circle Punches
  • Tattered Angels - Glimmer Mists - Patina, Lemon Zest