Saturday, November 2, 2013

Creativity

Happy Saturday to you!  I swapped out my blog header last week with something I had created and wanted to share some of the details with you. 
The new craze out there is the gelli plate.  I decided to give it a try and have been playing around with paints, stencils and the gelli plate.  This project came from a session with warm fall colors and one stencil.  I loved how this series turned out.   This project was made from me pulling up the stencil from the paint filled gelli plate and applying the painted side of the stencil onto white cardstock.  I loved the effect and put the stencil back onto the leftover paint on the gelli plate and repeated the process until I covered the cardstock with varying depths of paint.   After that had dried I stamped the beautiful butterfly multiple times using versamark.  I sprinkled Stampendous Aged Spice Embossing Enamel over and heat embossed them. 

I knew I wanted to update my blog header so I added the Creativity quote with the same embossing enamel.I then cut down the size of my background leaving the butterfly wing open on the top.  I sprinkled the surface with mica flakes.

I then used Picasa (software) to add my blog name across the top and crop the image to create my blog header.

Products: DarkRoom Door - Eclectic Butterfly, Creativity Quote, Stampendous - Aged Spice Embossing Enamel, Gilded Mica Flakes, Ranger Distress Ink - Aged Mahogany, Gelli Plate, Paper Artsy - Claret, Haystack,    Pumpkin Soup,   The Crafters Workshop Mini Zinnia stencil

Have a lovely Saturday!

Suzz

Thursday, October 31, 2013

Happy Halloween!

Happy Halloween!  Trick or Treat!  I finished my witches hat just in time... The Ranger blog is having a little contest for Halloween projects and I will be linking this up over there. They are sharing Candy's fabulous project on the blog and you need to go see how clever she was in creating her spooktacular project.
I got this hat partially created and then it sat for a long time waiting for me to get the inspiration to finish. The crafting contest had me pulling out my Visual Artistry set and Stampers Anonymous stamps to finish this.
The base is a paper mache witches hat.  I painted it with orange acrylic paint.  The background is stamped randomly with Memory Box Vintage Halloween in black ink.  The next step was apply Wendy Vecchi Black Embossing Paste over sequin waste randomly to apply a little texture.  After that dried it sat on my desk. :)

I then stamped the family from the Visual Artistry Journey set and cut them out to place them in my tulle bow.  I die cut branches from cardboard and painted them with a combination of Ranger Distress Stain - Walnut Stain and embossed with black embossing powder.   I stamped the spider using black ink on acetate and heat embossed using black embossing powder. I cut them out and attached them to the bow and the tree.

Now I am ready to go out on my broom. :)   Have a wonderful Halloween! I hope you get all treats and no tricks!

Suzz

Wednesday, October 30, 2013

All Hallows Eve

Are you all ready for Halloween?  We don't get any children by our house on Halloween so we go to my MIL house on Halloween to Trick or Treat and see all the cool costumes that people think up.  This morning I finished a tag and card for my daughters.

I used the Stampendous Owl  for my tag for my older daughter.


I had created this tag awhile ago using cardboard painted with white acrylic paint. I then layered on a distress stain upon which I added a crackle finish.  After it dried it looked like wood which gave me inspiration today to use the owl. I die cut branches and a stamped the Stampers Anonymous Halloween wish.  On the backside I added a pocket for a gift card and a Halloween wish.

I made this sweet card using the Stampendous Pumpkin Kiddo  for my youngest.  

 I created a few different mono printed backgrounds using a gelli plate with red, orange and white paint from Americana  I cut up the print to create the background and inside the card.
I stamped the pumpkin kiddo using black ink on white cardstock. I cut the circle around the image.  The girl is colored using STAEDTLER Karat Aquarell watercolor pencils.   I added an edge of micro orange glitter.
The inside has a pocket for a gift card for a local ice cream store.  My daughters love this place as it serves a soft frozen yogurt with a variety of toppings that you can scoop. 

I have one more Halloween project for tomorrow. I hope I have time to finish it off. :)  Have a lovely day!

Suzz


Sunday, October 27, 2013

Charming

The challenge this week at  Simon Says Stamp Monday Challenge is Anything Goes! That means anything that inspires you!  Come join in for a chance to win a $50 gift voucher at Simon Says Stamp!

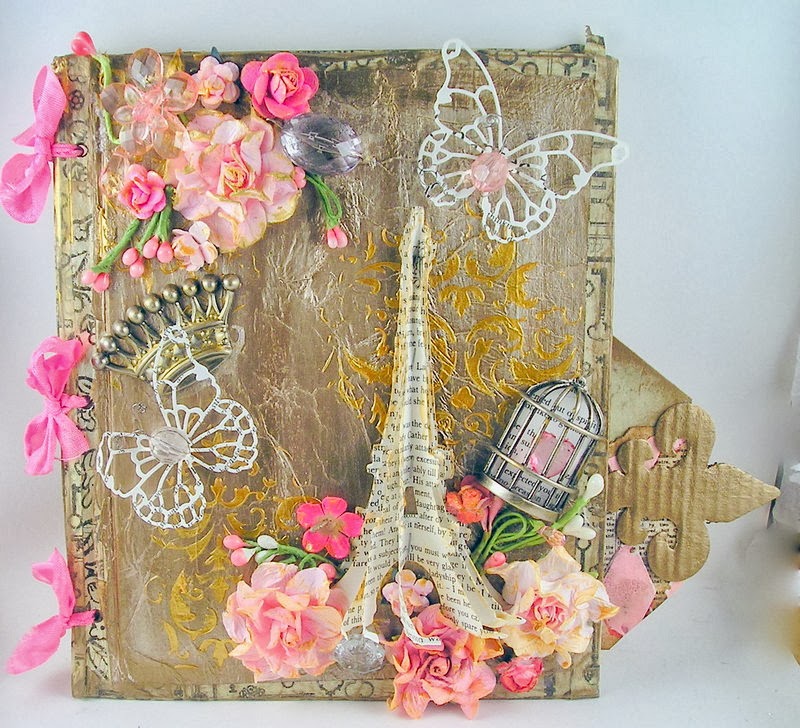
I took this challenge to play with a little bit of everything following the thoughts of fairytales.
I started with a old Golden Book as the base.  I covered it with tissue paper which was decoupaged to the surface and covered in gold and bronze metallic sheen.  I added a coat of gold embossing paste over a stencil to add a damask texture.

I added layers of flowers, die cut text butterflies and a dimensional Eiffel Tower.  I took an idea-ology birdcage and trapped a heart gem inside.  The edges were covered with tissue tape and colored with a touch of gold paint.

The inside pages are different sizes and shapes:

As you turn each page you can see the layers built into the pages to allow different opportunities for journalling and photos:

I added text with the harlequin stencil painted in white and pink acrylic paints.
The reverse side has sprays. The edges were torn and gilded with gold.

A few accents to coordinate and the back inside cover includes a layer of die cut cardboard.

The back cover and view:

The front cover finished and put together:

Products: Metallic Finishes, Memory Box Butterfly Die, Sizzix Fleur De Lis & Eiffel Tower Die, Flowers, Prima Flowers Flourish Stencil, Wendy Vecchi Gold Embossing Paste, 7 Gypsies Metro Tape, Idea_Ology Regal Adornments, Tim Holtz Idea-ology Bird Cage Charm, The Crafters Workshop Harlequin Stencil, White Paint, Pink Paint

Don't forget the challenge was moved and the new blog is up here:
SSS_checkoutnewblog

Come play along with us at  Simon Says Stamp Monday Challenge for a chance to win a $50 Gift voucher from  Simon Says Stamp.
Thanks for stopping by!


Suzz


Christmas Tag

I am back with my second tag...   I am playing along with Linda's Funkie Junkie Tags and this one is inspired by week #5 sponsored by her Funkie Junkie Boutique.   


Linda's tag had a sweet Santa image framed out in the center of the tag.  I started with wooden frame which I backed with a stamped image of Father Christmas.  I stained the frame with brown distress stain and added hints of gold with gold paint and embossing paste.  The background is a mix of paints, stamping, tissue paper, and distress inks. I died ribbon and lace to coordinate.

Products:  Ranger Distress Stain - Walnut, Ranger Archival Ink - Coffee, Brown Pearls, Brown Lace, Twine, Ranger Distress Ink  - Vintage Photo, Aged Mahogany  Artistic Outpost - Snowy Woods, Ranger Distress Paint - Gold, Ranger Distress Stains - Gold

Thanks for stopping by!

Suzz

Friday, October 25, 2013

Beauty of the Season

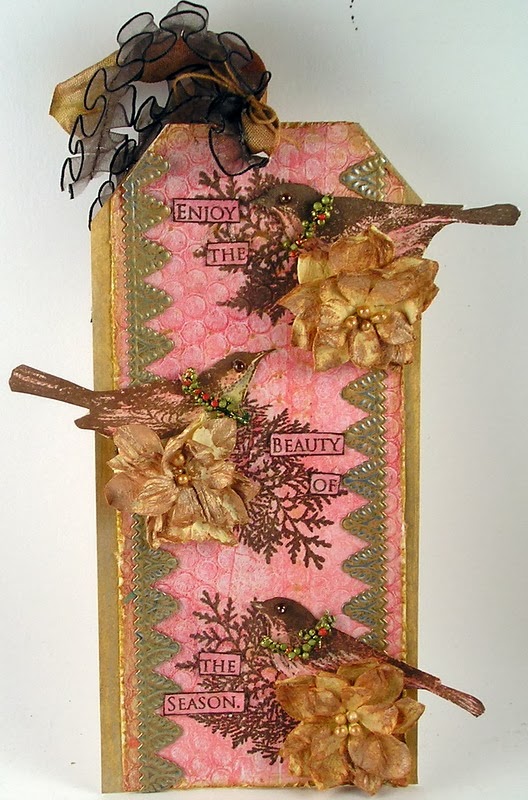
Happy Friday!  It took me all week to create two tags. Slow creative process. :)  I am playing along with Linda's Funkie Junkie Tags sponsored by her Funkie Junkie Boutique.  I also mixed in the colors from the Mixed Media Color Challenge #10 into one of my tags.  I am going to share that tag today and share my other tag later this week. 


I didn't have some of the elements found in Linda's  tag, so I decided to focus on the layout and the design.    The background was created using a gelli plate, sequin waste and pearlized paint.  After it had dried I smeared a dye ink over the surface to capture the pattern and the coral color found in the challenge. I added birds from Artistic Outpost and colored them with STAEDTLER Karat Aquarell pencils.  The flowers were dabbed with gold paint.  The trim is metallic and from Ranger / Tim Holtz smeared with the same gold paint.  The background is painted with Ranger Metallic Stains.

Products: Artistic Outpost - Snowy Woods, Artistic Outpost - Midwinter, Birds of a Feather, Ranger Distress Paint - Gold, Ranger Distress Stains - Gold, Brass, Pewter,  Ranger Archival Ink - Coffee, STAETDLER - Karat Aquarell Watercolor Pencils

My inspiration:

Thanks for stopping by!

Suzz

Sunday, October 20, 2013

Trick or Treat?

Are you ready for Halloween?  I haven't made my annual Halloween cards for my kiddos yet.  The challenge this week at  Simon Says Stamp Monday Challenge is spooky.  This will get me inspired to work on my cards for my kids.   


I decided to pull out my beeswax and melt pot to play around with a mix of textures.

The background has a hint of stamping in brown ink. I then added a layer of blue mist and green paint.  I decided to put my beeswax over the stamped image. I poured the beeswax over the background and then added a touch of sequin wasted in the corners with the beeswax  poured over the waste. After it cooled down I pulled it off and smeared gold paint over the texture.  

The vintage witch is stamped on the background in brown ink and then stamped onto tissue paper using black ink and decoupaged onto the surface. 

The sentiment is from stickers with a hint of blue dye ink smeared over the surface. I painted metal letters and framed them with a touch of black twine. The edges were gilded with the gold paint.

The ribbon and lace were spritzed with mist and touches of gold paint.


Products: Artistic Outpost Vintage Halloween, BeesWax, Melt Pot, Idea-ology Seasonal Chit Chat Stickers, Sequin Waste, Ranger Archival Black Ink, Coffee Ink, Paper Artsy Fresco Finish - Mermaid, Limelight, Prima Numbers, Ranger Distress Paints - Gold,
Lace, Ribbon, Twine


Come play along with us at  Simon Says Stamp Monday Challenge for a chance to win a $50 Gift voucher from  Simon Says Stamp.