
Showing posts with label Glitter. Show all posts

Tuesday, March 8, 2016

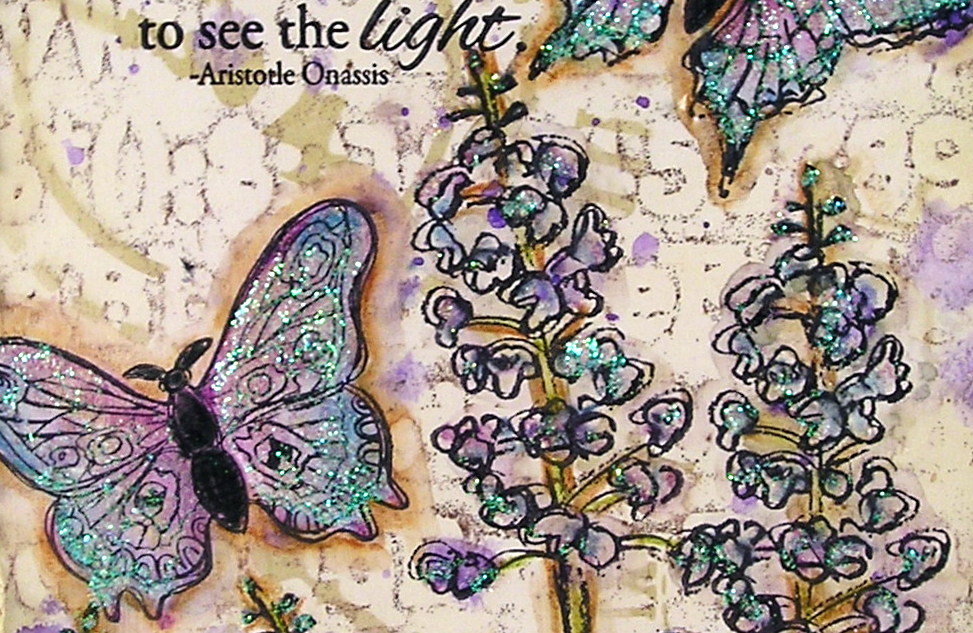
Shimmering Butterflies

Good Morning... More butterflies.. :)  I guess all this 60 degree weather has me thinking spring and summer.

This actually started from a scrap pile that I had leftover from one of Tim's tags.. I was playing with different backgrounds and had quite a few leftover and this was one of them that I had cut to card size and set aside.  Usually when I am working on a project I can't walk away and play with other projects but I have one on my desk that is going to take a week to work on so I put it aside and decided to play with some new stamps.

The background is a mix of paints with an embossing folder and a stencil overlay on top of that.  I then stamped the flowers and butterflies onto that with archival ink.  I colored them with the watercolor pencils and waterbrush. I wanted to make the coloring very splotchy around the flowers and on the butterflies to give it a very ethereal effect.  

I added a hint of shadowing and then the sparkles to give the shimmer.  I finished it off with this beautiful sentiment from Inky Antics. 

Thanks for stopping by!

Suzz

 I am entering this into the following challenges:

Words & Paintery February Challenge - Colors & Glitter
The Mixed Media Monthly Challenge - Photo Inspiration  (Check out this pretty picture)
Anything but Cute Challenge - Crazy for Color

Products:  Inky Antics - Sentiment, STAEDTLER watercolor pencils, The Crafters Workshop Stencil, Ivory Cardstock, Crystal Stickles


Sunday, November 15, 2009

Glittery Goodness

Still playing around with the glitter for the Hero Arts Blog Challenge for this week. When I was looking at inspirational pieces I did see a lovely bed cover that was toile but white on red.

I liked the shape and the colors and decided to emulate it in a card.

Very simple as the stamped background is the Hero Arts Poinsettia and Birds Design Block stamped in versamark and white embossed.
The sentiment is Hero Arts as well and is stamped again in versamark and embossed using white embossing powder.
Now on to something fun... My youngest got up this morning and decided to make a card. She saw an idea I was working on with some fun Memory Box stamps and decided to create her own version of my card.

She used some items from my wall of shame. (Island of Misfits - where I stick all my unused animals or cut out pieces that don't make it onto a card)
She created a scene where the penguin was ice-fishing for hearts and inside it says:


LOL! This was exactly my design but I didn't finish it yet. Something I was trying out for a class in January for Valentines day.

Well I hope you enjoyed her little card.

Have a lovely day...

Suzz

Saturday, November 14, 2009

Inspiration...

I have been struggling again with ideas and inspiration the last couple of days... So I used an idea that Cathy over at the Moxie Fab World blog initiated for Tuesday Triggers... The idea is to find something beautiful that inspires you and create a card from that inspiration. I decided to go exploring and see if something inspired me to create.
I found inspiration in a pillow from Crate and Barrel:

I was thinking an all white card with layers of embossing. Of course somehow I ended up here:

The current challenge at Hero Arts blog this week is to use glitter... So I figured why not stay with the circles and layers but add edges of glitter.


The color happened by accident. In all my playing I used a purple StazOn on my Antique Flower Background stamp. I had wiped it off several times thinking it was clean. Unfortunately after I die cut all my circles and started to stamp with my versamark I was picking up a faint purple.

I decided to go with it...

Recipe:

  1. Die cut 3 size circle multiple times. (I made 8 flowers in all and used the nestabilities large circle set.) I used the smallest 3 circles from the set.
  2. Stamp using versamark the antique flower background all over on all of the circles. Heat emboss using clear embossing powder.
  3. Crumple up every circle multiple times to soften the edges and the circles.
  4. Sponge Memento Plum around the edges of the circles.
  5. I then used a Zig glue stick to add glue around the edges and dipped the edges into the glitter.
  6. Pop dot the circles together. Add gem in the center.
  7. The rest is putting it together. I folded some ribbon in half and tucked it in various spots to make my foliage.

Products:

  • Hero Arts - Antique Flower Background
  • Nestabilities - Large Standard Circles
  • Versamark
  • Clear Embossing Powder
  • Zig Glue Pen
  • Penny Black - Full of Life
  • Cuttlebug Embossing Folder
  • Memento - Plum
  • Martha Stewart - Ribbon
  • Fairy Dust - Glitter
  • Versafine - Imperial Purple

Well I hope you are having a beautiful weekend. We are! The weather is gorgeous.

Suzz

Wednesday, November 11, 2009

Caardvarks - Circle of Friends - II

Caardvarks challenge is circle of friends which is creating a circle card. This card started from a scrap idea on another card which I haven't shared yet. (Pending another challenge.)

This lovely antique background is embossed with clear embossing to resist the dye ink sponged over it.

This is going to some good friends of ours with whom we exchange ornaments. It is designed to be a card and then can be hung on their tree if they choose to.

Imagine the areas that look like black are actually a deep chocolate brown. Maybe one of these days I will use the light brown paper so it looks like dark brown when I take my picture. :)


I added the tag and the ribbon after I had finished the card to turn it into an ornament. The backside of the card is a off-white circle for us to write our holiday wishes!


Products:
  • Hero Arts - Antique Flower Background
  • Hero Arts - Deer
  • Penny Black - Joy Seal
  • Ranger Distress Inks - Antique Linen
  • Versamark
  • Clear Embossing Powder
  • Martha Stewart - Cornice Edger Punch
  • Versafine - Vintage Sepia
  • Copics
  • Memento - Tuxedo Black
  • Signo - Uniball White Gel pen
  • EK Success - Corner Punch
  • Fiskars - Circle Templates

Thanks for stopping by...

Suzz

Sunday, September 7, 2008

Let it Snow... (Not)


This card was made as an entry into the Hero Arts weekly blog challenge. The theme this week was about giving. Challenge Link: http://heroarts.com/blogs/club/2008/09/01/tis-the-season-to-give/ .

Recipe:
  1. Smear Distress Ink - Broken China all over a transparency.
  2. Mist until the water bubbles across the entire transparency.
  3. Spritz purple Glimmer Mist in multiple places on the transparency.
  4. Place white cardstock on the transparency. Pull off and lay face up to dry.
  5. Line up clear snowflakes in a row alternating heights. Ink with StazOn Royal Purple.
  6. Stamp rows of snowflakes across the background paper.
  7. Clean snowflakes thoroughly. (hint... I didn't do this properly and will have to clean my Brilliance Ink Pad)
  8. Ink snowflakes with Brilliance Moonlight White and stamp them slightly off-center from the purple row. Continue this for each row.
  9. Versmark entire stamped background. Heat emboss with Kaleidoscope Embossing Powder.
  10. Punch Circle from the original background piece. Make sure the circle is big enough to fit the penguin.
  11. Curve the clear design sentiment to follow the outline of the circle. Lay the acrylic block over the circle and lay the clear stamp on the acrylic block to align to edge of the circle.
  12. Stamp Sentiment two times around the circle edge using the StazOn purple ink. Stamp baby snowflakes in between the sentiments.
  13. Versmark the circle and heat emboss with Kaleidoscope ebmossing powder.
  14. Stamp penguin with StazOn black ink. Color hat scarf with purple watercolor pencils. Smooth color with aquabrush.
  15. Apply glitter to the stomach using a glue pen and white glitter.
  16. Apply fun flock to the hat ball using glue pen and fun flock.
  17. Wrap ribbon around penguin neck and glue dot ends onto stamped scarf.
  18. Cut ribbon in half and length of brim of the hat and glue it onto the hat.
  19. Apply stickles on the hat snowflakes.
  20. Apply black gems for eyes. Use Signo White uni-ball pen to add white to the eyes.
  21. Assemble the card.

Products:

  • Versamark Watermark Ink Pad
  • Signo Uni-Ball White Gel Pen
  • StazOn - Black, Royal Purple
  • Brilliance Ink Pad - Moonlight White
  • Hero Arts - Sparkle Design - Birdhouse
  • Hero Arts - Clear Design Warmest Winter Wishes
  • Hero Arts - D5081 - Cap and Scarf Penquin
  • Stampendous Stamp N Stuff Kaleidoscope Transparent Embossing Powder
  • Hero Arts Black Gems, Light Blue
  • Marvy Uchida Scalloped and Circle Punches
  • Tattered Angels - Glimmer Mist - Purple
  • Ranger Distress Inks - Broken China
  • Ribbon - Unknown
  • General Kimberly Watercolor Pencils
  • Ranger Stickles - White

Thanks for stopping by!

Wednesday, July 23, 2008

Snowy Day

I love the Hero Arts DesignBlock Tree stamp. I think it is a beautiful stamp. I wanted to use it with some of the techniques I had used on my earlier card with an overall glaze.

This is what I ended up with:


I was really pleased with how this picture turned out. I was trying to capture the glitter and I think it actually photagraphed better than the card looks in person. Hee Hee... Maybe this should be sent in an email instead of snail mail.

Here are the steps to create:
1. Begin with a piece of glossy cardstock.

2. Stamp the tree using Versamark Watermark Stamp Pad.

3. Emboss the tree using JudiKins Metallic Copper Embossing Powder.

4. Paint on twinkling H2O's with a water brush. Colors used were Periwinkle, Blue Ice, Passion. Use a lot of water and swirl around. Dab off excess and smear with paper towel.

5. Stamp over the entire picture with Versamark Watermark Stamp Pad.

6. Heat emboss with clear embossing powder.

7. While the embossing powder is still hot add another layer of clear embossing powder and heat.

8. While the embossing powder is still hot sprinkle fine glitter (light blue) on the wet embossing powder. (This will get very messy as not all the glitter will stick and the hot air from the heat gun will blow the glitter all over.) I am covered in a fine blue sparkle as I type. :)


9. Finish off the layers with one more layer of clear embossing powder while the picture is still hot.


Other Products:

Penny Black - Celebrate the Wonder

Ribbon - Sweet Treat Ribbon, Michael's

Fiskars 3 - in -1 Corner stamp - Heritage

TFL!