
Showing posts with label StazOn. Show all posts

Saturday, June 30, 2012

Mary Mary Quite Contrary

Today is the last day of the blog hop week with  Stampendous, Clear Scraps, and  Tsukineko. For all the details, head over to the Stampendous Blog, you still have time to enter to win prizes! 

We were provided some beautiful Send It Clear Cards and Clear Scraps Album and StazOn Inks to create our projects.  For my project today I used the Clear Scraps Album to create a garden album.
This is the closed view of the album.  I cut cardstock or pattern paper to fit behind my acrylic pieces to highlight the beautiful colors captured with copics and StazOn.

The cover page has the gorgeous Jumbo Cling HollyHocks stamped using StazOn Stone Gray Ink. This makes the lines softer than if I had used the black StazOn.  I had to flip the acrylic cover over and color on the reverse side using my copics.  If you tried coloring over the stazon the copics would erase the stamped image.  I used a oranges and yellows on the flowers and green on the leaves from my copics.  The beautiful Stampendous Butterflies were stamped using black ink and colored with the same copics used on the flowers.  

Behind the acrylic page I traced a piece of white cardstock to the same shape and stamped the Dream Text using brown ink over the page to provide better visibility to the acryclic page and flowers when closed. When you flip through the album your see all the wonderful effect of the acrylic colored flowers!

The first page of the album:

On this page I covered the chipboard with some beautiful Bo Bunny Paper from the Country Garden collection and added the Cottage Rose flowers using black StazOn ink. I colored the flowers using watercolor pencils and white gel pen highlights.  The butterflies are from Stampendous and are also colored with watercolor pencils. I finished it off with the sentiment stamped with the Altered Type Alphabet letters.


The next set of flowers are tropical and warm... I used the beautiful Tropical Garden and backed the page with Bo Bunny paper in the background.  The images were stamped with black StazOn.


The next page:
On this page again I worked with the Bo Bunny paper in the background and stamped the Jumbo Iris several times using the StazOn black ink and colored with glimmer mist and waterbrush. The sentiment was added with the Altered Type Alphabet.


The last page uses the Stampendous Chrysantheum  stamped in the background using the StazOn Ink - Black.  The flowers were colored on the reverse side using copics.

The pages have all been left open to add pictures, pockets or other details.
To see some other fabulous inspiration hop over to:


Thanks for stopping by!
Suzz

Sunday, January 10, 2010

Moxie Fab World - Tuesday Trigger

The Tuesday Trigger on the Moxie Fab world was selected by Maren B. Here is her inspiration picture from Pottery Barn.

Now you would think.... that if you had 3 porcelain plates purchased at a discount store with the intent of stamping on them..... that you would have had an Ah Ha moment when you saw the trigger....

Unfortunately some of us take a little longer. :) I love these plates I picked up and just this morning did I remember that they were sitting there and that they would look lovely with a similar idea.

The best part is I have had this poem from Verses which works perfectly with the image.

The hardest part about this project was finding something to put my cling stamps on that fit in the center of the plate. It only took me 5 failed attempts before I decided to look for a circle surface for my cling stamps. (glass jar top)

I stamped using my StaZon ink which takes nicely on the surface. If you make mistakes you can wipe it off using the StaZon cleaner. I don't have a sealant over my stamped image, so this will be a decoration only.

The verse in case you can't see it clearly is as follows:

Hope is the thing with feathers

that perches on the soul,

that sings a tune without words

and never stops at all.

Emily Dickinson

Products:

  • Stampers Anonymous collection - Artful Flight
  • Inkadinkado - 98170-K
  • Verses - QQ1007-D Hope Feathers
  • StaZon - Timber Brown

Off to Church and then cleaning up the Christmas decorations. The house always feels so bare after the holidays.

Hope you have a blessed Sunday!

Suzz

Tuesday, December 8, 2009

Tag Tuesday Challenge #29

I know I said I was done with tags... But Louise has the weekly tag challenge and I enjoy participating. So one more tag this week. The colors for this challenge are Teal, Wine, and Blue. She is kind enough to let us select the hues of the colors we use.

I was thinking of how to incorporate the colors together and I thought of wool knit mittens we had as children.


I first hand drew the shape of the mitten. (would have been helpful if my little one were around or had mittens in the house) I think it looks pretty close to the correct porportion. The background was stamped using StaZon Teal blue ink and the Hero Arts Dots and flowers Designblock stamp.

I added a dot in the center of each flower using my blue watercolor marker. The edges are sponged with stonewashed blue.

The buttons and ribbon are a burgandy color but unfortunately when photographed they reflect the highlights. The other button is a nice deep blue which looks like black in the picture.

I hope you enjoyed my little mitten tags as much as I enjoyed making them.

Products:

  • Hero Arts DesignBlock - Dots and Flowers
  • Adirondacks - Stonewashed
  • Watercolor Marker
  • Lace, Buttons, Twine, Ribbon - Unknown
  • StaZon - Teal Blue
  • Versacolor - Burgandy
  • Hero Arts - Holiday Messages

Thanks for stopping by...

Mitten update... I am like the kittens... I have lost my mittens...

Due to the Christmas decorations being put up, I have had to move my shadow box where I take my pictures onto the floor in the other room. I sometimes leave my project in the box until after I clean up and load in case I need to take another picture. Unfortunately my puppy who is almost a year old was very quiet while I was typing away in here. Yep.. She was having a feast on my lace, twine, ribbon and buttons. I don't even want to think about where they went. So my poor mittens are destroyed.

Suzz


Wednesday, December 2, 2009

Tag Tuesday Challenge #28

Christmas tags in green, purple and silver is the tag challenge at Louise's blog this week. The best part is the Hero Arts blog challenge this week is also holiday tags. So two challenges in one. :)

I have three tags to share. I started down a path of trying to use this color combination. (3 more rejects on my table right now.)

This was my first attempt... Wasn't sure I really liked how this turned out, so I kept going... Along the way I made a background that I liked and this tag was created.


The tree was from a previous reject. I tried creating the faux metal in the middle of the tag as a strip of faux metal and didn't like how it looked. I didn't want to lose the pretty faux metal. I punched it out and that is how this tree came to be.
The snowflake was a tag I had started previously by stamping with StazOn on the clear acrylic snowflake tag. The Stazon was a light green and you couldn't see it. I also stamped a background stamp with clear sparkly embossing powder. Pretty but difficult to see.

For this challenge I decided to add a layer of iridescent embossing powder over the entire background and heat emboss it. I then added a layer of white embossing powder over the entire surface. I came back and stamped on the front the sentiment using StaZon (Royal Purple) . Edged with the silver krylon pen.

Products:

  • Hero Arts - Antique Flower Background
  • Hero Arts - Three Holiday Messages
  • Penny Black - Joy Seal
  • Hero Arts - Poinsettia and Birds
  • Cuttlebug Embossing Folder
  • Embossing Powders - Iridiscent, White, Silver
  • StaZon - Royal Purple, Cactus
  • Versamark Watermark Inkpad
  • Versafine - Imperial Purple
  • Aluminum Foil
  • Recollections - Pearls
  • Ranger Distress Inks - Concord Purple
  • EK Success Punch - Tree
  • Krylon Paint Pen - Silver

Thanks for stopping by... If you are interested in details on any of the techniques send me an email and I would be happy to share.

Suzz

Wednesday, November 25, 2009

Happy Birthday Lexi!

This weekend I have to create 3 cards... I finished 2 of them and am still working on the third. I also want to send off a few packages which need a few cards too. The first card is for our niece Lexi. She is turning 12 and I am hoping she will enjoy this card as much as I enjoyed creating it!
These colors were inspired by the Basic Grey Urban Prairie paper. I have this lovely Inkadinkado butterfly stamp and had never inked it up but thought how perfect it was for this paper. The other background I had in my scraps pile an it seemed to work well with the color scheme.

I love these colors together. The yellows, pinks and turqouise are such fun colors.

Products:

  • Inkadinkado - 993113-P
  • Basic Grey - Urban Prairie - 6x6 Pack
  • Hero Arts - Black and White Flowers
  • Hero Arts - Birthday Messages
  • StaZon - Fuschia Pink, Teal Blue, Yellow
  • Memento - Rosebud
  • Watercolor Pencils
  • Stickles - Crystal, Blue

Thanks for stopping by...

Suzz

Friday, November 6, 2009

Raspberry and Lime

Unexpected Colors for holiday cards is the Hero Arts Challenge this week. This is a simple little card.

I started with this fabulous ribbon from May Arts. I had some of this ribbon awhile ago and used it all up. Just purchased some more and decided to use it for my inspiration point.

Love the little penguin in his pink and green outfit. Hand me downs from his older sister I am sure. :)

Have a fabulous fall day...

Suzz

Sunday, October 18, 2009

Stamptoberfest Challenges...

I have a few more things I have created for the Stamptoberfest...
The first was for two different challenges. One is to create a tag hosted by Laura and the other is to use a technique called Josephs Coat.
The Josephs coat challenge is hoasted by Daria and she provided the details on her challenge.
The technique is to cover the surface with a layer of blended colors. You could use a brayer on a blending of colors using dye ink on a glossy card surface. You cover the entire surface. You then take and stamp your images using Versamark. Heat emboss using clear embossing powder.
Now take and cover the entire surface with a dark dye ink. Her examples used black and I decided to use the brown ink. Wipe off any excess and your images that are embossed will pop out.


I created mine using sponges and Ranger Distress inks. I covered with the Ranger Corduroy brown dye ink and I didn't use glossy cardstock I used regular white cardstock. When I was finished I clear embossed the entire surface to give it a glossy finish.
The picture doesn't show how rich and beautiful the colors are. I really enjoyed this and will probably do it again. :)
The second is a scrapling challenge hosted by Martha.

This worked out perfectly as I had a scrapling from the card I shared the other day and just added an acetate overlay of the words and trees. Simple and easy as can be. Of course it took me a long time to come up with simple and easy. :)

Hope you have a wonderful day!

Suzz

Sunday, September 27, 2009

Caardvarks Challenge Sketch - Saturday

Wow... what a week of sketches. This has been good for me as a challenge... Using sketches every day is different for me as I usually go where the paper, stamp, inks take me...
Here is the final sketch for the Caardvarks Sketch Challenge: http://caardvarks.blogspot.com/

and here is my card:
Unusual for me because the main image is not stamped. It is this absolutely gorgeous vellum paper with a printed pattern from Kodomo Inc. called Peony Collage. Here is what it looks like unfortunately you can't see the sheer translucence in the picture. I usually don't buy too much pattern paper but this was a special sheet and I have been hoarding it and decided to pull it out and cut out the main peony.

I then tried to recreate it on the background by stamping my Flourishes Poppy stamps randomly across the background with an overlay of the Hero Arts Kanji Poem stamp. I slightly colored the edges and stems to emulate the vellum patterned paper colors.
I have colored my pearls before using sharpies and alcohol inks. I decided to try the Copics on the pearls to make the yellow seeds on my poppies. I was really pleased. The color with the Sharpies or the Alcohol inks was never consistent or the right shade. The Copics went on smoothly and provided a lovely color.
Products:
  • Kodomo Inc. - Peony Collage
  • Hero Arts - Kanji Poem
  • Flourishes - Poppy Patch
  • Ranger Distress Inks - Shabby Shutter
  • StaZon - Dove Grey
  • Watercolor Pencils
  • Ribbon, Pearls - Unknown
Thanks for stopping by... Have a blessed Sunday
Suzz


Sunday, August 23, 2009

Caardvarks - My StampBOX Challenge

Caardvarks challenge this week is to use black, white and hot pink... Now how can you go wrong with that? Here is the link to the challenge: http://caardvarks.blogspot.com/2009/08/mystampbox-challenge.html


Strong colors and I love them.. I made the tissue flowers again because I think they are so beautiful and I used 2 new Hero arts stamps.

Products:

  • Hero Arts Designblock - Antique Flower Background
  • Hero Arts - Cling Stamps - Special Moments
  • StaZon - Fuschia Pink
  • White & Clear embossing Powder
  • Versamark Watermark Ink Pad
  • Versafine Black Onyx
  • EK Success Punch (Leaf)

Thanks for stopping by... I hope you enjoy your Sunday!

Suzz

Thursday, August 13, 2009

Card created 2 different ways


As you may know I have a little scrap issue... Meaning everytime I create a card I end up with as many scraps as I do the finished card. My definition of scrap is pieces that I have created with intention of using them on the card but they get discarded as they don't fit, match, etc the final creation.
Yesterday I decided that I wasn't going to let the scraps go and I finished two of the same card.


Here is one of the cards that I started with...


And here is the second card that was spawned from the first.


These are both for the Hero Arts Challenge on the blog this week. They have provided sketches as the challenge. Sketches are harder for me to work with rather than easier... Don't know why...

Products:

  • Hero Arts - Old French Writing
  • Versafine - Vintage Sepia
  • StaZon - Teal Blue
  • Watercolor Marker
  • Hero Arts - Heart Winged Butterfly
  • Hero Arts - Pop Stems
  • Hero Arts - Kanji Poem
  • Hero Arts - Everyday Sayings
  • Hero Arts - Birthday Messages
Thanks for stopping by...

Suzz

Tuesday, August 4, 2009

Still on vacation and sharing another card...

We are still travelling.. Can't wait to get my fingers inky again...

This was the circle cut out from my other card which I shared earlier this week. I have used the punched out flowers around the circle card before but I always think the circle is so bare without an edge. :)

The flowers were made from a glimmer mist paper stamped with the grid paper stamp from Cornish Heritage Farms.

The circle background was glimmer mists and the stamped One Sheet Wonder/Masterboard.

The edges were darkened with a brown dye ink sponged on the edges.

The tag is vellum and stamped with StaZon. Tied with twine another punched flower and button.

I had to share a few more pictures from New York City. We took a bus ride around the city and I am sharing a few pictures. I don't have my photo editing software to do touch ups but enjoyed the architecture and buildings from the trip and wanted to share a few pictures.

We stopped in Cooperstown too but it rained and I mean rained alot so I didn't get any pictures although it is a cute town and we would have meandered more if it wasn't pouring buckets on us.


Recognize this sign. :)


Just one of the many sculptures on the building. He is looking fierce. :)
Thanks for stopping by..
Suzz


Friday, July 24, 2009

I Heart Hero Arts Blog Hop

Ashley M over at the Flckr Hero Arts Group initiated this blog hop for today. Here is the link to all the other people participating: http://www.flickr.com/groups/heroarts/discuss/72157621682950519/.

The idea was to discuss how we got started using Hero Arts products and what we are thankful for.

The Hero Arts products were introduced to me by my good friend Lisa. She is the one who started me on the path of creating cards and has been a good crafting buddy ever since!

I am thankful to Hero Arts for starting the blog, the flickr group and the continuously providing challenges all on top of the great stamps!

Here is my thank you card!


This was made using alcohol inks on the grass, dress, flowers, background and bird. :)

I started with a monochromatic them because that is the challenge this week on the HA blog but gave up because I wanted to have the sky blue.

I was trying to make the little girl blowing bubbles but I don't think you can see them that clearly in this picture.

Products:

  • Hero Arts - Asian Dolls
  • Hero Arts - Sparkle Clear -Hello Tree
  • Hero Arts - Clear Design - Woodland Critters
  • Hero Arts - Woodgrain
  • Hero Arts - Holly Bird
  • Ranger Alcohol Inks & Blending Solution: Raspberry, Stonewashed
  • Memento - Rose Bud, Rich Cocoa
  • StazOn - Royal Purple
Thanks for visiting..

Suzz

Thursday, July 23, 2009

Thinking Pink Ink & More

I was on a scraps binge again... I dug through my scraps and came up with a pile of pink scraps and this weeks challenge over at the Hero Arts Blog is monochromatic cards. http://heroarts.com/blogs/club/2009/07/20/monochromatic-monday/

This was my first card using some of my scraps and creating some new scraps...

and here was my second card using up some other pink scraps I had laying out..

The card opens up under the heart and the ivory circle is for the sentiment and signing.

Products:

  • Fiskars Corner Punch
  • Cuttlebug Embossing Folder - Textile
  • Hero Arts - Old Writing
  • Hero Arts - Antique Brocade
  • Hero Arts - Heart Winged Butterfly
  • Hero Arts - Anytime Messages
  • Hero Arts - Elegant Flower
  • Memento Rose Bud
  • Light Pink Embossing Powder
  • Versamark Watermark Ink
  • StaZon Fuschia
  • QuicKutz - Labels
  • Cuttlebug Swiss Dots Folder
  • Blue Moon Beads - Lost & Found Charms (Cameo & Heart Charm)

Thanks for stopping by..

Suzz

Sunday, June 7, 2009

Background Stamps

I drew up this sketch and then tried to execute it... I am not very good at translating sketches to cards. I wanted to use three bows across a circle. Unfortunately... I didn't have enough ribbon in the color and size I wanted to get bows. So I ended up with knots...


and the card was modified from the sketch because the visual effect was not as pretty as the sketch. :)

Products:
  • Hero Arts - Wavy Leaf Pattern
  • Hero Arts - Raindrop
  • Hero Arts - Sandra's Letter Background
  • EK Success Border Punch
  • Fiskars - Circle Template
  • Versamark Watermark Ink
  • Light Purple Embossing Powder
  • StazOn - Vibrant Violet
  • Kaiser's - Gems
  • American Craft - Ribbon
  • Prima Flowers

I have been so busy lately that my cardmaking has reflected it. My son has just graduated from 8th grade. My mom is sick and we have been working on getting her medication correct. We have a new puppy and then there is always work. So this has been a little bit why you have seen so little of my cards lately.

Have a great day!

Suzz

Tuesday, May 26, 2009

Raspberry Suite Challenge #7

I decided to play along with Dawn's color challenge... http://dawnmcvey.typepad.com/these_are_a_few_of_my_fav/2009/05/raspberry-suite-color-challenge-7.html
How can you go wrong with green and pink and she said you could add white if needed.

The die cuts are from quick kutz and the only die I own from them but I like that it cuts the shape and also provides a very thin frame as well.

The raspberry paper is the Coredinations White Wash.

Products:
  • Stampabilities - Tapestry Pattern
  • Saavy Stamps - Silhouette Flower Garden
  • Marvy Uchida - Butterfly Punch
  • Quick Kutz - Cookie Cutter Nesting Labels
  • Memento - New Sprout, Bamboo Leaves
  • StazOn - Fuschia
  • Tombo - Watercolor Marker
  • Bazzil - Ribbon
  • Hero Arts - Gem Flowers, pearls
  • Coredinations - WhiteWash
  • Hero Arts - Petite Birthday
  • Crochet Flowers - Unknown

Thanks for stopping by...

Suzz

Thursday, May 14, 2009

Dots and Ferns

I was inspired by Kiara's lovely card: http://stampingcafe.blogspot.com/2009/05/one-layer-monday-week-4.html because when I looked for something to do with dots for the challenge this week at HA blog I pulled out the three ferns stamp and decided to emboss it on a PP with dots.


I embossed using light yellow embossing powder on the lovely lilac patterned paper. I used a template with the circles and sponged them on using embossing powder. I accented the entire fern with pink gems and tied off the stems with a little sheer pink ribbon.

Products:

  • Hero Arts - Three Ferns
  • Hero Arts - Gems
  • Stampendous Stamp n Stuff - Sunny Yellow Pastel
  • Versamark Watermark Ink
  • The Creative Workshop - Stencil
  • Hero Arts Sparkle Clear - Messages
  • Tapestry by CR Gibson - Geo Breeze
  • StazOn - Fuschia

Thanks for stopping by..

Suzz

Thursday, April 30, 2009

Stamping on Fabric

Jennifer McGuire is hosting Stamp Camp Week # 4 at two peas: http://www.twopeasinabucket.com/mb.asp?cmd=display&forum_id=52&thread_id=2797276 her class is how to stamp on fabric. I decided to play along and created this:


I started with a sheer curtain panel of curtains I am not using anymore. :) I had visions of Carol Burnett playing Scarlett OHara on her show wearing that curtain rod dress.

I stamped the damask background using my StazOn ink and heat dried it right away. The curtain is made from a nylon so I was very careful to keep my heat gun farther away to prevent melting. I did have some melting when I embossed. I stamped the entire piece with versamark and heat embossed using some iridescent clear embossing powder to give it the glimmer.

The butterfly was created usign the same material only I embossed the outline with a pearlescent blue embossing powder. Then I sprayed purple and blue glimmer mist over the image and let it dry. I than covered the entire image with versamark and embossed using clear iridescent embossing powder.

I used the leftovers from my border punch to accent the corners of my damask background.

Products:

  • Impression Obsession - Lofty Dreams
  • Hero Arts - Heart Winged Butterfly
  • Stampabilities - Tapestry Background
  • StaZon - Hydrangea Blue
  • Stampendous Pearlustre Sapphire
  • Jo-Ann CraftEssentials Iridescent Sparkle
  • Versamark Watermark Ink Pad
  • EK Success Border Punch
  • Pearls - Crystal Stickers

Thanks for stopping by...

Suzz


Monday, April 13, 2009

Stone Soup...

The stone soup story tells how you start with a stone in a bucket of water and keep adding things until you get soup. Well this card started like that. :)


This started from an inked background which I honestly don't remember if I used my glimmer mists or ranger dye re-inkers on acetate to make.
  1. Apply bleach on acetate and ink(bleach?) a flourish stamp and stamped randomly over the background.
  2. Ink flower stamp and dragonfly with StazOn and stamp over the background.
  3. Sponge green dye ink randomly.
  4. Versamark the entire surface and emboss using incadescent embossing powder.
  5. Repeat the process for the sentiment background.
  6. Stamp sentiment on vellum.

Products:

  • Stampendous - Retro Happy Birthday
  • A Stamp in the Hand - Tall Poppies
  • Stampabilities - Dragonfly 02
  • StazOn - Azure
  • Ranger Distress Ink - Shabby Shutter
  • Paper Inspiration - Floral Flourish

Thanks for stopping by...


Suzz

Friday, April 10, 2009

I have been ink deprived...

I have had so much going on at home this week, that I have had very little time to work on projects. I created this project for the Hero Arts weekly challenge http://heroarts.com/blogs/club/2009/04/06/motivation-mondays-beyond-paper/ which is anything but paper. (Stamp on anything but paper) and the CPS challenge. http://cardpositioningsystems.blogspot.com/2009/04/cps110-sponsored-by-hero-arts-part-3.html

I have been dying to play with my grungeboard paper and decided to create some flowers. Here is a close up of the flower:


The flowers were created by using the scallop punches and punching out grungeboard paper.


After the circles were punched spray Tattered Angels Glimmer Mist on the grungeboard. Both sides took some of the glitter but only one side took the color (Non-textured side). Take an Adirondack Dye Ink pad and smear directly on the scallop. Stamp the birthday DesignBlock from Hero Arts using an Orange StazOn ink.

After that was all done and dry, cut slits around the scallops towards the center.


Fold the flower in half and put a glue dot in the fold. Fold the flower again in half and put another glue dot in the middle. Roll edges of flower outword by rolling on petals with pencil to curve.

The butterfly is also made from grungeboard. The image is stamped using StazOn ink and colored over with a permanent marker to get a darker effect. The inside of the butterfly is colored using alcohol markers (Copic). I only have a few colors to I didn't have the opportunity to do too much shading on the butterfly.

Products:

  • Hero Arts DesignBlock - Birthday
  • Hero Arts - DesignBlock - WoodGrain Pattern
  • Hero Arts - Fanciful Filaments
  • Hero Arts - ClearDesign Birthday Expressions
  • Hero Arts - Heart Winged Butterfly
  • Hero Arts Shadow Ink - Soft Sand
  • Ranger Distress Ink - Shabby Shutters
  • StazOn - Pumpkin
  • Fiskars Shape Express Cutter
  • Fiskars Circle Template

Thanks for stopping by....

Suzz

Tuesday, March 31, 2009

Happy Blog Birthday Hero Arts...

Hero Arts Challenge http://heroarts.com/blogs/club/2009/03/30/its-a-one-derful-day/ this week is single layer cards and they are celebrating their anniversary of their blog this week. Lot's of fun activities on their blog this week.

Kiara is also hosting a challenge on her blog http://http//stampingcafe.blogspot.com/2009/03/one-layer-monday.html for a single layer card.

The Hero Arts flickr group had a thread about single layer cards and we mostly agreed that we start with single layer card when you first stamp and move up to the multiple layers and fix things by adding layers when we make a mistake. :) So this week will be interesting to see what people come up with.


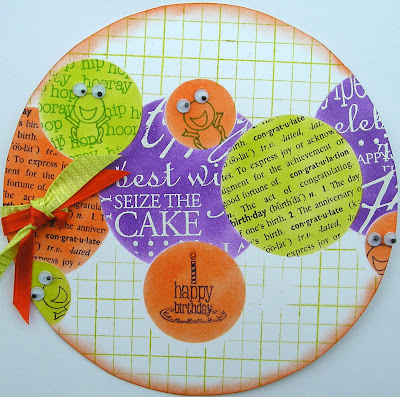
So here is my single layer card. Two things about this card...

One: it is for my eleven going on twelve year old daughter's birthday which is next week.

Two: Her room is painted in purple, green, and orange with circles... We used the same techniques as applied on this card in her room.


This take a little planning and laying out before starting. This was my template:
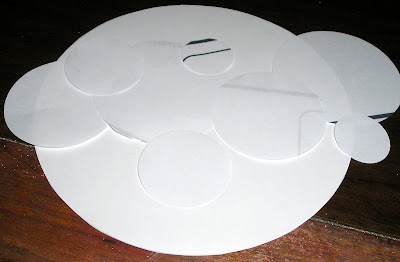


Recipe:
  1. Punch out all circles from a piece of copy paper. You need to use thin paper to help with the masking and reverse masking. I cut multiple circles in each size to allow me to play with placement.
  2. Keep the circles and the sheet you used to punch them from.
  3. Lay out your circles with overlaps where you think you want them. After you position them where you would like them and how you would like to overlap them...
  4. If you can keep your template with circles laying there as a guide and use another circle to work on.
  5. Start with your full circles and where you want them placed. Lay the piece of paper with the punched out circles and lay it on your card where you would like the circle positioned. Sponge or brayer the color for that full circle. Do this for each top circle/full circle on your card.
  6. Partial circles or underlapping circles. Lay the circles scraps on already sponged circles to protect them. (If you have repositionable tape you can lightly tack them in position.) Postion them exactly on top of the sponged in circle. Now take your sheet with the punched out circles and lay where you want the next circle to be sponged. Sponge the next color in the circle.
  7. Continue this until all your colors are sponged on.
  8. Repeat the same process but now stamp your images in using the same methods. Cover the circles you don't want to be stamped on and use the sheet with the punched out circles to mask surrounding areas.

Thanks for stopping by...

Suzz