Wednesday, July 31, 2019

Marvellous Metallics

It's Wednesday,  which means another fun Funkie Junkie Boutique Challenge!  This time around it is hosted by the brilliant Jenny Marples.   She has challenged us with Marvellous Metallics and here is how she describes the challenge:

"There are so many ways to add metallics to your projects, from embossing powders and pastes, metallic finish cards and foils, metallic inks and paints to metal embellishments. And you can leave them untreated for a touch of glamour or alter them for an aged or more grungy look. Show us how you like to use metals on your vintage or shabby chic projects."
Sizzix Geo Insects Stamperia Wonderland Prima Marketing Metallique For The Funkie Junkie Boutique

Because I have been using gold so much recently I wanted to use silver.  I pulled out my silver paint and the jar wouldn't open.  I tried a few times but decided but was too lazy to get up and run it under hot water to loosen the top.  I quickly decided that it would have to be the gold. :)

The beautiful Stamperia Wonderland paper has been sitting by my desk patiently waiting for me to pick it up and use it.   I looked through the pages and was enchanted by the paper with the beautiful flourishes.
Sizzix Geo Insects Stamperia Wonderland Prima Marketing Metallique For The Funkie Junkie Boutique

I thought wouldn't this look lovely with a metallic highlight painted on?  Hence the silver and gold paint choice. 

I opened the jar of paint and used a paint brush to add thick strokes of gold on the edges.  I love how the little touch of gold on edges make the background sing.

Sizzix Geo Insects Stamperia Wonderland Prima Marketing Metallique For The Funkie Junkie Boutique


I pulled out my geo insects and die cut one from aluminum foil.  I always strengthen my foil by putting it onto cardstock first.  I cut it out and then painted it with the same gold paint.  I heat set the paint which helped add texture by bubbling the paint on the die cut.  I then pulled out some accessories that received metallique rubs and paints. 

Please go check out everyone's fabulous art on the team and then come join us in the fun! 

The winner will earn a chance to be a Guest Designer at a future date here at The Funkie Junkie Boutique blog, and everyone who enters and follows the rules will go into the draw for the chance to win a $25 spending spree at The Funkie Junkie Boutique. There are also Top 3 Badges for three additional outstanding entries, chosen by the Design Team.


Thanks for stopping by!


Suzz


Products (Links to The Funkie Junkie Boutique)
Stamperia Wonderland Paper
Sizzix Thinlits Tim Holtz Volume 2 Geo Insects 
Metallic Embellishment 
Idea-Ology Tim Holtz Word Bands
Prima Marketing Art Alchemy Metallique Wax Vintage Gold
Prima Marketing Art Alchemy Metallique Ancient Coin Acrylic Paint
Ranger Silver Foil Cardstock

Wednesday, July 24, 2019

Birthday Candles!

Hi!  The summer is flying by here!  I can't believe we are near the end of July!  The birthday parade is still happening this month so a perfect time to share a few projects with the new Darkroom Door Eclectic Stamp - Candles!

Darkroom Door Eclectic Stamp Candles Rubber Stamp Set Simple Sayings Vol 1 for DarkRoom Door
 I love the simple pattern of them and the fun polka dots!  I started by creating a few mini bags for either party favors or gift cards!   I used a die to cut out the bag shape which required some simple scoring and taping together.  I used a larger paper bag as my material.

I then left them flat and unfolded to play around with the surfaces.  One was painted white acrylic paint on the surface with a splattering of pink dye ink.  The other was stamped with white acrylic paint.   I did the same thing on both sides of the bag. 

I then took out some tissue paper and stamped the candles multiple times on the tissue paper to use as filler for the treat bags.

To add a little whimsy I created mini tags and stamped the happy birthday sentiment.  (I could have used the Thank You sentiment for party favors.) 

I also wanted to create a bigger tag to use as a gift card holder. 
Darkroom Door Eclectic Stamp Candles Rubber Stamp Set Simple Sayings Vol 1 for DarkRoom Door

 I stamped a fun frame stamp first onto the tag and then stamped the candles inside of the frame.  After that I added the sentiment on the top.   I had a leftover sentiment on a piece of cardstock that made a perfect gift card pocket on the reverse side.


I then just stuck the tag inside of the bag to give as a gift with a gift card for a local restaurant.  The recipient is going to be very happy!

Darkroom Door Eclectic Stamp Candles Rubber Stamp Set Simple Sayings Vol 1 for DarkRoom Door

 After I played with the pinks and hints of purple I wanted to play with blues and greens and these two cards formed themselves!

I pulled out the Rubber stamp Set Stars and started stamping stars in a mix of green and blue.  I then stamped the candles in the same colors.  I cut them out and started layering and mixing them up.
Darkroom Door Eclectic Stamp Candles Rubber Stamp Set Simple Sayings Vol 1 Rubber Stamp Set Stars for DarkRoom Door
I thought wouldn't it be fun to give a candle background inside of the outline star.  I stamped a series of the stars and stamped over them with the candles.  I then just cut out the stars that I wanted to use and paired them with a coordinating candle.

I inked up some twine and colored some sequins with alcohol markers to coordinate.  The cards probably took me a lot longer in composition than anything I did for the individual pieces. ;)

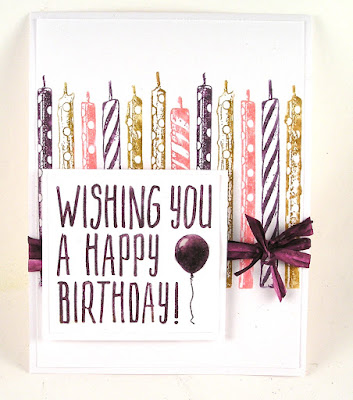
I then decided to try a pretty violet color and did a layering of candles with a simple sentiment.

Darkroom Door Eclectic Stamp Candles Rubber Stamp Set Simple Sayings Vol 1 for DarkRoom Door

I stamped the candles multiple times across the card base.  I stamped the candles on another piece of cardstock and then cut them out.  I added a hint of shadows on the base card with a gray watercolor pencil and a waterbrush.  I pop dotted the top layer and alternated the candles. 

The final touch was to add the stickles to give light to the candles! 

Darkroom Door Eclectic Stamp Candles Small Stamp Birthday for DarkRoom Door
I wanted to finish with the card I shared the other day to show how fun it is to use markers to color the candles different colors. 

Thanks for stopping by!

Suzz

Products:  (Linked to Darkroom Door Site)
Darkroom Door - Eclectic Stamps - Candles 
Darkroom Door - Rubber Stamp Set - Stars
Darkroom Door - Rubber Stamp Set - Simple Sayings Vol 1 
Darkroom Door - Frame - Emulsion
Darkroom Door - Small Stamp - Birthday
Ranger Archival Ink - Violet, Thistle, Magenta Hue, Forget-Me-Not, Leaf Green
White Acrylic Paint
Staedtler Watercolor Pencils
Waterbrush
Copic Alcohol Markers
Sequins
Twine, Raffia
Ranger Distress Watercolor Markers
Stickles

Wednesday, July 17, 2019

It's Heating Up!

Hot, Humid, Sunny....  The rain has finally moved on for a bit but the humidity is sticking. :)  I am hosting the challenge at The Funkie Junkie Boutique Challenge blog this time around and I picked our new challenge:  "It's Heating Up!".

Here is my description of the challenge:

"July is when the weather here in the Midwest really starts to turn warm and muggy. This is the inspiration for our challenge to interpret the heat with using one or more of the following colors: Yellow, Red or Orange. Your challenge is to create a vintage or shabby chic project where the main color is yellow, orange or red. I can't wait to see how you turn up the heat in your art!"

Stampers Anonymous Entomology Ranger Tim Holtz Layering Stencil Honeycomb For The Funkie Junkie Boutique

The heat had me thinking of long summer days with the flowers in bloom and the bees hovering over their buffet of flowers to partake from. 
 From my wide range of stencils, I selected a variety of summer inspired shapes and started playing with the yellow sprays, embossing paste and browns. 
Stampers Anonymous Entomology Ranger Tim Holtz Layering Stencil Honeycomb For The Funkie Junkie Boutique

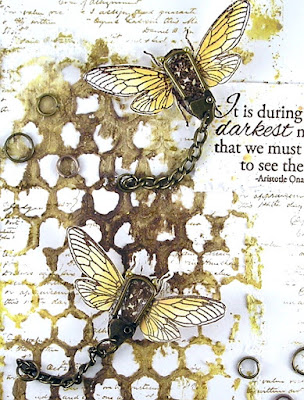
 I was playing around with trying to create an embossing paste honeycomb with a mix of sprays.  I pulled up my stencil and the back of the stencil had the most beautiful mix of embossing paste, yellow and brown inky mess.

I quickly laid that down onto a piece of mixed media paper and what fantastic mix of texture and color.  I loved this more than the embossed pieces I created. (Never fear they will stay in the scrap pile to pull out for future fun!)

After that this just seemed to come together quickly because of course we needed some type of bug to crawl over our beautiful texture.  I stamped them with brown ink and embossed with brown embossing powder. 

I then added a hint of the entomology script over the background.   The bugs were colored with a hint of yellow distress oxide spray.

Stampers Anonymous Entomology Ranger Tim Holtz Layering Stencil Honeycomb For The Funkie Junkie Boutique

What a beautiful quote by Aristotle Onassis and a perfect match with the yellow hues found in the wall hanging.
Stampers Anonymous Entomology Ranger Tim Holtz Layering Stencil Honeycomb For The Funkie Junkie Boutique
 The bugs were cut out and pop dotted to give them depth.  They needed something to make them stand out even more so they were given a fun bod with tail to give them more movement.

I hope this has  you thinking about how you can play along in the challenge with the colors of summer.

 The winner will earn a chance to be a Guest Designer at a future date here at Frilly and Funkie, and everyone who enters and follows the rules will go into the draw for the chance to win a $25 spending spree at The Funkie Junkie Boutique. There are also Top 3 Badges for three additional outstanding entries, chosen by the Design Team.

Thanks for stopping by!

Suzz

Products:
Stampers Anonymous - Entomology
Idea-Ology - Tim Holtz Display Hanger
Bronze Jump Ring Set
Idea-Ology - Tim Holtz Swivel Clasps
Idea-Ology - Tim Holtz Index Clips 
Ranger Tim Holtz Layering Stencil Honeycomb
Wendy Vecchi White Embossing Paste
Ranger Distress Oxide Spray - Fossilized Amber 
Ranger Distress Ink Spray - Walnut Stain
Ranger Archival Ink - Potting Soil 
Stampendous Brown Embossing Powder
Idea-Ology - Tim Holtz Quotations Metallic Stickers
Inky Antics - Darkness and Light Stamp

Saturday, July 13, 2019

Saturday Showcase at The Funkie Junkie Boutiqe Challenge

Howdy!  Hope your Saturday is treating you right!  I am sharing a Saturday Showcase of the Stampers Anonymous Fragments Stamp over on The Funkie Junkie Boutique Challenge blog today!

Here is one of the projects I was working on for the showcase:


I had so much fun pulling out scraps and pieces left over in my stash to create a variety of art using the fragments stamps!

Pop over to the blog to see the rest of the projects I created!

Thanks for stopping by!

Suzz

Sunday, July 7, 2019

Happy Birthday!

Hi!  Happy Birthday to all you July Birthdays!  We have a big month of birthdays in July in our family.  This month had me working in overtime creating cards!  Lucky for me I had the new Darkroom Door Birthday stamp to help inspire some of my cards for this month.

My first inspiration was to play with the coordinating Darkroom Door Candles stamp and create an overlapping sentiment with the fun birthday candles. 

I colored the candles with watercolor markers and spritzed with a little water and stamped them.  I repeated the colors and did it again to give me a fun row of candles. 

Next I colored the sentiment with the same markers and stamped onto cardstock. I cut the sentiment out and layered it up. 

I then found some white raffia and colored it with the same markers to coordinate and wrapped it around the card front and tied it.

My final touch was to add gloss to the balloon and pop dot the sentiment over the raffia.  A quick and easy birthday card!

 My next card I wanted to add one of the sweet birds from the new bird life set.  I stamped him first in the corner.  I then masked the balloon on the sentiment with a post - it note and inked up the sentiment. Pulled off the post-it note and stamped the sentiment. 

I liked the idea of the balloon, that inspired me to cut a slit under the beak of the bird.  I colored some coordinating twine and inked up cardstock with the same colors.  After that I drew a balloon and cut it out to coordinate.  (I originally tried the balloon on the sentiment but it was very out of proportion and I had to hand draw mine. :)

I colored the bird with some watercolor pencils and a waterbrush.  Another sweet and simple card for a family member.

Next up a little Fireworks inspiration!  This card took me quite a few tries as I was trying different ideas to get the fireworks to light up!  

I actually created this sentiment for the first card but didn't like how the ombre effect didn't pop with the candles.  Hence the ombre background on the card with the fireworks to coordinate.

I ended up creating three versions of the ombre with the fireworks.  This version was my favorite.  I stamped the fireworks on white cardstock with versamark and heat embossed it with clear embossing powder.  

I then sponged the three distress oxide inks over and blended them together.  I used dry paper towels to brush off the excess ink and brighten the fireworks.  I added a few tiny gems for pop of sparkles.

Last but not least was a simple flower card with the fun sentiment with the balloon masked again.

I inked up the daisy stamp with distress oxide ink around the edges and colored the center with a marker and spritzed with water.  I stamped off the image a few times to get a softer image on the background.  I repeated with the script and butterflies. 

I then stamped the sentiment over the stem with an archival ink. 

Thanks for stopping by!

Suzz

Products:
Darkroom Door Small Stamp - Birthday
Darkroom Door Eclectic Stamp - Candles
Darkroom Door Eclectic Stamp - Daisy
Darkroom Door Texture Stamp - French Script 
Darkroom Door Rubber Stamp Set - Bird Life 
Darkroom Door Rubber Stamp Set - Wings 
Darkroom Door Rubber Stamp Set - Celebration
Ranger Distress Markers - Seedless Preserves, Crushed Olive, Worn Lipstick, Gathered Twigs, Fossilized Amber
Ranger Distress Oxides - Seedless Preserves, Crushed Olive, Worn Lipstick, Fossilized Amber ,
 Gathered Twigs
Ranger Archival Ink - Jet Black, Peat Moss
Versamark Watermark Ink
Clear Embossing Powder
Twine
Raffia
Ranger Glossy Accents 
Tiny Gems
Staedtler Watercolor Pencils 


Wednesday, July 3, 2019

Water, Water, Everyhwere

Hi!  A little surprise here... We have changed up the challenges a bit and Frilly and Funkie and now you get to see the whole team's art all at once.   The talented Cec is hosting the new challenge which is called Water, Water, Everywhere.  She describes the challenge as:


"Often when people go on vacation there is water involved – fishing, cruising, checking out the aquarium, enjoying water sports or playing in the sand at the beach. For this challenge I want you to create a vintage or shabby chic project that reminds you of one or more of these past times"

I thought about the water in the summer time and I was drawn to the ocean and wanted to see if I could create a vision of the ocean using alcohol inks.

Stampers Anonymous stuff to say Ranger Alcohol Inks Yupo Paper For the Funkie Junkie Boutique
 I had so much fun with this!  I wish I had a huge canvas of Yupo paper and could create this for my family room!

I started with some lovely translucent Yupo paper as my base.
Stampers Anonymous stuff to say Ranger Alcohol Inks Yupo Paper For the Funkie Junkie Boutique
I started with laying down the indvidual colors in each section with drops of the color and the blending solution on the felt.

I smeared the colors across the sections.  I then went back in with a tiny bit of ink to blend between the sky colors. 

In the blue and brown areas I added a few drips of darker colors on the felt and dabbed them on randomly to get the pops of dark color.

To add the waves I put blending solution along the edge of a piece of felt and picked it up and used it to smear some wavy lines in my water. 

I finished off with some blending solution drops to add bubbles along the top of the water line.  I also splatted some white paint over the water as frothy bubbles.

I then stamped the sentiment on the top of the tag and mounted it on white cardstock. 

Stampers Anonymous stuff to say Ranger Alcohol Inks Yupo Paper For the Funkie Junkie Boutique

I found the cutest brass charms to add as an accent but painted them white to coordinate.  I wanted to add more to my tag but didn't want to cover up my scene I had created. :) 

Please check out the design team's fabulous inspiration and play along with us!   The winner will earn the chance of a Guest Designer spot at Frilly and Funkie, and everyone who enters and follows the rules will go into the draw for the chance to win a $25 spending spree at The Funkie Junkie Boutique. And there are Top 3 Badges for three further outstanding entries, chosen by the Design Team!

Thanks for stopping by! 

Suzz 

Products: 

Tuesday, July 2, 2019

Heart of Art

Salutations!  I have been busy playing with a new stencil from Darkroom Door the Small Heart Stencil.


The stencils are fun because they come with the cut out opening but also with the reverse mask!  I used it on this tag to protect my heart after I created it.

I started with using the heart stencil to layer a second stencil under the heart opening and then using embossing paste to create a heart shape of the first stencil.

I let the embossing paste dry and then placed the heart over the textured letters and misted with a mix of distress oxide sprays.

After that dried I used a black pen and charcoal pencil to outline the heart.

I then masked the heart and stamped the pencils along the side of my tag.  I came back with the original creativity stencil and put post it notes around the words create art and used black embossing paste to add the words along the top.

I finished it all off with a splattering of mists and using the texture stamp I added some black spots.

I love how graphic this design was.  But I was off playing with other ideas that were much cleaner in composition.


I wanted to use the beautiful Part of You Quote as the focal point and then just add a soft shaded  heart around the center to accent the heart section of the quote.  I love hos simple this is and how it makes the quote shine.
 

As I looked through my many Darkroom Door stamps this little robin popped out at me.  I decided he would be the perfect fit inside the heart.

I laid out the heart in the center of my card and stamped the robin over the opening.  After I stamped the robin I sponged antique linen around the edges.

I then added a little shading around the outside of the heart with a water color pencil.  To add the script I used the mask to cover my stamped bird and sponged heart.  I then used the script stamp to stamp over the masked heart to give me a background of stamping.

I finished off the sweet bird with a little bit of thread with a button and a lovely little sentiment. 

 I wanted to share a few other things I was playing with by layering stencils. 
I first stenciled the creativity in a blue dye ink and then came back with the stencil and sponged the hearts with antique linen randomly over the surface.
I wanted to show you what the stencil and mask look like and you can see the remnants of my projects on the stencil/mask.  I will need to use some stamp cleaner to clean them up later. :)

I have my last two projects which both use the same quote and splattering but two different effects  with the stencil. 
 On the first one I stamped the Wordblock stamp through the stencil and then sponged a lovely pink over the words.  I then outlined the heart with a black pen and watercolor pencil.

The second one uses the same quote but the heart contains an embossing paste stenciled words with a distress ink spray over the image.

Well I hope you have enjoyed the tour of hearts today!  I have included links to everything from Darkroom Door below in the products list.

Thanks for stopping by!

Suzz

Products:
Darkroom Door - Small Heart Stencil 
Darkroom Door - Medium Creativity Stencil
Darkroom Door - Quote Stamp - Part of You 
Darkroom Door - Eclectic Stamp - Robin 
Darkroom Door - Eclectic Stamp - Pencils
Darkroom Door - Texture Stamp - French Script
Darkroom Door - Texture Stamp - Splatter
Darkroom Door - Wordblock - Love
Ranger Distress Inks - Broken China, Antique Linen
Ranger Distress Oxide Inks - Picked Raspberry
Ranger Archival Ink - Jet Black 
Ranger Distress Oxide Sprays - Picked Raspberry, Fossilized Amber 
Ranger Distress Sprays - Picked Raspberry
Watercolor Pencils
Watercolor Brush
Sponge / Applicator