Saturday, December 31, 2011

CR84FN45 - Never Stop Going

 Happy New Year!  We are welcoming in the new year at CR84FN with some bright and bold colors!  I used the Card Patterns Sketch #146 for my layout.


I was lucky enough to get to play with the new Our Daily Bread Designs -  January Release.  There is this fantastic grunge Butterfly image with coordinating die and background stamp. 

I started with an ink based background using Rusty Hinge re-inker and Tattered Angels Glimmer mist.  I spritzed the glimmer mist onto the craft mat and dripped in the re-inker.  I then used my plastic ruler to smear the two together on the craft mat. I then pulled out white cardstock and dragged it across the inky mat to pick up the colors. 

At the end of the smears there are always drips and drops of colors and I pick those up with a new piece of cardstock.

The main image was stamped over one of the pieces I created in my inky process.

The butterfly image is stamped on the inked background using StazOn Azure.  I then re-stamped the butterfly only in Rusty Hinge.  I stamped the overlay details of the wings of the butterfly on acetate using the StaZon Azure ink. The die cut will cut the shape of the butterfly so I was able to die cut all my butterfly pieces.

The backgrounds were created by stamping the small butterflies using Azure and smearing over it with white acrylic paint. The second background piece is from the ink smearing.  The lovely sentiment comes in another new set being released this week at ODBD.

The CR84FN challenge is back to the regular schedule which means this challenge will run for two weeks.  Here are the beautiful colors for this week. The pictures are provided by  Deborah Frings

For all the details on the challenge this week go to the CR84FN blog. 

The wonderful CR84FN Design Team:

Deborah Frings * Sue Lelli  * Andrea Matthews *  Stephanie Kraft * Suzanne Czosek (me)  *  Heather Jensen * Mona Pendleton  * Lisa Somerville *

Happy New Year!

Suzz

Friday, December 30, 2011

A Year in Review

I love when people do a year in review as it brings back beautiful projects they have done. I decided to go through the months and grab some of my favorites from the year. Disclaimer... This is a really long post! Lot's of pictures and I hope something enjoyable to wander through... I love seeing all the different styles, techniques and fun things I learned this year. 

I created this back in January for Memory Box.  I love the layers of flowers, stamping and embellishments. I looked through my January folder and it was 70 percent pink and gray color combinations. :)

For this card I remember using up some scraps of beautiful black, grey and white papers with creating a shimmery heart as my focal point.  The verse (Verses Rubber Stamps)  is one of my favorites and I must have used it so many times this year.


This card was created for the Moxie Fab Challenge to use tissue tape in an innovative way.  It didn't win but still is a favorite of mine as I loved how the copics colored on the tissue tape!
The next was my blog header created in the spring/summer which I get to use some of my favorite flowers and butterflies from Hero Arts.

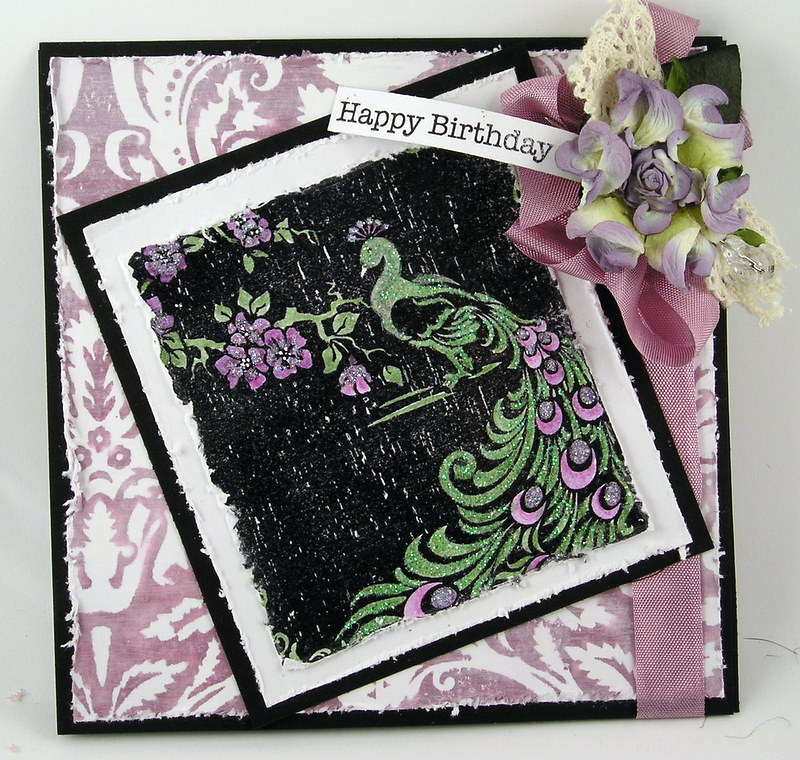
I love this background stamp from Hero Arts and love adding color to the peacock and glitter!

I am a big fan of the Lucie Attwell images from Artistic Stamper and had to include one of my cards with with one of her sweet images:


I was able to play with this lovely butterfly bush from the Faith set at Our Daily Bread and decided to make a die cut easel card and I loved how this design turned out:
This was a piece of lovely pattern paper which I mixed some Hero Arts and Verses Rubber Stamps together to create a summery flowery scene. This was another quick and easy card.  I wasn't sure about it when I was done but it grew on me. : )


This card started with an unusual sketch with two circles. The sketch inspired me to use the Artistic Outpost timepiece as one of my circles and a similar AO image should be used in the second circle.
The next piece uses a Sparkle Rubber Creations image on a cute bookmark.  My girls loved this!


This one was fun for me as I love designing small grids and blending the colors, images and sentiments together into a hopefully cohesive card. 

The next was a set of three bird houses which were very fun to create!  I love the color combination on this birdhouse and will probably re-visit the birdhouses again.


This one was a struggle and so not my usual style. I was pleased with how it ended up and we gave this to my daughter's teacher for her Christmas gift and she loved it as she rides a motorcycle and has actually rode her motorcycle to some of the places on the map! 

The next was a card using the Whimsical Melange plate from Artistic Outpost. The plate has these wonderful house shapes and they are perfect for birds as well as frames for other images. I enjoyed the unusual design along with the litter banner around the circle.

This was created at the same time and I love the ruler in that plate and decided it would make a fantastic background.
This next card was a easy design just a leaf layered on some beautiful Memory Box paper. Some of my favorite designs come from scraps of die cuts or pattern paper which I play around with for a design first. That is what happened with this card. Layering the papers and then adding the focal image.

This fall thank you card was all about the distr4ess inks and techniques. I played around with some inks and layering of the leaf images.  I added a frosty painting to some of the leaves to give them a washed out effect.


The next card using the dragging of the inkpad across the paper to create a faux wood effect. Love how this creates a rustic background quickly. The Stampendous flower was so beautiful and easy to pop into the corner with a few flourishes.


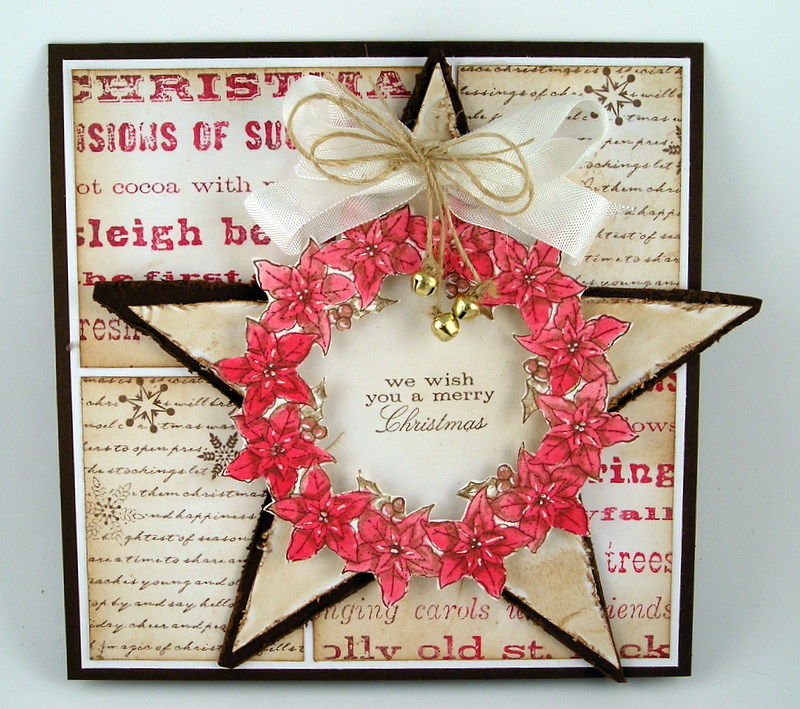
I have a fascination with the star shape and used that with a wreath on this card which I love the effect. The background is a repeated pattern of a few different Memory Box stamps. Love how the star showcases the wreath and the background showcases the star.


I had to share one alcohol ink background as I love playing with the alcohol inks and the effect of the inks on glossy cardstock is so beautiful. This just highlights a warm and rich background with a simple sentiment. So not only did I get to play with my inks I also ended up with a masculine birthday card!

This just showcases a lot of my favorite things: The paper flowers, glimmer mists, distress inks and layering textures, images and papers all together.


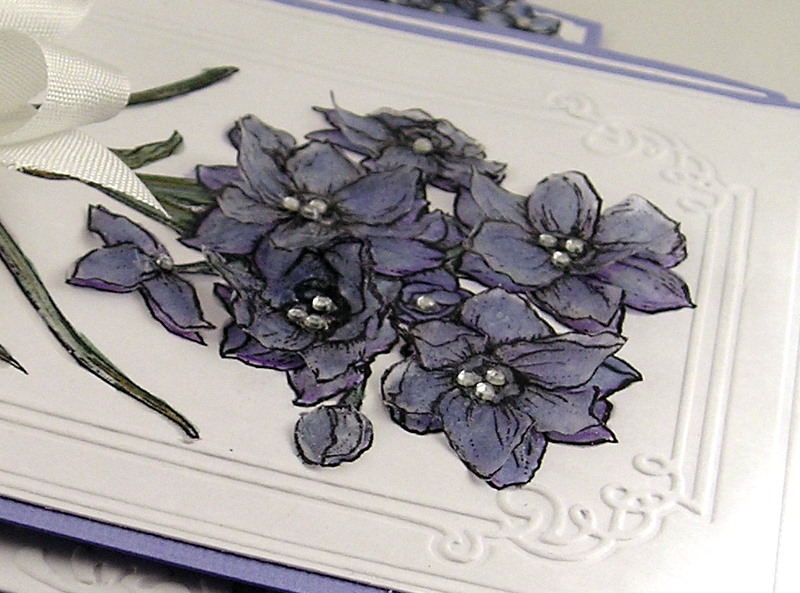
This is one of my recent cards using the white on white and a verse.  I love the softness of the monochromatic card and the tissue paper flowers.
This next card was created for ribbon challenge where I was given four different ribbons and asked to show them all on one project.  I love how the ribbons created the banner and effect across the front of the card.
My last three projects were my blog header for winter and a few of the tags for tim's twelve days of tags.  His techniques really inspired me to play around with some new toys and I had a blast.  Of course I used some of my old favorites of glimmer mists, embossing and glitter.


 Sorry my year in review was such a long post.  I had fun re-visiting my projects and actually was surprised by how many I loved from this year. :) 

The majority of the stamps here are from: Memory Box, Hero Arts, Stampendous, Artistic Outpost, Chapel Road Artstamps, Verses Rubber Stamps Our Daily Bread Designs, The Artistic Stamper, Lily Bee Designs, Sparkle Creations Rubber Stamps.

Have a wonderful day! 

Suzz

Thursday, December 29, 2011

A Touch of Pink

A combination of three challenges today: City Crafter a Cut Above, Mojo Monday #221 and ColourQ #117 to create my card.  I have a nasty cold and it is slowing me down this week.

I used some of my favorite Memory Box stamps to create this and pink as my pop of color for the ColourQ challenge.  (Birch Branch Print - G1720, Flower Bundle - E1321, Alpha Background E996, Happy Birthday Candle - C1373)

The background was created by stamping the alphabet multiple times using black ink and not re-inking to allow variations in the hues of the letters.  I added a layer of white acrylic paint to soften the background.  The edges were sponged with black dye ink. 

A layer of tree branches and flowers were added over the background using black ink.  

A simple card for me. :) 

The color palette:
 The sketch:
Have a wonderful day!

Suzz

Tuesday, December 27, 2011

Think Lovely Thoughts

The challenge at Fashionable Stamping Challenge is Travelling.  I thought why not Peter and Wendy?  They certainly traveled a great distance to NeverLand. "Second Star to the right and straight on til Morning".

I used the Artistic Outpost Loverly London plate and the Artistic Outpost Neverland  to create a view over London with Peter and Wendy talking about flying as the levitate over the city.

The city was created by stamping the image multiple times and coloring with a touch of watercolor. Then I layered the images and pop dotted them to give additional depth. After that was done I trimmed them off to conform to the edge of the circle.

The main images were stamped using black archival ink and colored using watercolor pencil.  They were cut out and pop dotted onto the background.

We are just starting to wind down on the holiday festivities and getting in some fun family outings. Also sneaking in some stamping time with some good friends!

Have a lovely Tuesday!

Suzz

Saturday, December 24, 2011

Merry Christmas!

 I have been doing quite the clean up in my crafting space the last couple of days. Two big bins of stamps and other items to go to the stamp store garage sale.  During the rummage and cleaning  I found a lovely unfinished  ornament in my alterable items.  

I used one of my favorite retired Hero Arts stamp with the Madonna and child to create an ornament to celebrate the birth of Jesus.

I started with a mistake of course where I got some glimmer mist from the other side of the ornament on the bottom of the image.  I just worked with it and made the background the same blue and luckily it was only around the edges.  

The image was stamped using a black archival ink.  The ornament had no glossy finish so I was able to stamp and color the surface and finish it with a couple of coats of clear embossing powder. I colored with a combination of glimmer mists, watercolor pencils an dye inks.  

The surface was covered with versamark at the end and heat embossed using clear embossing powder. Before I embossed using the clear embossing powder I sponged brown dye ink around the edges over the versamark.  

Now the other side I used a different Hero Arts Christmas set and a much simpler scene: 
Have a blessed Christmas! 

Suzz

Friday, December 23, 2011

Christmas wishes!


I wanted to try coating an image using bees wax.  I had seen this done in a Stampington magazine and loved the effect.

I stamped the image using a water resistant black ink.  Then I colored it using watercolor pencils and a water brush.  I sponged the edges with distress ink. 

I heated up the beeswax in the melt pot and dipped my image in the pot.  I used my tweezers and had to rotate half way through to get wax over the entire surface.  After it was coated I laid it down to let it cool. Then I heated it up with the heat gun to move the wax and dabbed up excess wax with baby wipes.

After that it was just layering and distressing the edges.  I also highlighted the main image with glitter and white gel pen.

Images: Artistic Outpost Snowy Woods Frosty and Friends

Wishing you all wonderful Christmas Wishes!

Suzz

Wednesday, December 21, 2011

Music of Life

The City Crafter Challenge this week is Winter White and I paired that up with the Mojo Monday #220 Sketch.

I love all white cards... They are always beautiful.  Of course I started with an all white card which ended up with a little shading of gray.

Recipe:
1. Stamp background using Memento London fog and one of my favorite Verses Rubber stamps which is the poem by Elizabeth Barret Browning - How do I love thee - QQ0809-G.  The stamp actually is the full poem in a little script and makes the perfect background.
2. Stamp Verses Rubber Stamps Life is the Music on white cardstock using Versafine Smokey Gray.
3. Stamp over sentiment using Cornish Heritage Farms Music background with Memento London Fog.
4. Stamp Music over tissue paper using Versafine Smokey Gray. Die Cut flowers and assemble. Dab glue over flowers and sprinkle with Stampendous Ultra-Fine glitter.
5. Punch Butterflies from leftover music background. Add glitter and gems.
6. Emboss white cardstock with embossing folder. Sponge with gray dye ink.
7. Distress all edges with distressing tool and sponge on gray dye ink.

The sketch:

Have a wonderful day!

Suzz

Tuesday, December 20, 2011

Tag # 13

Simon Says Stamp and Show challenge this week is a Tim Holtz Inspired Tag.  I had bits and pieces left over from the flurry of tag creating for the last couple of weeks so I pulled them together into another tag.
 I had this lovely background leftover from my blog header.  I created it by mixing glimmer mist and chalkboard mist together on white cardstock..  (Patina Glimmer Mist and Decadence Chalkboard)  The next step was to stamp the beautiful swirling snowflake from the Stampendous Jumbo Cling using versamark and embossing with the Stampendous Silver Tinsel.  I then highlighted areas of the swirls using white gel pen.  After that was all done I covered the entire surface with versamark and clear embossed it.  I repeated that several times. 

Then I created a tag shape.  Smeared the edges with versamark and added a layer of gold embossing powder around the edges.  The angel was created last week. But I added to her today.  I stamped her using black ink. Watercolored her with a touch of blue and skin color.  I had her framed in this time piece from Tattered Angels.  I poured a layer of Kaleidoscope embossing powder into the frame and heat embossed from underneath.  I then did the same with clear embossing powder to create a layer of glaze with shimmer.

The rest was just digging through my piles of embellishments to find fun bits and pieces to decorate the tag.

Hope you are getting ready for your holidays. :)  We have school party, cookie party, cleaning etc... But all fun things to get ready for the main event. Thanks for stopping by...

Suzz

Sunday, December 18, 2011

Joy

Today I am posting on the Flourishes blog.    I used the beautiful Paperwhites set to create my card:


I used a fun technique with chalk to paint the flowers.  To see all the details head over to the Flourishes blog. 

Thanks for stopping by!

Suzz

Saturday, December 17, 2011

Stampendous Saturday

I am back today to share another card for the  Stampendous challenge and I used this weeks Mojo Monday sketch #219.

The Stampendous challenge this month is to use the colors pink, brown, cream or gold. Pick at least three of the colors to use on your cards or projects.

This week I played with the beautiful Eiffel Noel image:


The main image is stamped using Ranger Archival ink - Coffee onto Lost and Found - Madison Avenue pattern paper. The background papers are all from the same collection.  The edges are all sponged using brown dye ink and the main panel of pattern paper was sponged with brown dye ink and an edge of Stampendous gold embossing powder was added around the edges. The flowers were giving a dusting of Stampendous Halo Gold Glitter

Go visit the rest of the Design team playing along this week: 

Thanks for stopping by!

Suzz


Friday, December 16, 2011

Winter Wonderland

I combined the Lessology Frame of Life challenge with Simon Says Stamp and Show Depth to create a little winter wonderland scene.
I recycled the shadow box frame from a previous project.  The inside of the box is stamped using the Hero Arts - Snowflakes DesignBlock on white cardstock using brown dye ink.  Then white acrylic paint is sponged over the surface to soften the snowflakes.  The sentiment is from Stampscapes  and stamped in brown ink and heat embossed using Stampendous brown embossing powder.  The trees are from Stampendous and stamped in brown ink and heat embossed using Stampendous brown embossing powder.  The bottom is big flakes of crystal glitter and a few bottle brush trees and plastic deers. The frame is painted with white acrylic paint and rock candy distress. After it dried the snowflakes were stamped using brown ink.  Then the edge was decorated with the vintage silver tinsel. 

Happy Friday! 

Suzz


Thursday, December 15, 2011

O Holy Night

I think I must be creatively stumped after the fun playing with the twelve tags.  I haven't had any inspiration to play in any challenges.  I decided to share one of my cards that was was published last month in the Crafts N Things December issue.  You can find the details here.

Hope your week is going well!

Suzz

Monday, December 12, 2011

Tim's Tags Day Twelve - Peace

I have to say that my favorite tag from Tim is today's final tag.   I love the white and blue colors and the softness of the background.  That is what I tried to bring into my tag today.  I love the 12 days as he is always showcasing different techniques which inspire me to play with my inks, tools and just try something new.


 I have been wanting to use this Stampington angel on one of my twelve tags.  I used the sweet angel image  to replace the doll fragment Tim used. 

Quick run-down on what I did:
  1. Stamp on background of the tag Hero Arts Design Block - Damask using black ink. 
  2. Stamp Cornish Heritage Farms Scrapblock - Music sheet onto tissue paper about 4 times. 
  3. Run tape over the surface of the tag. Layer on stamped tissue paper.  Repeat multiple times tearing excess and re-applying. Cut off excess tissue paper around the edges.
  4. Coat with Distress Crackle Paint.  This caused the tag to bend and warp. So when it dried I attached it to a piece of re-cycled cardboard. 
  5. Stamp angel onto white cardstock. Highlight with watercolor pencils. Versamark entire surface and heat emboss using Kaleidoscope embossing powder. 
  6. Stamp tissue paper with music background. Cut in long strip. Fold every 1/4" back and forth (fan). Tie in center. Trim edges and fluff to flower. Spritz with glimmer mist. Apply glue along edges and glitter. 
  7. Attach frill and tinsel along bottom. 
  8. Cut house shape from thin chipboard. Emboss with embossing folder. Paint with white and blue paints. Apply blue dye ink over embossed areas. 
  9. Stamp O Holy Night and cut. Sponge edges with blue dye ink. Attach to house. 
  10. Pop Dot angel and apply to house. 
  11. Apply dye ink, silver paint to sticker letters.  Apply glue pen and glitter. 
I forgot one little detail. I made a wire halo for my angel.  It is hard to see but so cute IRL!

**** Edited to add *****

I just realized I forgot to pick the winner of my blog candy....  Drumroll please... 
 
Ros said...
How very pretty this is ... love the embossing and those pretty flowers
Have a wonderful day!

Suzz

Sunday, December 11, 2011

Tim's Tags Day Eleven - Frosty the Snowflake

Off to a slow start on Tim's Tags Day 11!   I wanted to pull out the melt pot which involved a little work...
This is my melt pot creation or at least one of them....  I was lucky enough to get a melt pot from a good friend (Thanks Lisa!) although she told me it needed to be cleaned out... I thought I had cleaned it out... not realizing there was a second pan full of bees wax. :)  Until I had heated it up... So my technique ended up using bees wax. :)

Here is the full tag:


I started with a scrap I had made awhile ago from green and blue glimmer mists. I added a layer of stamping with the snowflakes embossed in white embossing powder.  I then stamped over using the music sheet and StaZon blue ink.  I added my forest and birds using brown ink. I then added some snow down on the bottom and on the branches of my trees.

The snowflake is the pinecone die leaves shrinky dinked, coated in bees wax and dipped in crushed glass glitter.  I put them together with a snowflake die as the center.  It is really pretty as it is coated in what looks like frost. 

I wasn't finished yet...


I created a star dipped in white embossing powder and stamped the nativity in black ink and embossed in white. With a stamping overlay of Joy to You definition stamp.

Stamps: Hero Arts, Memory Box, Penny Black

Thanks for stopping by!  One more day of tags... Than back to regular programming.  :)


Suzz

Flourishes - Sweet Peas

I am sharing the card that is being posted over on the Flourishes blog today.

I share a fun technique using the beautiful Flourishes Sweet Peas set and canvas paper.  I had a lot of fun playing with the lovely flowers and my copics.

Have a wonderful Sunday!

Suzz

Saturday, December 10, 2011

Stampendous Challenge - Pink, Brown, Cream and Gold

I am back today to share another card for the  Stampendous challenge!

The challenge this month is to use the colors pink, brown, cream or gold. Pick at least three of the colors to use on your cards or projects.  This month Stampendous is giving away a Amore Frame Perfectly Clear Set  to a random US participant. You don't have to use a Stampendous image or products to play along, but it is appreciated when you do!  You have until Thursday, January 5th at 11:59 PM EST to add your link to the linky tool, and Stampendous will draw a random winner from the US participants.  You can enter as many times as you'd like.

This week I used the lovely Rose Corset image:


I added a little bit of music behind the corset from the Vintage Piano set and the beautiful Fall Tendril in the background.  Everything was embossed using the Stampendous Gold Embossing powder.

The flowers are leftover wax paper from my project earlier this week. Alcohol inks, a gold burnish and the Spellbinders rose dies.
For more inspiration and some blog candy  in the color challenge go check out the wonderful design team and blogstars projects:

Stampendous Impressions 
Taylor Usry 
Pam Hornschu
WendyJordan 
Melinda Gleissner
Krissy Fossmeyer
Jennie Lin Eiger Black
Jennifer Dove
Jennifer Ingle
Wendy Price

I am also lucky as today I get to offer some fun blog candy from Stampendous!  I have a Cling Cold Pair Set to give away.  All you have to do is leave a comment by Sunday Dec. 11th, 2011 11:59 PM CST and I will pick a winner using random number generator!
Thanks for stopping by!

Suzz


Tim's Tag #10 - O Holy Night

Tim's Tag #10 uses some lovely clear pieces with images backed by foil.  I followed his lead and tweaked it a bit to fit my images. I kept my tag very rustic and simple this time as I featured a few stamps with the Madonna and Child.  The image is from a retired Hero Arts stamp which I love. I was so happy to find it in a pile of discontinued stamps.  The other two images are from another stamp featuring the holy family.

I took the clear acrylic tags and stamped on them using StazOn ink.  I then backed them with aluminum foil and applied alcohol inks on the reverse side from where I stamped.  I then sponged a little versamark around the edges and embossed with the Stampendous Aged Gold Embossing enamel. (I love this stuff and I am going to have to order some more as I am almost out!)

The background of the tag is stamped with Memory Box Vintage Christmas Words in black ink and sponged with brown dye ink. I then layered a music sheet torn over the top and distressed everything with the distressing tool and sponge.

I finished it off with the burlap, sentiment and some gold embossed brads.

Thanks for stopping by!

Suzz