Friday, August 18, 2023

By the Numbers

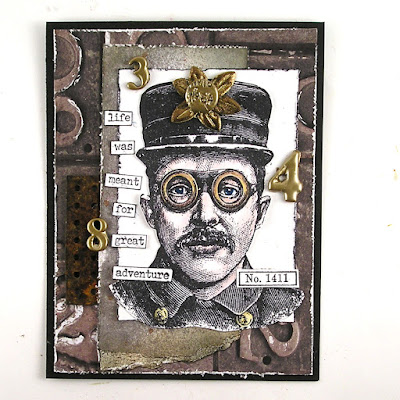
 The Funkie Junkie Inspiration Avenue is focused on numbers and how they can be inspiring!  The numbers had me cutting out numbers, stacking numbers and looking for numbers in patterned papers.

I spent time using left over pieces of cardboard in various depths to cut out multiple sizes and quantities of different numbers.  I made sure I had enough of each number to stack at least 3 of each number.


I taped together the numbers to provide a series of stacked numbers.  Then the numbers were layered and placed randomly over the back of the card base.

The next background used a singles of each number and randomly placed across the backdrop.  Then the background was painted with white acrylic paint.


After a couple of white acrylic paint coats were applied and dried a mix of mica stain sprays were used to apply a shimmery background effect.
This background used a mica stain spray and the antique bronze distress stain spray.  The paint itself provided a layer of texture to the background.

This background used the merry mint along with a distress stain spray to give a mixed patina of green with brown hints.  

The card  used the Halloween backdrops from Tim Holtz to provide the numbers. 


The inspector was stamped using archival ink and then highlighted with color using watercolor pencils.  A remnant background piece spritzed with distress stains was added to layer in a different effect.  A piece of rusty metal (found in a parking lot) was added in the background.  A variety of metal numbers were embossed in gold and added to layer in.  The Inspector's hat got a final touch with a stamped metal piece. 

Thanks for dropping by!

Suzz

Products:

Friday, August 4, 2023

Distressed about Paints?

 Hi!  The new theme at The Funkie Junkie Inspiration Avenue is all about paints.  I love to watercolor and play around with watercolor pencils so I decided to switch it up and use white acrylic paint and showcase how pretty it is when used as a base for other mediums. 

I am a big fan of the Crest layering stencil and I used it to create my various ideas and samples.
 

The first background that was created used the Tim Holtz backdrop paper.  The crest layering stencil was placed on the paper and  white acrylic paint was sponged over the stencil to create a base coat.  While it was still wet fine glitter was sprinkled across the wet paint to add a shimmer to the paint.  

After that additional sprinkling of white paint was splattered across the surface.  Then the entire paint was heated to dry and set the glitter.  

Next a brown distress ink was sponged over the surface and water splatter was added to showcase water spots.  Then some splattering from a distress stain spray was added to add darker water spots.  

After that the background was cut to fit the card front and was accessorized with the beautiful flowers and added to a white card base. 

Next a variety of backgrounds were created on white cardstock, black cardstock and mixed media paper. The stencil was laid onto the surfaces and white acrylic paint was sponged over the stencil to repeat the crest. 

Each white acrylic painted image was treated differently to get a different effect.


For the white on white image I experimented with the crayons and water color pencils.  With the crayon it naturally rubs over the surface and applies a lovely layer of color.  The bottom was rubbed off with paper towel and spritzed with water to soften the effect. This was done without the stencil in place.  It reminded me of being back in school rubbing crayons over leaves under a sheet of construction paper.

The watercolor pencils gave a beautiful soft effect over the white paint.  The water brush was used to pick up the color from the tip of the pencil and then painted over the stencil image.  It created an easy way to blend the various colors together. 

The next project was to see if I could get a lovely shimmer on the black cardstock.

The white background was a perfect foil for the mica stain sprays.  They shimmer on the black background and on the white paint.  

For the next few images the mica stain sprays were applied over the acrylic paint.  The first one was applied while the paint was still wet and the stencil was laid over the painted background while the stain was sprayed over the image.

The stencil was removed and water was spritzed over to spread the color and allow it to pool and blend. 

While the stencil still contained paint and mica stain I laid it on another scrap of paper and used the same paint sponge to drag the color over the stencil and onto the background. 

That effect was much softer and distressed in the image it provided.  Another lovely background to play with.

For my next background the stain was sprayed after the paint had dried.


After all the backgrounds were created I trimmed down the different backgrounds to create different size backgrounds for tags, cards, and other projects.


I hope this has you inspired to pull out your paints and play! 

Suzz

Products: