Wednesday, July 4, 2012

Happy 4th of July!

Happy 4th of July!

Tim's July tag celebrated the 4th with its colors and content.  I loved the technique he used and couldn't wait to try it out.


 Tim's technique used compressed air which I didn't have but that didn't stop me... I pulled out a drinking straw and used a little of my own air.

This was my first attempt at the technique. I have a few other tags I created using the technique which I will share tomorrow and I think I got a little better at my version of the technique with practice.

Recipe:
  1. Spritz surface of glossy cardstock with water. (I mis-read his instructions.) 
  2. drip red pepper alcohol ink onto surface. Blow on with straw. 
  3. Drip cloudy blue alcohol ink onto surface over red area and white. Blow with straw to spread. 
  4. Drip white mixative onto surface blow.  (This didn't work as it was too thick so I added a drop of alcohol blending solution and then blue.  Hence the blended white area.) 
I stamped the Artistic Outpost She-Roes set to get my words and images.  The ribbon was inked up with the alcohol inks and blending solution to fade it a little and mix it up.  I used the white acrylic paint on the ideology charm.

Happy and safe 4th of July!   

Suzz


Saturday, June 30, 2012

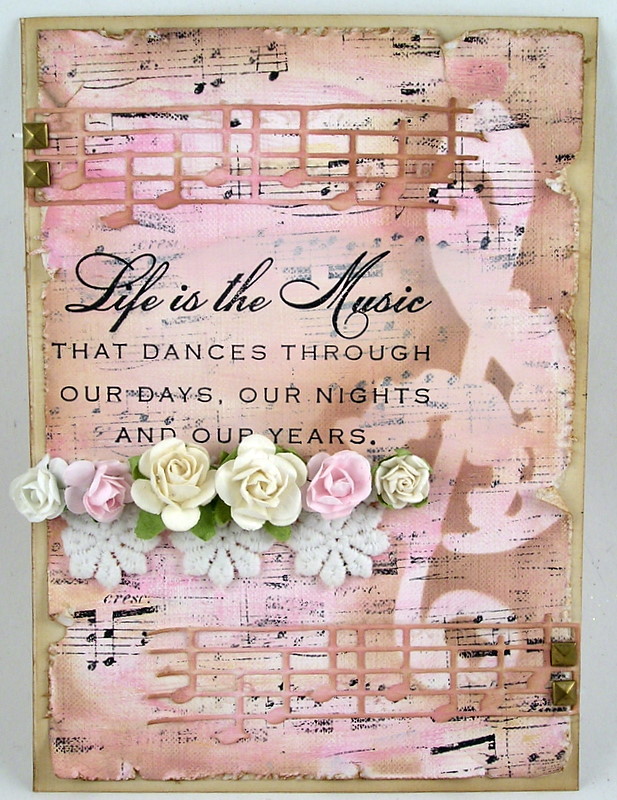
CR84FN57 - Music and Life

A shabby chic card  for the CR84FN57 challenge. 


I started with some fabulous canvas paper.  I painted over with a combination of white and pink acrylic paint. I added a layer of stamped music (Hero Arts) and masked in a Note (Hero Arts Digital Dies). I sponged around the die cut with brown dye ink.

I die cut two pieces of the Memory Box music notes on white cardstock. I painted them pink with the acrylic paint and after they were dry I added a touch of brown dye ink.

I stamped the lovely Verses Rubber Stamps - Life is the Music stamp in black over the surface. (Hint: I added a bit more of paint in this area to allow me to get a more bland surface for the sentiment to really pop.  I acccented it with a touch of lace and flowers.

The edges were distressed with a distressing tool and brown dye ink. I put it on a tan cardbase distressed with a touch of brown dye ink.


Here are the beautiful inspiration photos and colors:

For all the details on the challenge this week go to the CR84FN blog. 

For more inspiration the CR84FN Design Team:
Deborah Frings * Sue Lelli  * Andrea Matthews *  Suzanne Czosek (me)  *  Heather Jensen * Mona Pendleton  * Lisa Somerville * Shannon White* Pauline Pollington

I have truly enjoyed being part of such a wonderful team.  I will be looking forward to future challenges and all the inspiration provided by the design team.

Suzz

Mary Mary Quite Contrary

Today is the last day of the blog hop week with  Stampendous, Clear Scraps, and  Tsukineko. For all the details, head over to the Stampendous Blog, you still have time to enter to win prizes! 

We were provided some beautiful Send It Clear Cards and Clear Scraps Album and StazOn Inks to create our projects.  For my project today I used the Clear Scraps Album to create a garden album.
This is the closed view of the album.  I cut cardstock or pattern paper to fit behind my acrylic pieces to highlight the beautiful colors captured with copics and StazOn.

The cover page has the gorgeous Jumbo Cling HollyHocks stamped using StazOn Stone Gray Ink. This makes the lines softer than if I had used the black StazOn.  I had to flip the acrylic cover over and color on the reverse side using my copics.  If you tried coloring over the stazon the copics would erase the stamped image.  I used a oranges and yellows on the flowers and green on the leaves from my copics.  The beautiful Stampendous Butterflies were stamped using black ink and colored with the same copics used on the flowers.  

Behind the acrylic page I traced a piece of white cardstock to the same shape and stamped the Dream Text using brown ink over the page to provide better visibility to the acryclic page and flowers when closed. When you flip through the album your see all the wonderful effect of the acrylic colored flowers!

The first page of the album:

On this page I covered the chipboard with some beautiful Bo Bunny Paper from the Country Garden collection and added the Cottage Rose flowers using black StazOn ink. I colored the flowers using watercolor pencils and white gel pen highlights.  The butterflies are from Stampendous and are also colored with watercolor pencils. I finished it off with the sentiment stamped with the Altered Type Alphabet letters.


The next set of flowers are tropical and warm... I used the beautiful Tropical Garden and backed the page with Bo Bunny paper in the background.  The images were stamped with black StazOn.


The next page:
On this page again I worked with the Bo Bunny paper in the background and stamped the Jumbo Iris several times using the StazOn black ink and colored with glimmer mist and waterbrush. The sentiment was added with the Altered Type Alphabet.


The last page uses the Stampendous Chrysantheum  stamped in the background using the StazOn Ink - Black.  The flowers were colored on the reverse side using copics.

The pages have all been left open to add pictures, pockets or other details.
To see some other fabulous inspiration hop over to:


Thanks for stopping by!
Suzz

Friday, June 29, 2012

Exciting News!

I am thrilled to share that I have joined the Simon Says Stamp and Show Challenge Design team!  I have enjoyed playing along in the challenges every week and find tremendous inspiration every week. 

I am joining the very talented design team:


  • Anna-Karin Evaldsson
  • Ashli Oliver
  • Candy Colwell
  • Dan
  • May Flaum (team leader)
  • Sandra Mouwen
  • Sarah Engels-Greer
  • Suzanne Czosek
  • Terry
  • Tracy Evans


  • You can see all the exciting new here.

    Thanks for stopping by and sharing in my joy.

    Suzz


    Moxie Fab Birthday Wishes

    July is a big birthday month in our family... I lined up the cards last week for everyone.  I also created this card as a backup to add to our stash of birthday cards and for the Moxie Fab World Birthday Card challenge.

    I used a few simple pieces to put this together.  The butterfly is the new butterfly die from Memory Box which I used the scrap after the die was cut to mask the pattern paper. (Valise)  I sponged the background with brown dye ink to create my shape. I then stamped over the surface with black ink and the Vintage Scroll (Memory Box) stamp.

    The next step was to cut the circle around the butterfly and pop it onto a black card base with coordinating paper and the same slightly larger circle cut out from the center.  Finish it off  with the sentiment popped in the center.  A fairly simple design and a quick card.

    Hope your Friday is fabulous!

    Suzz

    Wednesday, June 27, 2012

    Stampendous & Clear Scraps Blog Hop - Silvery Butterfly

    All this week Stampendous and Clear Scraps are hosting a fabulous blog hop.  Tsukineko also provided some of their fantastic inks to help us ink up our projects.  For all the details, head over to the Stampendous Blog.

    We were provided some beautiful Send It Clear Cards and Clear Scraps Album to play with.  We also received some fantastic StazOn Inks which I love to use.  For my project I used the Clear Card kit to create two ATC's.

    My first ATC:

    For both of my ATC's I used alcohol inks on the clear surface to create a kaleidoscope of colors. The first one uses a combination of pinks, reds, and yellows with a touch of the blending solution.  The key with stamping using the StazOn on the alcohol inks is to let the alcohol inks dry completely and then you can stamp onto the alcohol ink or with the acetate you can flip the ATC over and stamp on the reverse side.

    I stamped in the background using the StazOn - Metallic - Silver and the lovely Stampendous Eiffel Tower Clear set.   I used the same ink to stamp the Stampendous Butterfly on a piece of the clear card and cut it out with detail scissors.  I then smudged the edges with Versamark Watermark Ink and heat embossed using Stampendous Aged Silver Embossing Enamel.  I repeated the same process on the edges of the ATC.

    I stamped the flourish from the Cherub Wishes Perfectly Clear Set  using the Versamark and heat embossed with the Aged Silver Embossing Enamel.  I think I have used that set so many times in so many ways and this little accent was perfect for my ATC.

    I finished the ATC with gem flourishes in the corners and a paper flower with a touch of embossing enamel.

    My second ATC: 
    I crated the background of the ATC using the blue and green alcohol inks blended with blending solution. I flipped it over and this time edged the background with Stampendous Silver Embossing Powder.  The Eiffel Tower was stamped twice.  The first time it was stamped with the StazOn Azure ink pad and stamped a second time with the StazOn Metallic Silver ink pad.  The Stampendous Butterflies were stamped with versamark on the clear card and heat embossed with silver embossing powder.   The Rose Branch was stamped using Versamark ink and heat embossed with silver embossing powder.  The letters were stamped from the Altered Alphabet set.

    To see some other fabulous inspiration hop over to:
    Stampendous Impressions – http://www.stampendousblog.wordpress.com/
    Clear Scraps http://clearscraps.typepad.com/
    Janelle Stollfus - http://rainpuddlesdesign.blogspot.com/
    Cristal http://www.blueyecicle.blogspot.com/
    Suzanne Czosek - http://suzzstampingspot.blogspot.com/
    Adora http://adoraconcepcion.blogspot.com/
    Wendy Jordan - http://papertherapy-wendy.blogspot.com/
    Lynn Mercurio - http://www.stamperosity.com/
    Good Luck!

    Suzz

    Tuesday, June 26, 2012

    Dad

    I just picked up this clipboard and wanted to make a fun wall hanging with it.  I decided to play along in the Simon Says Stamp and Show Depths of Distress.  I had intended this to be Lacy and flowery but my images went a different direction. :)


     I started with distressing the top and bottom edges of the clipboard with Walnut Stain.  I finished it off with the Distress Stains which makes it appear almost black in color.  But it is a rich brown. :)  I added a touch of Stampendous Aged Bronze Embossing Enamel on the metal clip.  The edges of all the paper are distressed with a distressing tool and sponged with Ranger Distress Inks - Walnut Stain.

    The image that started it all was the Simple Pleasures from Inkadinkado - Tin Can Mail. I hadn't ever used this image and had purchased it at my LSS garage sale. Love the image of the dad, son and their pup talking a walk.  I found the coordinating Verses Rubber Stamp - You May Be the World which I thought works so well with the sweet image.

    The branches are Stampers Anonymous.  The papers are all from Bo Bunny.I added a few twine accents and a few Ideology pieces on the top.

    Hope your week is off to a good start!

    Suzz