Friday! Yeah! I have been having a dry spell with my creative juices. Today I decided that I was going to create something, anything to keep me creating. I decided to use a new stencil with ferns and glimmer mist to start the art!
I misted the ferns in the background and then added a layer of stamped text.
I did this three times because I tried different effects on the ferns and ended up muddying them up. I persisted and on my third attempt I added the lovely Verses Rubber Stamps sentiment and wanted to have a flower coming across in in a different direction and the PaperArtsy flower was the right length and fit perfectly.
Of course I went to stamp it and it didn't get an even image. Easy enough to fix with a second stamping on a second piece of cardstock. Color, cut and pop onto the top of the original image.
Products: The Crafters Workshop - Fern Stencil, Tattered Angels - Kiwi Glimmer Mist, 7 Gypsies stamp (text), PaperArtsy Flower - Hot Picks, Ranger Archival - Potting Soil, Verses Rubber Stamps - Great Things, Stampendous Bronze Crushed Glass Glitter
Well I hope you have a fabulous Friday!
Suzz
Friday, February 26, 2016
Wednesday, February 24, 2016
Heartful of Coffee
Howdy! I have been playing a little in my craft room but mostly had a bad cold which has kept me out of my craft room. Since I started feeling better I decided to try my hand at playing with coffee. I am not a coffee drinker so I had to mix up a little paste with some grounds and warm water to kick this off.
I actually laid out my project two different ways and wanted to share the first layout because you can see the coffee background which started my project.
I started with making a paste of grounds and water which I used to paint over a stencil on mixed media paper. I then added a layer of glimmer mist sprayed over the surface and splattered in spots to add a lovely coral color to the background.
After that I wanted to keep the texture of the grounds on my background before they completely dried and blew away from the paper. I left the grounds on the paper and used a trick taught to me by Fran at Stampendous by pouring my clear embossing powder over the surface and heating underneath. This captured the grounds and kept them on the surface of my paper to add a coffee texture.
After that I cut my shape of the heart from the background. I distressed the edges and used Aged gold embossing powder to give a golden tint.
I decided to stain a white doily with the coffee and then embossed the frame with the gold embossing powder. I cut the center and stamped the image of the little girl over the surface. I heat embossed this with clear embossing powder after splattering some coral color mist on the background.
I then put the center back into the middle of the gold frame and added a mix of black and gold glitter around the edges.
The flowers were misted and then embossed with the gold embossing powder. I stamped the sentiment on a remnant of my coffee background and embossed the edges in gold.
This project was created with a few different challenges in mind:
Mixed Media Place - Creative Gym #17 - Coffee
Vintage Journey - Industrial
Anything but Cute - Grungy Love
Thanks for stopping by!
Suzz
I actually laid out my project two different ways and wanted to share the first layout because you can see the coffee background which started my project.
I started with making a paste of grounds and water which I used to paint over a stencil on mixed media paper. I then added a layer of glimmer mist sprayed over the surface and splattered in spots to add a lovely coral color to the background.
After that I wanted to keep the texture of the grounds on my background before they completely dried and blew away from the paper. I left the grounds on the paper and used a trick taught to me by Fran at Stampendous by pouring my clear embossing powder over the surface and heating underneath. This captured the grounds and kept them on the surface of my paper to add a coffee texture.
After that I cut my shape of the heart from the background. I distressed the edges and used Aged gold embossing powder to give a golden tint.
I then put the center back into the middle of the gold frame and added a mix of black and gold glitter around the edges.
The flowers were misted and then embossed with the gold embossing powder. I stamped the sentiment on a remnant of my coffee background and embossed the edges in gold.
This project was created with a few different challenges in mind:
Mixed Media Place - Creative Gym #17 - Coffee
Vintage Journey - Industrial
Anything but Cute - Grungy Love
Thanks for stopping by!
Suzz
Labels:
Coffee,
Graphic45,
Heart,
Stampendous,
Tattered Angels
Wednesday, February 17, 2016
Love is in the Air
Zoe is hosting the
Frilly and Funkie challenge this week. "LOVE IS IN THE AIR" is the challenge theme. Zoe described the challenge as "Create a vintage or shabby
chic project with love as the central theme.
Think hearts, cupid, love and romance in whatever color palette your
heart desires."
With the idea of Love is in the Air I thought Valentine postcards would be perfect for the challenge.
I have come to realize one of my favorite things is the one layer stamped projects. This was a fun project for me.
I was able to use a standard size for my postcards and then just add a hint of color with smearing ink on the craft mat and spritzing it with a gold shimmer spray. I then just dragged the fronts and backs of my postcards through the color. I ended up with two blue backgrounds and three pink backgrounds.
Next I stamped on all of them the post card image and the stamp placement box. I embossed that on some of the backgrounds. The gold shimmer leaves a coat and causes the ink to not take in some places as strongly so in those I would emboss the ink to help make it more pronounced.
I used the Tim Holtz Layering Stencil to add some brown splattering with a sponge and brown dye ink. I also sponged the edges to give a faded look.
The rest was looking through my many stamps and deciding which ones I wanted to blend together to make my postcards.
Then the coloring and shading if I had an outline stamp or adding other stencils with sponged backgrounds or traced hearts for additional details.
I even stamped a few of the backs of the postcards for fun.
I hope you enjoyed my Victorian Valentine Postcards!
Have a lovely day!
Suzz

With the idea of Love is in the Air I thought Valentine postcards would be perfect for the challenge.
I have come to realize one of my favorite things is the one layer stamped projects. This was a fun project for me.
I was able to use a standard size for my postcards and then just add a hint of color with smearing ink on the craft mat and spritzing it with a gold shimmer spray. I then just dragged the fronts and backs of my postcards through the color. I ended up with two blue backgrounds and three pink backgrounds.
Next I stamped on all of them the post card image and the stamp placement box. I embossed that on some of the backgrounds. The gold shimmer leaves a coat and causes the ink to not take in some places as strongly so in those I would emboss the ink to help make it more pronounced.
I used the Tim Holtz Layering Stencil to add some brown splattering with a sponge and brown dye ink. I also sponged the edges to give a faded look.
The rest was looking through my many stamps and deciding which ones I wanted to blend together to make my postcards.
Then the coloring and shading if I had an outline stamp or adding other stencils with sponged backgrounds or traced hearts for additional details.
I even stamped a few of the backs of the postcards for fun.
I hope you enjoyed my Victorian Valentine Postcards!
The Design Team will choose their top four picks with the winner being
invited to join us in a Guest DT spot at Frilly and Funkie and the next
three will receive badges to display on their blogs. Everyone who enters
and follows the rules will have a chance
to win a $25 spending spree at The Funkie Junkie Boutique.
Suzz

Sunday, February 14, 2016
Courage
Hi! Happy Valentine's Day! No Valentine's projects to share today.
I am back after playing with a very messy waxy mix of stuff. Leandra at PaperArtsy has been pulling together challenges highlighting different concepts, techniques and ideas which are brilliant and very inspiring. The latest challenge is highlighting "Wax". I always love when I see art using this medium but fail to achieve what I want in this area. I decided to give it another go after seeing all the team has been doing for the challenge and Leandra's inspirational Challenge post.
Sometimes when you are creating your art you go through stages on a project where you love it and then you don't love it. This is one of those projects for me. :) I laid it out and I was in love with the effect. Then I glued it down and didn't love it. Then added wax and moved it around to thin it out and get bunches in certain areas and back to not sure if I liked what I had created. I think art is a journey though and to learn new things and expand your skills, knowledge and even love of art you need to explore and try new things.
Anyhow it was very much a learning process for me and when I got done I didn't like it as much as when I started. When I pulled the photos in the thumbnails I thought it was really cool.
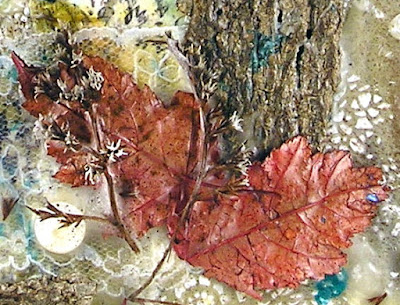
I used bits and pieces I grabbed in the fall to add to the beautiful stamped image/sentiment from PaperArtsy.
I used the Tattered Angels Glimmer Mists (Gold, Dragonfly, Brown), 7 Gypsies Lace Trim, Canvas Corp Tissuestock, and 7 Gypsies Large Tickets to add texture.
I embossed using the Doily stencil over the background.
I stamped the PaperArtsy Sara Naumann 18 - Eclectia Stamp with the PaperArtsy Hot Pick 1011 and on the background there is a little writing from one of the sets as well.
Have a fabulous Valentine's Day!
Suzz
Labels:
7 Gypsies,
Canvas,
Canvas Corp Brands,
PaperArtsy,
Tattered Angels,
Wax
Saturday, February 13, 2016
Golden Hearts
Happy Saturday! I am sharing a Step by Step of this fun journal page over at the Frilly and Funkie blog today!
For all the details head over and check it out!
Have a great day!
Suzz
For all the details head over and check it out!
Have a great day!
Suzz
Labels:
Frilly and Funkie,
Hearts,
Step by Step,
Valentines
Tuesday, February 9, 2016
February Tag
Hello! Time for Tim's February Tag of 2016. His tag is a beautiful Valentine's tag using a few of his fun techniques from last year's tags. I ended up with about 8 different backgrounds and used this one to create my take on his tag.
I played around with a variety of stencils to do my mono print and I like how the clock stencil gave a strong imprint of color.
I used the travel theme on my tag instead of Valentine's. The background is antique linen with a mix of a gold shimmer spray. I then inked up the stencil with Ground Expresso and misted it and placed it on my background.
I then stenciled the words with embossing paste and added Penny Copper Embossing powder. I stamped the little boy (Artistic Outpost) using Ranger Archival Ink - Sepia. I sponged the numbers from the stencil using ground expresso.
Have a happy Tuesday!
Suzz
I played around with a variety of stencils to do my mono print and I like how the clock stencil gave a strong imprint of color.
I then stenciled the words with embossing paste and added Penny Copper Embossing powder. I stamped the little boy (Artistic Outpost) using Ranger Archival Ink - Sepia. I sponged the numbers from the stencil using ground expresso.
Have a happy Tuesday!
Suzz
Saturday, February 6, 2016
Spring Punk
Happy Saturday! I am back with a few more Valentine's I am using the Anything But Cute Challenge "Grungy Love" to inspire my first valentine.
This one started with a bunch of splashes of Tattered Angels Glimmer Mist on a white background.
After the glimmer mist I splattered white acrylic paint over the surface. It added a subtle texture and when I added the watercolor pencil you could see the resist. I then traced in the heart with watercolor pencil. I shaded it with another layer of watercolor pencil and blended with the waterbrush. I stamped the sentiment and then went looking for the right embellishments to give it edge.
This reminds me of a previous challenge at AO where we were challenged to do Spring SteamPunk. I liked that idea of the bright vibrant colors with the touch of metal. I think this one is going to go off to my son. He will get a kick out of it.
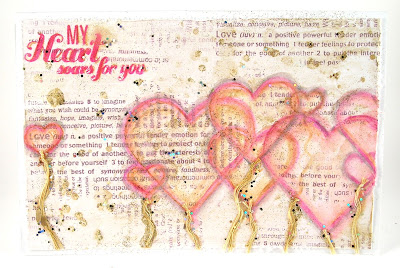
Next up is a softer Valentine's with some pretty gold and pinks.
I had another scrap of inky background with all gold mist. I started tracing hearts in various colors and then blending them out with the waterbrush.
You can see I had fun layering them in various sizes. I loved the translucent effect and thought of balloons. So I added some thread to the balloons along with a bit of the definition stamped in the background and found the perfect sentiment to go along.
Products: Tattered Angels Glimmer Mist - Merlot Gold, Marigold, Coral Reef, It's Black, Kiwi, Staedtler Watercolor Pencils, Stampendous - Dream Text, Simon Says Stamp - Valentines, Idea-Ology - Pins, Gears, Clock Hands
Have a happy Saturday!
Suzz
Subscribe to:
Comments (Atom)


