Friday, November 25, 2022

Shimmer & Shine

Hi!  The team at The Funkie Junkie Inspiration Ave is inspiring us this time around with the Christmas Tim Holtz Idea-Ology!  This is where my inspiration led me!


 There was so much beautiful shimmer and shine between the deco papers, droplets, and bells!  I decided to use the beautiful droplets to create a Christmas wreath.

I used a circle die cut to trace a circle in the center of the card and then I applied tape in the circle.  I then pulled out the color combination of droplets I wanted to use in various sizes. (light blue, silver, white).  

I placed the largest droplet size in one color and place them equally spaced around the circle.    I repeated the process with the next color until all the large sized droplets were placed.  I then repeated the process with the next size down.  I ended up having to shift some of them at the end with the smallest ones. 

To finish off the card I stamped a sentiment in gray ink and sprayed a shimmery ribbon with mica stain spray to blend with the colors of the wreath.

Next I started to play with the deco sheets.  I wanted to cut some snowflakes and stars from the shimmery paper.


I used some parchment paper and a metal shim to get a clean cut.  The thinlets required the extra pressure to help keep the edges cut with all the details.  I also ran them back and forth a few times to get the best cut. 

I used two different sized stars laid together on the cutting board to get my star outline.  I then cut a piece of deco as the background layer of my tag.  I accented with a few droplets and the sentiment.  I finished it off with some died ribbon and a shiny bell!  

My final tag highlights the shimmery snowflakes. 


The background was stamped with a silver ink using the beautiful renaissance stamp.  Then heat set the ink before adding an edge of silver embossing and a sentiment embossed in gold.  The snowflakes were cut and added with a touch of bling using the droplets.  

The ribbon was embossed using silver tinsel embossing powder.  I used versamark ink  to sponge the ribbon and then dipped it in embossing powder and heat set the embossing powder.  


Thanks for stopping by! 

Suzz

Products: 

Friday, November 11, 2022

Gift Here and Gift There!

 Hi!  Posting some inspiration for inspiration Ave over at The Funkie Junkie Boutique Blog.  

We are highlighting the beautiful Distress Colors from Tim Holtz this season.

I decided to create a series of envelopes to hold gift cards as they are a popular gift for us to give over the holidays! 

Here are the variety of envelopes created with the beautiful seasonal mica stain sprays and stencils.


I used a variety of mini layering stencils to cover my gift card holders both on the front and back of the envelope.  

I made my own template by starting with a gift card and measuring around it.  Here is my template and measurements. 

 The full measurement is 5 1/4" x 3 3/4".  After you cut this you will score along the one side 1/4" and do the same along the bottom.  starting from the side with no score go in 2 1/2" and score in the middle.

I then cut out the corner piece and on the right side the bottom 1/4".  This is to allow you to fold the pieces inwards and put tape along them to close the holder and have a pocket to hold the gift card.  

I also died ribbon to match my envelopes and tied them around my gift card to give them fancy toppers and to pull the card in and out of the envelope.  (With that addition it doesn't even require the bottom to be taped closed. :) 

I then took a hold punch and cut out the circles on the top.  If you don't have a punch big enough you can use circle dies and position them to cut half a circle. 

Next up was to come up with some bits and bobs to use for embellishments.  Does this look familiar to anyone?  I hope other people's crafty space looks like this while they are creating. :) 


 I die cut, sprayed and stamped a few different images and pieces of cardstock in different color palettes to coordinate. 


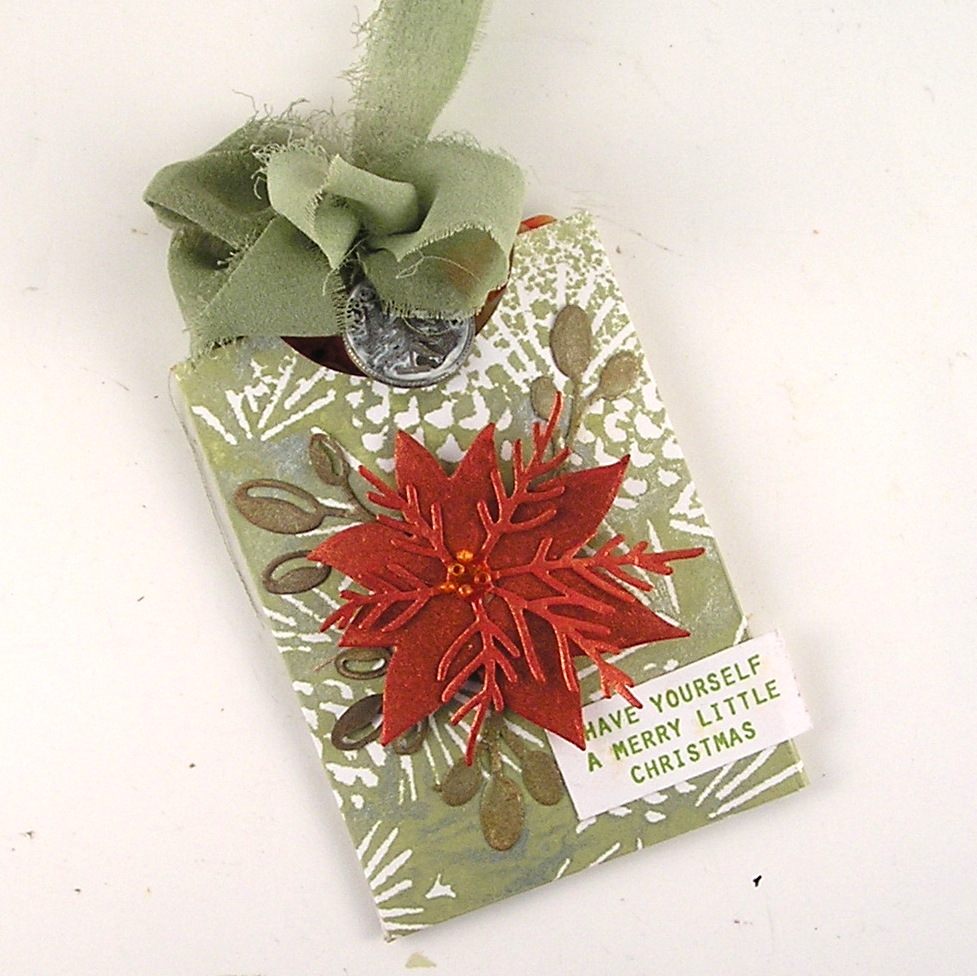
 Then it was a matter of assembling a design.  On this one I used a layered poinsettia and some of the sweet stamped sentiments.  The topper included the died ribbon and a holiday token.

When pulled out you can see how the ribbon was tied around the gift card to make it easy to pull in and out.


The background was the revers of the stencil.  After I had sprayed another piece of cardstock with the stencil I took the stencil saturated in ink and laid a piece of white cardstock and got a beautiful reverse image on the paper.  I cut it up to create the holder shown above. 

Up next is my ugly sweater card holder.  For this one the background is opaque crackle distress paste.  After it dried it was sprayed with the pretty tart cranberry mica stain spray.

I stamped the fun puppy image and gave him a sweet twine bow and bell and tag!  I color coordinated the ribbon with a silver bell.  

Then I wanted a holiday plaid and used the cocktail party mica stain with the plaid stencil.  I decided to pair the Shiny bauble colors with the pretty pink.

The Santa image was stamped with the archival ink and surrounded with the cool Tim Holtz ideology tinsel. 

Next up continuing with the same color scheme I reversed the background and accent colors.

I stamped the images and sentiment with a pretty pink raspberry ink and added a star to the mix. The background was a mini stencil with the mica stain spray spritzed over it. 

I hope this has you inspired to make a few gift card holders and get out the fabulous mica stain sprays.  The shimmer is fabulous! 


Suzz

Products: 

Friday, October 28, 2022

Tree Rings

The Funkie Junkie Boutique Inspiration Avenue is highlighting a the Sizzix Chapter 4 release.  I knew right away I wanted to feature the beautiful tree rings texture folder.

The rings of the tree are so beautiful and showcase the life of the tree.  I knew I wanted to use them to create beautiful layers of texture.

I generated many pieces of embossed backgrounds and ended up highlighting two of them. The backgrounds were both white cardstock that were embossed using the texture fade.

The next step was to take that embossed background and add color.  I had all the beautiful Distress Mica Stain sprays from the fall and winter releases sitting on my desk and decided to use them on my cards.

For my first background I used the Antique Bronze spray and spritzed the background completely.  After it dried I decided to tear the edges to create a rough effect.  I spritzed some of the edges to blend in with the effect. 

After I had that beautiful background ready it was easy enough to die cut a variety of leaves and spray them with a mix of the mica stain sprays and layer them into a wreath.  

I finished the wreath off with a sweet bird and a little message across the wreath.

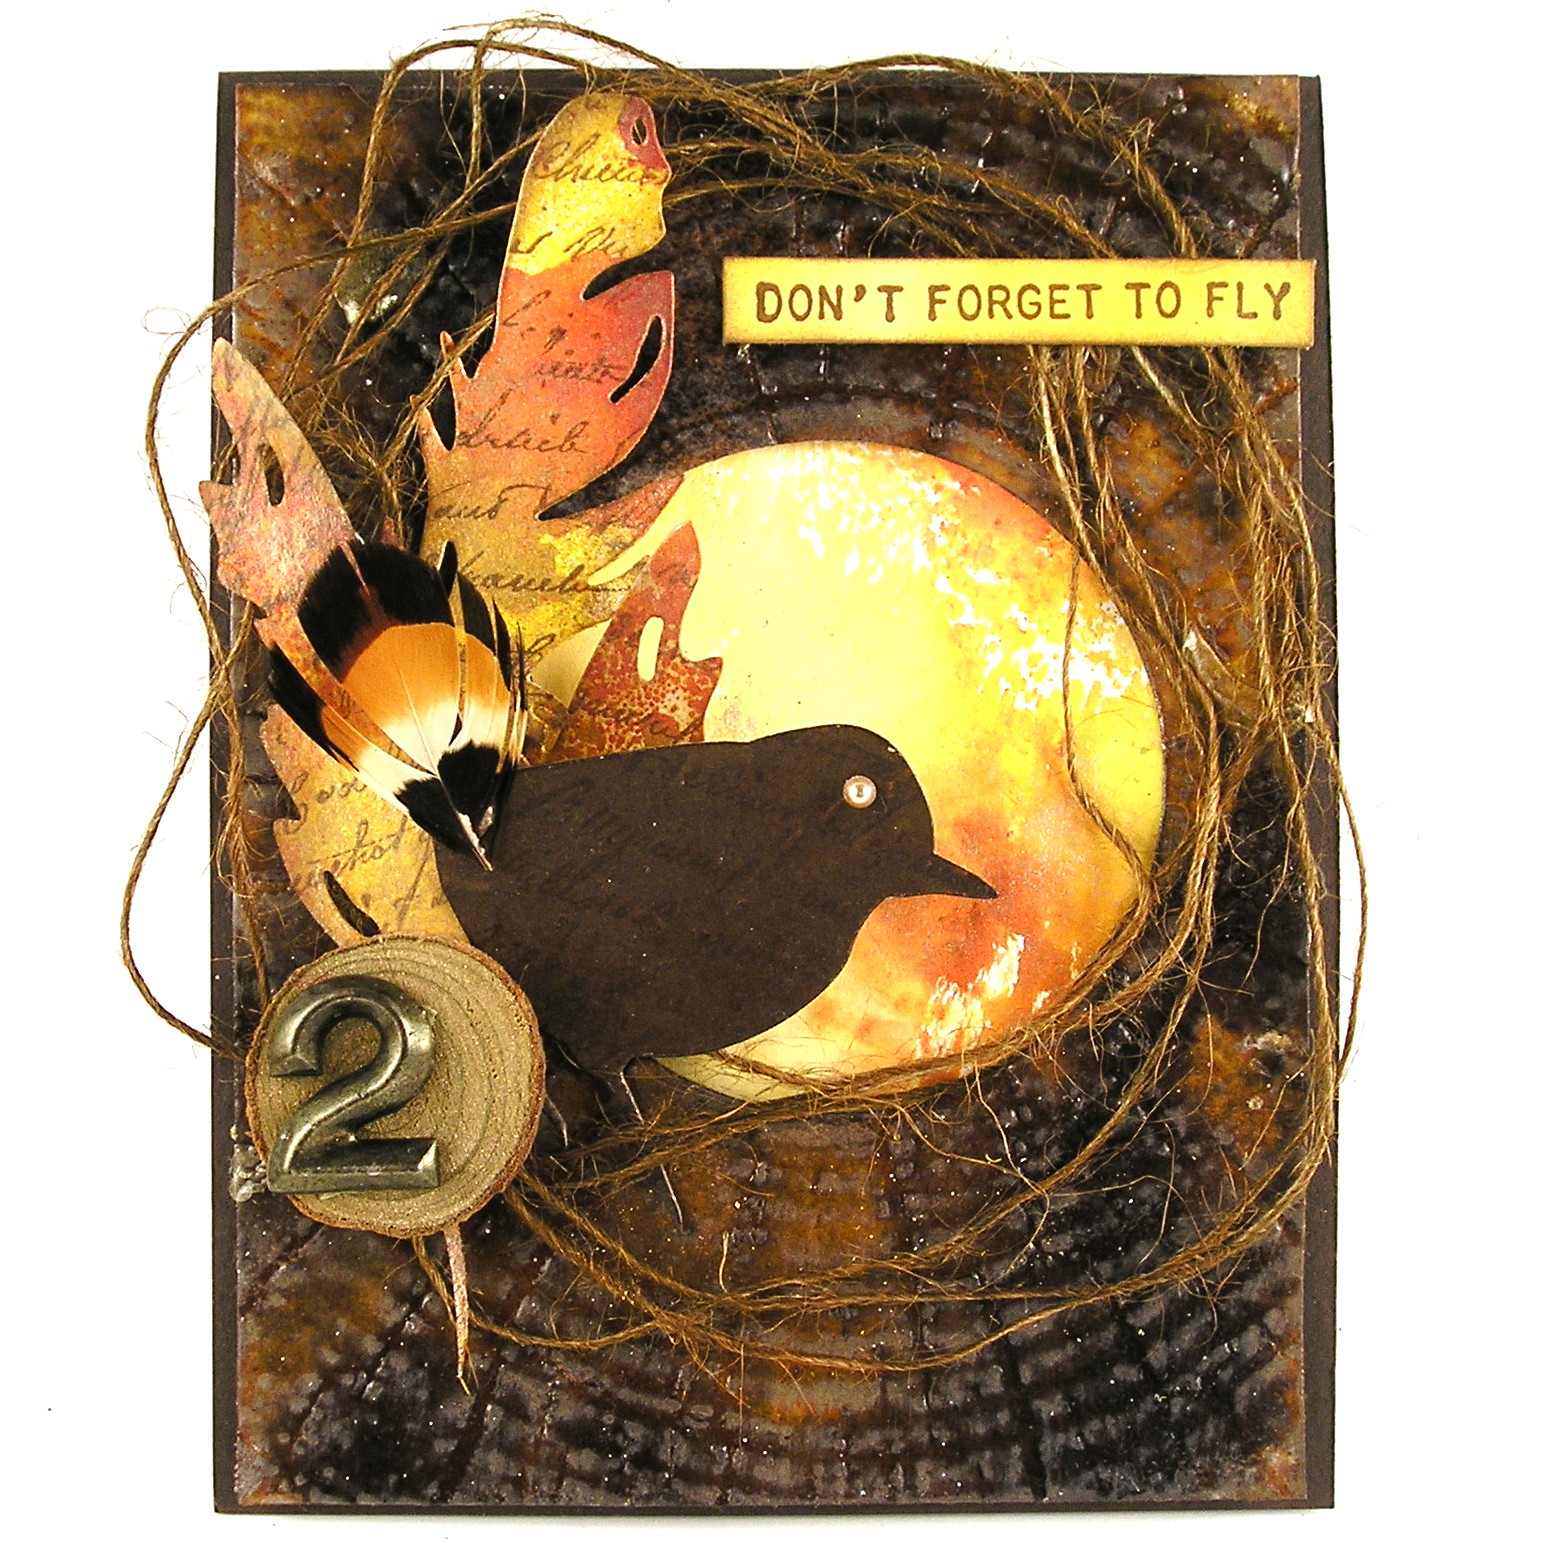
On my next card the background started again from a white piece of cardstock.  I embossed the cardstock using the texture fade tree rings.  The background was spritzed with a mix of mica stains starting with the pretty Harvest Moon.  While that was still wet I mixed in some of the Decayed colors and spritzed on water to move the colors and blend them together.  

After it had dried completely, I used a layer of clear embossing powder to highlight the colors and add a shine.  I die cut the center of the tree rings (to be used in the future).  I used a remnant of an inky background to pop behind the tree rings. 

I die cut some feathers and another bird to use as accents.  The feathers were cut from the same inky background.  I added a hint of stamping to the bird and feathers.  

The rest was just layering up the embellishments to the card and adding a sentiment. 

Suzz

Friday, October 14, 2022

Inky in October

Welcome back!  The Funkie Junkie Boutique is hosting an "Inky in October" inspiration post.  Here is a description of what inspired the team:

Get out your Distress Inks, Sprays, and Mediums. Create a vintage or shabby chic project featuring Distress products. Let’s have some creative fun and get our fingers inky this month, happy crafting!


I was inspired by the mica distress stains.  I had this scrap left over from a previous playing with the seasonal distress mica sprays and decided to build upon it. 

I stared with embossing the beautiful flourish with the crackle paste.  I then sprayed over it with the mica inky spray.   After that dried I covered the entire surface with versamark ink pad and embossed with a clear coat of embossing powder. 

You can't see it in the photo but that clear coat made all the magic of the mica sprays shimmer and shine!  

Finally I spritzed up some flowers, leaves and ribbon to accent the tag.  The vellum has a soft stamped image in gold of flowers. 

Come share your inky goodness a the Funkie Junkie Boutique Challenge blog! 

Thanks for stopping by! 


Suzz

Products: 


Suzz

Wednesday, September 21, 2022

Friendship

 Hi!  I am back today with a post for the Funkie Junkie Boutique Challenge!  The challenge this time is about Friendship! Here is the description of the challenge: 

"Many people will walk in and out of your life but only true friends leave footprints in your heart.  Create a project celebrating a friendship that has left footprints on your heart."


I knew I wanted to share about our two dogs who are not puppies anymore but certainly act like it every day!  The unconditional love and everyday affection given by our dogs certainly qualify as one of the best friendships you could have!  


I used some lovely inky sprays, some stencil paste and a variety of stencils.  I layered the stenciled and sprayed backgrounds under some sweet pictures of our dogs.  

I layered in some sweet hearts and stamped sentiment.  

Come join us in the challenge for a chance to win prizes and a guest designer spot on The Funkie Junkie Boutique blog.

Thank you for stopping by! 


Suzz

Products: 

Wednesday, September 7, 2022

Back To School

 Well hello there!  I can't believe it is September already!  Teri set the challenge this time at The Funkie Junkie Boutique and she has us thinking about back to school! 

Here is how she described the challenge: "Create something with books, alphabets or anything reminding you of learning!"

I started with the idea of vintage school days but ended up somewhere completely different. :)  

Well... I was thinking that witches had to go to school too?  


I took a children's book that was already torn and in sad shape and painted the front and back with white gesso. 

I added a layer of distress crackle paste through the ruler stencil.  Let that dry and then added some color with the antique linen and black soot distress sprays.

That made me thinking of Halloween and then I decided we were going to make a book for witches to go to school. 

Why not a book with enhchanted spells that they can learn!  There was a lot of embossing, spraying and painting in this fun book. 

Come play along with us in the challenge.  The overall winner will be offered the chance to be a Guest Designer at a future date at The Funkie Junkie Boutique Blog, and everyone who enters and follows the rules will go into the drawing for the chance to win a $25.00 spending spree at The Funkie Junkie Boutique. There are also Top 3 Badges for three additional outstanding entries, chosen by the Design Team.

 Thanks for stopping by!


Suzz 

Products: 


Wednesday, August 24, 2022

Stamped With Love

 Hi!  Time for another Funkie Junkie Boutique Challenge!  It is all about my favorite things.... Stamps!  Here is the challenge description: 

"Look through your collection of Tim Holtz stamps - old and new - and choose one of your favorites to create whatever you imagine with it. Your entry could be a card, a vignette, a layout, or something even more amazing!"

I decided to use the new Botanic Collage and make 3 ATC's from them: 

I felt very retro with coloring my stamps with distress marker and giving them a light spritz and then stamping them.  I had fun playing with the various colors.  I also inked up a portion of the stamp with a dye ink pad.
There is something about ATC's and creating in a small format.  Less to design and just highlight the stamps!

The new botanics are dreamy and I loved the text behind them.  I inked up the stamp with dye ink and then wiped off the ink for the flower petals and colored them back in with markers. 
 

I also played with a little handheld sewing machine.  I stitched the body of the butterfly to attach it. It didn't show up because the thread was white so I added pearls over it.  But it was fun and something I can't wait to try again! 

Please come join us and share your favorite TH stamps!  The overall winner will be offered the chance to be a Guest Designer at a future date  at The Funkie Junkie Boutique Blog, and everyone who enters and follows the rules will go into the drawing for the chance to win a $25.00 spending spree at The Funkie Junkie Boutique. There are also Top 3 Badges for three additional outstanding entries, chosen by the Design Team.

Thanks for stopping by! 


Suzz

Products: