Saturday, June 30, 2012

CR84FN57 - Music and Life

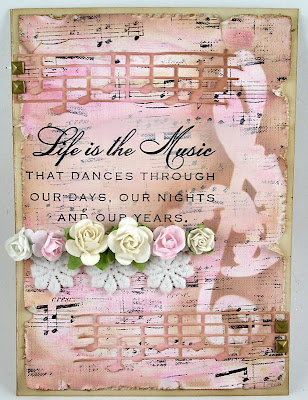
A shabby chic card  for the CR84FN57 challenge. 


I started with some fabulous canvas paper.  I painted over with a combination of white and pink acrylic paint. I added a layer of stamped music (Hero Arts) and masked in a Note (Hero Arts Digital Dies). I sponged around the die cut with brown dye ink.

I die cut two pieces of the Memory Box music notes on white cardstock. I painted them pink with the acrylic paint and after they were dry I added a touch of brown dye ink.

I stamped the lovely Verses Rubber Stamps - Life is the Music stamp in black over the surface. (Hint: I added a bit more of paint in this area to allow me to get a more bland surface for the sentiment to really pop.  I acccented it with a touch of lace and flowers.

The edges were distressed with a distressing tool and brown dye ink. I put it on a tan cardbase distressed with a touch of brown dye ink.


Here are the beautiful inspiration photos and colors:

For all the details on the challenge this week go to the CR84FN blog. 

For more inspiration the CR84FN Design Team:
Deborah Frings * Sue Lelli  * Andrea Matthews *  Suzanne Czosek (me)  *  Heather Jensen * Mona Pendleton  * Lisa Somerville * Shannon White* Pauline Pollington

I have truly enjoyed being part of such a wonderful team.  I will be looking forward to future challenges and all the inspiration provided by the design team.

Suzz

Mary Mary Quite Contrary

Today is the last day of the blog hop week with  Stampendous, Clear Scraps, and  Tsukineko. For all the details, head over to the Stampendous Blog, you still have time to enter to win prizes! 

We were provided some beautiful Send It Clear Cards and Clear Scraps Album and StazOn Inks to create our projects.  For my project today I used the Clear Scraps Album to create a garden album.
This is the closed view of the album.  I cut cardstock or pattern paper to fit behind my acrylic pieces to highlight the beautiful colors captured with copics and StazOn.

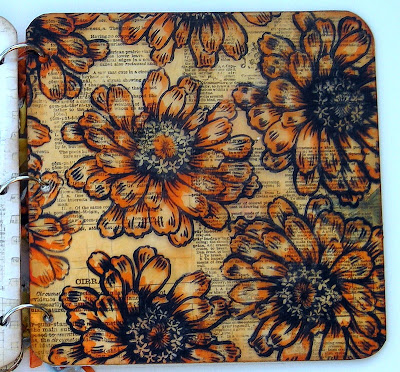
The cover page has the gorgeous Jumbo Cling HollyHocks stamped using StazOn Stone Gray Ink. This makes the lines softer than if I had used the black StazOn.  I had to flip the acrylic cover over and color on the reverse side using my copics.  If you tried coloring over the stazon the copics would erase the stamped image.  I used a oranges and yellows on the flowers and green on the leaves from my copics.  The beautiful Stampendous Butterflies were stamped using black ink and colored with the same copics used on the flowers.  

Behind the acrylic page I traced a piece of white cardstock to the same shape and stamped the Dream Text using brown ink over the page to provide better visibility to the acryclic page and flowers when closed. When you flip through the album your see all the wonderful effect of the acrylic colored flowers!

The first page of the album:

On this page I covered the chipboard with some beautiful Bo Bunny Paper from the Country Garden collection and added the Cottage Rose flowers using black StazOn ink. I colored the flowers using watercolor pencils and white gel pen highlights.  The butterflies are from Stampendous and are also colored with watercolor pencils. I finished it off with the sentiment stamped with the Altered Type Alphabet letters.


The next set of flowers are tropical and warm... I used the beautiful Tropical Garden and backed the page with Bo Bunny paper in the background.  The images were stamped with black StazOn.


The next page:
On this page again I worked with the Bo Bunny paper in the background and stamped the Jumbo Iris several times using the StazOn black ink and colored with glimmer mist and waterbrush. The sentiment was added with the Altered Type Alphabet.


The last page uses the Stampendous Chrysantheum  stamped in the background using the StazOn Ink - Black.  The flowers were colored on the reverse side using copics.

The pages have all been left open to add pictures, pockets or other details.
To see some other fabulous inspiration hop over to:


Thanks for stopping by!
Suzz

Friday, June 29, 2012

Exciting News!

I am thrilled to share that I have joined the Simon Says Stamp and Show Challenge Design team!  I have enjoyed playing along in the challenges every week and find tremendous inspiration every week. 

I am joining the very talented design team:


  • Anna-Karin Evaldsson
  • Ashli Oliver
  • Candy Colwell
  • Dan
  • May Flaum (team leader)
  • Sandra Mouwen
  • Sarah Engels-Greer
  • Suzanne Czosek
  • Terry
  • Tracy Evans


  • You can see all the exciting new here.

    Thanks for stopping by and sharing in my joy.

    Suzz


    Moxie Fab Birthday Wishes

    July is a big birthday month in our family... I lined up the cards last week for everyone.  I also created this card as a backup to add to our stash of birthday cards and for the Moxie Fab World Birthday Card challenge.

    I used a few simple pieces to put this together.  The butterfly is the new butterfly die from Memory Box which I used the scrap after the die was cut to mask the pattern paper. (Valise)  I sponged the background with brown dye ink to create my shape. I then stamped over the surface with black ink and the Vintage Scroll (Memory Box) stamp.

    The next step was to cut the circle around the butterfly and pop it onto a black card base with coordinating paper and the same slightly larger circle cut out from the center.  Finish it off  with the sentiment popped in the center.  A fairly simple design and a quick card.

    Hope your Friday is fabulous!

    Suzz

    Wednesday, June 27, 2012

    Stampendous & Clear Scraps Blog Hop - Silvery Butterfly

    All this week Stampendous and Clear Scraps are hosting a fabulous blog hop.  Tsukineko also provided some of their fantastic inks to help us ink up our projects.  For all the details, head over to the Stampendous Blog.

    We were provided some beautiful Send It Clear Cards and Clear Scraps Album to play with.  We also received some fantastic StazOn Inks which I love to use.  For my project I used the Clear Card kit to create two ATC's.

    My first ATC:

    For both of my ATC's I used alcohol inks on the clear surface to create a kaleidoscope of colors. The first one uses a combination of pinks, reds, and yellows with a touch of the blending solution.  The key with stamping using the StazOn on the alcohol inks is to let the alcohol inks dry completely and then you can stamp onto the alcohol ink or with the acetate you can flip the ATC over and stamp on the reverse side.

    I stamped in the background using the StazOn - Metallic - Silver and the lovely Stampendous Eiffel Tower Clear set.   I used the same ink to stamp the Stampendous Butterfly on a piece of the clear card and cut it out with detail scissors.  I then smudged the edges with Versamark Watermark Ink and heat embossed using Stampendous Aged Silver Embossing Enamel.  I repeated the same process on the edges of the ATC.

    I stamped the flourish from the Cherub Wishes Perfectly Clear Set  using the Versamark and heat embossed with the Aged Silver Embossing Enamel.  I think I have used that set so many times in so many ways and this little accent was perfect for my ATC.

    I finished the ATC with gem flourishes in the corners and a paper flower with a touch of embossing enamel.

    My second ATC: 
    I crated the background of the ATC using the blue and green alcohol inks blended with blending solution. I flipped it over and this time edged the background with Stampendous Silver Embossing Powder.  The Eiffel Tower was stamped twice.  The first time it was stamped with the StazOn Azure ink pad and stamped a second time with the StazOn Metallic Silver ink pad.  The Stampendous Butterflies were stamped with versamark on the clear card and heat embossed with silver embossing powder.   The Rose Branch was stamped using Versamark ink and heat embossed with silver embossing powder.  The letters were stamped from the Altered Alphabet set.

    To see some other fabulous inspiration hop over to:
    Stampendous Impressions – http://www.stampendousblog.wordpress.com/
    Clear Scraps http://clearscraps.typepad.com/
    Janelle Stollfus - http://rainpuddlesdesign.blogspot.com/
    Cristal http://www.blueyecicle.blogspot.com/
    Suzanne Czosek - http://suzzstampingspot.blogspot.com/
    Adora http://adoraconcepcion.blogspot.com/
    Wendy Jordan - http://papertherapy-wendy.blogspot.com/
    Lynn Mercurio - http://www.stamperosity.com/
    Good Luck!

    Suzz

    Tuesday, June 26, 2012

    Dad

    I just picked up this clipboard and wanted to make a fun wall hanging with it.  I decided to play along in the Simon Says Stamp and Show Depths of Distress.  I had intended this to be Lacy and flowery but my images went a different direction. :)


     I started with distressing the top and bottom edges of the clipboard with Walnut Stain.  I finished it off with the Distress Stains which makes it appear almost black in color.  But it is a rich brown. :)  I added a touch of Stampendous Aged Bronze Embossing Enamel on the metal clip.  The edges of all the paper are distressed with a distressing tool and sponged with Ranger Distress Inks - Walnut Stain.

    The image that started it all was the Simple Pleasures from Inkadinkado - Tin Can Mail. I hadn't ever used this image and had purchased it at my LSS garage sale. Love the image of the dad, son and their pup talking a walk.  I found the coordinating Verses Rubber Stamp - You May Be the World which I thought works so well with the sweet image.

    The branches are Stampers Anonymous.  The papers are all from Bo Bunny.I added a few twine accents and a few Ideology pieces on the top.

    Hope your week is off to a good start!

    Suzz

    Monday, June 25, 2012

    Under the Sea


    Just a reminder that the Stampendous Monthly Challenge is summer and is still open this week to play along.

    This card started from gauze that I had pulled  for another project.  I never got around to using it for the other project but decided  I would distress it with some brown dye ink. The brown dye ink was smeared onto my craft mat and spritzed with water until a nice puddle of brown ink was there.  The gauze was thrown into the puddle and smooshed around until it was a lovely shade of brown. After that I decided it looked like something you would see on the bottom of the ocean floor and that inspired my card.

    I set it aside to dry.  I then took some little shells and covered them in versamark and used my craft tweezers with the rubber handle to dip the shells in Stampendous Aged Bronze Embossing Enamel and heat embossed them.  While they were still warm I quickly dipped them into the Gold Glass Glitter

    Next up was to stamp the beautiful Stampendous Mermaid and color her.  I added some Mica Flakes to the bottom of the scales and colored them with copics to give a greenish copper color.

    The background was stamped in brown using the Stampendous Calligraphy Sampler on white cardstock. The surface and edges were distressed with brown dye ink.

    The gauze was attached to the background with white kraft glue and while it was wet the crushed glass glitter and mica flakes were sprinkled over the surface.

    The main image was mounted onto ivory cardstock sponged with brown dye ink.

    The Stampendous DT is joining up with the Clearscraps team all this week and sharing awesome artwork. Go here to find out how you can win prizes from Stampendous, Tsukineko, and Clearscraps!

    Have a lovely day!

    Suzz


    Saturday, June 23, 2012

    CR84FN57 - Thinking of You

    It is with a sad heart I share that the CR84FN57 colors will be my last challenge with the CR84FN Design Team.  I am going to miss playing along with the fabulous Design Team.  Thanks to the fabulous  Mona for allowing me to be part of this wonderful team! I will be sharing a card this week and next with the beautiful inspiration colors to finish out my term. 

    Lisa Somerville is also ending her term with the team so make sure to stop by her blog and give her a warm farewell. 

    Onto my card: 

    This week I chose to share a sweet image of  a little girl holding out her flowers in her pretty pink dress.  I added a hint of the tan on her shows and stockings.  I never was able to keep my party dresses clean when I was little. The sentiment and the image are from Stamping Bella. The little girl is drawn by Mo Manning.

    The papers are from Memory Box paper and Crate paper. 

    Here are the beautiful inspiration photo and colors:

    For all the details on the challenge this week go to the CR84FN blog. 

    For more inspiration the CR84FN Design Team:
    Deborah Frings * Sue Lelli  * Andrea Matthews *  Suzanne Czosek (me)  *  Heather Jensen * Mona Pendleton  * Lisa Somerville * Shannon White* Pauline Pollington

    Thanks for stopping by! 

    Suzz

    Edges of Time

    I pulled a card from the archives today.    I am busy working on something on my desk that is just for fun and taking longer than I thought to create. We will see if I can figure out where to go with it! 

    The background on this card was created by inking up the Hero Arts stamp with brown and green dye inks and spritzing them with the Perfect Pearls Mister.  The edges are distressed with the distressing tool and sponged with brown dye ink.

    Stamp the fern from Hero Arts with brown ink. Add a hint of green along the edges of the fronds.  Stamp the Verses Rubber Stamps Lightly Dance in the corner using brown ink. 

    To finish it off I added a few drops of glossy accents to add drew drops and the burlap ribbon with brad accents.

    Have a wonderful Saturday!

    Suzz


    Friday, June 22, 2012

    ATC Swap

    Happy Friday!  Another long week and so looking forward to a cooler and relaxing weekend. ;)  Today I have a few ATC's to share.  I am part of a swap group and this swap didn't require anything specific. I decided to pull out my scrap box and some new Crafty Secrets Creative Scraps Sheets.


    The girls were so cute and I needed something to put behind them.  I had this paper that worked perfectly with their outfit.  I then added a die cut and turned it into a mirror. The sentiment and girls came with the Crafty Secrets sheet.

    The next one started with a butterfly die cut sent to me from another friend. 

    I thought how fun it would be to make a Mardi Gras type of mask on one of the images. The background is a scrap stamped with a the same shade of purple.  The stamp was a lovely gift from Lesley. The image a gift from Jacqueline.  The sentiment (Artistic Outpost) was stamped on the same background.  I cut the butterfly in  half and placed it over her eyes. I had this little scrap of a gems flourish left and it worked perfectly on the middle.

    The last one uses a bit of heart doily over some beautiful butterfly paper(Thanks Kim).  The image was another one from Jacqueline(Thank You).  The sentiment is from Crafty Secrets Creative Scraps Heartwarming Vintage sheets.

    The best part of all of these ATC's are they are going off to friends and a good portion of them are bits and pieces from friends. :)

    Have a lovely Friday!

    Suzz

    Wednesday, June 20, 2012

    Happy Birthday


    Yeah it's Thursday!  A really busy week again and I am so looking forward to the weekend. :) 

    My card today is for the Mojo Monday Sketch #246 and for the Stampendous Monthly challenge of Summer.

    I struggled a bit with the Mojo Monday sketch #246 but I think this CAS card works with the sketch:


    I used the Stampendous Jumbo Cling Iris with a flourish from the Cherub Wishes set.   The lines are hand drawn and a touch of water with yellow dye ink.

    The flower is colored with dye inks and waterbrush.  The flourish is stamped with the coordinating green dye ink.

    The sketch:

    Don't forget, the Stampendous summer challenge!  Simply make a summer themed project of some sort and add the direct link for your project on the Stampendous blog no later than Thursday, June 28 at 11:59 PM EST .   As an extra incentive for playing along, one lucky crafter (drawn at random) will receive this fabulous new Friendly Phrases Perfectly Clear stamp set.  As an even bigger incentive, if you use Stampendous products on your project, that entry will count twice, which increases your chances of winning!  Due to shipping restrictions, the winner must have a US address.  We hope you have a chance to play along with us (you an enter as many times as you'd like!) this month...

    Have a wonderful Thursday!

    Suzz

    Tuesday, June 19, 2012

    Artistic Outpost Monthly Blog Hop

    Welcome to the June Artistic Outpost Blog Hop!   Today the Artistic Outpost Design Team  is sharing projects featuring either Apothecary or Gatsby.
    I decided to use the Gatsby plate to create a Father's Day card for my dad:  

    I used a piece of Basic Gray paper for the background. I added several strips of black cardstock over the background.  I stamped the handsome gentleman in black on ivory cardstock.  I placed him on an oval from an old book.  I layered that over a stamped background using gray ink on white cardstock and distressed the layers.  I finished off with some stickers spelling out Happy Father's Day and feather and button.

    To see all the other fabulous projects from the design team:


    Thanks for stopping by! 

    Suzz

    Time after Time

    The City Crafter Challenge this week is Time after Time.  I used up a lovely piece of vellum scrap which already had the clock (Hero Arts)  and flowers (Stampendous)  stamped on it.

    The rest was fairly simple:
    1. Cut Prima paper to fit background. Distress edges with distressing tool and sponge with brown dye ink. 
    2. Stamp bees (Impression Obsession) onto ivory cardstock using black ink. Cut out. 
    3. Highlight parts of the images using white gel pen. 
    4. Accent flowers with gems. 
    5. Add lace trim to edges. 
    6.  I then used the same sentiment from yesterday's post (Verses Rubber Stamps - Flowers that Bloom) and stamped and embossed using brown embossing powder. 

    Hope your week is going well...

    Suzz

    Monday, June 18, 2012

    Shades of Brown

    When I saw the Simon Says Stamp and Show a Bit of Brown I was inspired to create a card using shades of Brown.  I combined the Paper Players 100th challenge (Use a previous Challenge-I chose Summer) and the Fashionable Stamping Challenge -Nature.

     My favorite type of card... My flowers, butterflies, distress inks, resist and sponging all bundled into one card. 

    I stamped the Hero Arts flowers using versamark and brown versafine ink first.  Than I heat embossed using clear embossing powder.  After that I sponged Ranger Distress Inks (Walnut, Vintage Photo, and Antique Linen) darkest to lightest moving up the card. 

    I added the Verses Rubber Stamps Sentiment - Flowers in Bloom by stamping in brown ink and to make it pop more I embossed using Stampendous Brown Embossing Powder.

    I finished off with of course... Butterflies and twine! :)

    Thanks for stopping by...

    Suzz


    Saturday, June 16, 2012

    CR84FN - Birthdays & Graduations

    Back today to share my week II  CR84FN56 project:

    Products: Memory Box Something Special, Memory Box Flutter Vine, Vivienne Butterfly, Tessatina Border, Squash Dot Paper, Dream Text, Tattered Angels Frame, Acrylic Paint, Tattered Angels Lemon Zest Glimmer Mist.

    I was also  inspired to create this card which was for a niece's 8th grad graduation: 

    Products: Crafter's Workshop Template, Hero Arts Graduation, Tattered Angels Glimmer Mist, White Gel Pen, and  Imaginisce.

    Here are the beautiful colors:


    For all the details on the challenge this week go to the CR84FN blog. 

    For more inspiration the CR84FN Design Team:

    Deborah Frings * Sue Lelli  * Andrea Matthews *  Suzanne Czosek (me)  *  Heather Jensen * Mona Pendleton  * Lisa Somerville * Shannon White* Pauline Pollington

    Thanks for stopping by! 

    Suzz

    Stampendous Monthly Challenge - Summer

    The monthly challenge for Stampendous is Summer...

    This sweet girl was part of the last release. The daffodils are more springy but the colors are pure summer:

    The main panel uses the Cling Daffodil Girl colored with watercolor pencils.  Then I added some of the daffodils from the Cling Botanical Daffodil.

    The background paper is really lovely it has a texture to it.  I loved the soft effect.   The dirt has a little touch of the new color fragments from Stampendous.

    For all the details go here

    Suzz

    Friday, June 15, 2012

    Freedom

    I am participating in a Mini Card swap(1"x3").  I have never made anything this small before as a finished project so a perfect new challenge for me.  I am submitting this in the Simon Says Stamp and Show Anything Challenge.  The Mini Card swap theme is red, white, and blue patriotic which is perfect for the Really Reasonable Ribbons Rambling Challenge.

    In no particular order: (Can't show favoritism for my minis, can I?)


    I used a lot of different bits and pieces including a children's song book, ephemera from 7Gypsies, Bo Bunny Pattern Paper, and the She-roes set from Artistic Outpost.

    Have a wonderful Friday!

    Suzz


    Thursday, June 14, 2012

    Lightly Dance on Leafs

    This morning I was admiring Ellie's project and decided to go and play along in The Craft Barn challenge to use masks/stencils on your Art Journal.


    I pulled out a scrap with a glimmer mist background using a mask(Layers Of Colors). I added a layer of a script in the background and the leafy branch (Hero Arts) . Finished it off with vellum and stamped the lovely Verses Rubber Stamp sentiment in the corner.

    Have a lovely Thursday!

    Suzz


    Wednesday, June 13, 2012

    Walk in God's Beauty

    Some days it is so much harder to create... :)  I think my Mojo is out running all those crazy errands that happen when the kids are home and off school in the summer.    I decided to use the sketch from Mojo Monday #245 to try to get my inspiration going.  I also used the ODBD Shining Light Challenge #111 : Something old, Something new, Something Borrowed, Something Blue...  My something old is the lace trim, the new is the bird (Straight from the package), Borrowed (Sketch) and blue (that is the cool peri which is a purple/blue tone).

    I started with the sketch and cut all my pieces from white cardstock to see what the layout looked like in just cardstock. Next I pulled out my new Our Daily Bread Designs stamps to see what stamps I could combine to create the various pieces.

    Our Daily Bread Designs Products:  Sing to the Lord, Brocade Background, Bird Borders & Corners, and Sentiment Collection.  Inks: Versafine Smokey Gray, Adirondack Cool Peri, Ranger Distress Inks - Vintage Photo

    Thanks for stopping by!

    Suzz

    Tuesday, June 12, 2012

    Let's go to the Fair

    Summer time reminds me of the fair and my card today is a collage of fair images.  Playing along in the Simon Says Stamp and Show Anything Goes.


    The plate has this wonderful Ice Cream churn.  I got this silly idea to put the boy into the pot kind of like a jack in the box. :)

    Here is the full card:

    I used bits and pieces from different sets to create my Fair Collage.  (Kudzu Kafe, Country Life, Vintage Circus, Whimsical Melange, Quote and Quotables)

    The background is embossed and sponged with a light blue die ink.  The rest are stamped and colored with watercolor pencils. The banner is stamped and cut out and the letters are stickers.

    Thanks for stopping by!

    Suzz


    Saturday, June 9, 2012

    CR84FN56 - LOVE

    Welcome to CR84FN56, the colors are a lovely yellow, gray and neutral...


    My wonderful friend Jacqueline provided me the beautiful image. The image is perfect with her golden highlights and touches of gray. 

    I used some remnants of pattern paper smeared with acrylic paint and added the beautiful Verses Rubber Stamps Love & Music sentiment stamped in gray.  The butterflies are from Hero Arts Papillion set.


    Here are the beautiful colors:


    For all the details on the challenge this week go to the CR84FN blog. 

    For more inspiration the CR84FN Design Team:

    Deborah Frings * Sue Lelli  * Andrea Matthews *  Suzanne Czosek (me)  *  Heather Jensen * Mona Pendleton  * Lisa Somerville * Shannon White* Pauline Pollington

    Thanks for stopping by! 

    Suzz

    Thursday, June 7, 2012

    ATC Book

    Finally Thursday.... This week has been a really  long week for us with so many things happening. :) Today I am sharing over on the Outside the Box Blog my project featuring the new stamps and dies...


     Click to Enlarge


    Head over to the OOTB blog to see all the details about my little accordion style book.  This week there are are opportunities to win prizes from the new release. For all the details go here.

    Looking forward to the weekend. :)

    Suzz

    Wednesday, June 6, 2012

    Best Wishes

    Cath extended the Moxie Fab World Card Creations Challenges as her shoulder is not completely healed yet.  Feel better Cath!  I decided to enter another entry into the splatter category. 


     The background is a lovely pattern paper. The Stampendous Jumbo Cling HollyHock was stamped using versamark and heat embossed using Ivory embossing powder.  The sentiment was stamped and embossed using the same method. The Best Wishes sentiment is from the Cherub Wishes Perfectly Clear set.  I added a touch of color with watercolor pencils with a waterbrush.  The edges were distressed and sponged.

    Have a lovely day!

    Suzz

    Tuesday, June 5, 2012

    ODBDLYLS18 - Something New

    The Monthly Scrapbook Challenge at Our Daily Bread Designs is an inspiration photo and using something new on a layout along with your ODBD stamps. 

    Here is my layout for this month's challenge: 

    I used the new Bicycle set along with the Honeycomb, Wood Background.  The papers are from the Bo Bunny Garden Collection. The flowers are a mix of Prima, and My Moments.

    The background panel is stamped using gray ink and the wood grain background stamp.  I sponged the edges with brown dye ink.
    The main panel is the lovely Bo Bunny Garden collection with a random stamping of the Honeycomb background in a brown dye ink.

    I had the leftover circle in my scrap pile and I stamped over it with the wood grain and thought it would be fun to make it look like the bicycle wheel. So I hand drew in the spokes and added a gear in the middle.

    The vintage image is a couple of cuties colored with a touch of distress inks.  The bicycle is stamped using black ink and colored with a combination of watercolor pencils, distress inks and a water brush.
    The banners on the top were remnants from the paper and I couldn't resist adding them in for a little detail along the top.

    The rest was adding a touch of lace and flowers. 

    The inspiration photo:


    For more inspiration go see Gemiel's   Lovely Layout page.  The ODBD Scrapbook Challenge runs through June 30th, at 6 p.m. Eastern Time, click here for more details!

    Thanks for stopping by!

    Suzz

    Monday, June 4, 2012

    Textured Frame

    Monday mornings are always inspirational for me as the Mojo Monday Sketch and the Simon Says Stamp and show challenge are posted.  I used the Mojo Monday sketch and the texture challenge today to come up with my card:


    The papers are Memory Box, the bird and border dies are Memory Box as well.  The embossing folder is a new one for me from Sizzix and I love that it has the lovely framed opening. I embossed the paper and then painted over the embossed area with white paint and then added a sponged blue edges.  The rest of the papers and card base were also painted with white acrylic paint and sponged with Ranger Distress inks - Broken China.

    This week over on the MB blog Outside the Box we are having a blog blitz showcasing the newest release for Memory Box. Head over and leave comments for a chance to win! 

    Happy Monday to you!

    Suzz


    Sunday, June 3, 2012

    Gingham & Strawberries

    Sunday Morning and I am hiding out in the craft cave.. :)  It is early and everyone is asleep. I decided to pop in and share a post with you of something I created earlier with my peachy keen girl.  This one is another Mo Manning image (I love her images... she is an illustrator of children's books) from Penny Black. I am putting this in the Penny Black and More Challenge for My Favorite Things.

    I am submitting this to the Simon Says Stamp - Anything Goes Challenge and the Moxie Fab World - Gingham Challenge

    I colored this with my copics and added a touch of sponging around the edges.  The background is pattern paper from October Afternoon that hadn't been used before. Love the sweet innocence of the young girl and she is so happy with her strawberry outfit.

    Hope you have a lovely day!

    Suzz

    Saturday, June 2, 2012

    Think and Wonder

    Tim's Tag for June was posted last night and I used that this morning to play around with a few of the techniques he shared. By the way he has the sweetest image available on his blog today that he used on his tag.  I didn't use it as my printer doesn't print out and hold color so it would have smeared if I used it. :) But you should pop over and pick it up if you like vintage photos.

    Onto my tag:
     Here's my process as I had to vary from Tim's on where I didn't have the materials/tools in some cases.

    Recipe:
    1. Smear the Distress Stains onto craft mat as Tim shared. I used Dusty Concord and Picket Fence.  For some reason my Purple was being difficult so I ended up added more color with my ink pad. I spritzed with water and smeared onto my tag. 
    2. Distress edges of tag and sponge with walnut dye ink. 
    3. Stamp Artistic Outpost Secretary Pool image randomly over background using Ranger Archival Black Ink. 
    4. The photo was something I have taken to a copier place (The Library has this available as well for a fee) and made copies in different sizes. I love the family picture. :)  I painted the girl and mother's outfit using Ranger Distress Ink smeared onto the craft mat and picked up with a waterbrush. I did the same for the boy and man's shirts with broken china. The girls outfit came out too dark so I ended up lighting it with a touch of the Picket Fence Distress stain. I applied that with a paint brush. I also added a few shadows with watercolor pencil to darken a few lines. 
    5. Distress the edges of the photo with the distressing tool.  Sponge on the green, blue and brown in the background. Mount on cardstock. (Sponge edges with brown dye ink) 
    6. Stamp Think and Wonder (Artistic Outpost) along the edge using StaZon black ink. 
    7. Stamp Text onto vellum using StazOn ink. Tear edges and sponge with brown dye ink. 
    8. My flower was peach. I didn't have anything in white that size.  I ended up distressing it with brown dye ink and applying the purple stain on the edges per Tim's instructions. 
    9. The lace was distressed with the distress stain.  The ribbon with glimmer mist and I added gold embossing powder by smearing versamark onto the seam binding after the glimmer mist was applied. I then heat embossed some gold embossing powder onto the ribbon. 
    That's all.... I hope you have a lovely weekend....

    Suzz