Showing posts with label Adirondack. Show all posts

Tuesday, December 8, 2009

Tag Tuesday Challenge #29

I know I said I was done with tags... But Louise has the weekly tag challenge and I enjoy participating. So one more tag this week. The colors for this challenge are Teal, Wine, and Blue. She is kind enough to let us select the hues of the colors we use.

I was thinking of how to incorporate the colors together and I thought of wool knit mittens we had as children.


I first hand drew the shape of the mitten. (would have been helpful if my little one were around or had mittens in the house) I think it looks pretty close to the correct porportion. The background was stamped using StaZon Teal blue ink and the Hero Arts Dots and flowers Designblock stamp.

I added a dot in the center of each flower using my blue watercolor marker. The edges are sponged with stonewashed blue.

The buttons and ribbon are a burgandy color but unfortunately when photographed they reflect the highlights. The other button is a nice deep blue which looks like black in the picture.

I hope you enjoyed my little mitten tags as much as I enjoyed making them.

Products:

  • Hero Arts DesignBlock - Dots and Flowers
  • Adirondacks - Stonewashed
  • Watercolor Marker
  • Lace, Buttons, Twine, Ribbon - Unknown
  • StaZon - Teal Blue
  • Versacolor - Burgandy
  • Hero Arts - Holiday Messages

Thanks for stopping by...

Mitten update... I am like the kittens... I have lost my mittens...

Due to the Christmas decorations being put up, I have had to move my shadow box where I take my pictures onto the floor in the other room. I sometimes leave my project in the box until after I clean up and load in case I need to take another picture. Unfortunately my puppy who is almost a year old was very quiet while I was typing away in here. Yep.. She was having a feast on my lace, twine, ribbon and buttons. I don't even want to think about where they went. So my poor mittens are destroyed.

Suzz


Tuesday, December 1, 2009

A whirlwind of fun...

I have a couple of exciting things to share:

First... Finished this card last night after playing with my spellbinders die cut and some fun Memory Box stamps.


I had seen a gorgeous and I mean stunning card on Yvonne's blog here: http://yvonne-anabelle.blogspot.com/2009/11/serendipity-november-challenge.html. I have this stamp too and am re-inspired to use it for my Christmas cards. (Will share if and when they are created).

I used the same Fleur De Lis die cut and cut 12 from a Memory Box card which I had stamped with a Memory box flourish stamp in Stonewashed dye ink.

The flowers are Memory Box - Black Eyed Susan E422 stamped in versafine black onyx and colored using watercolor pencils. I used the same colors on the butterflies (memory box - periwinkle B1181)

I sponged the outer circle to give it the orange-yellow effect to match the butterflies and flowers.

Second exciting news:

Tim Holtz started his 12 days of tags today... So much inspiration in techniques all jammed into 12 days. Also he has wonderful prizes so go check that out. I think I am going to try to play along as it fits in with the HA blog challenge this week and Louise's tag Tuesday challenge too!

Third:
My card is posted on the Moxie Fab World as a Tuesday Trigger! and as a bonus I also won a pack of paper from another post on Cathy's blog.

So I am having a wonderful day.. I hope you are too!

Suzz

Saturday, September 12, 2009

Toast Anyone?

The moxie fab world blog is tons of fun and there are challenges...http://www.moxiefabworld.com/2009/09/you-asked-for-it-another-moxie-fab.html like this fun one which was to incorporate a household item into a crafty project.

Well... I love my stamps but don't have anything with a household item so this popped into mind... (Excuse the terrible pun)

I was inspired by the retro toaster on the blog and thought it would be fun to have a pop up card with toast as the message.

I created two slots with two pop up tags of toast. I actually stamped What's Up? On the two pieces of toast.

Well that was my fun this morning and my card was instantly claimed by my youngest who keeps pulling the toast out and in...

Products:
  • Hero Arts - Antique Flower Background
  • Hero Arts - Elegant Brocade
  • Versamark Watermark Ink
  • Clear Embossing Powder
  • Adirondack Brights - Pool
  • Memento - Rich Cocoa
  • Memories - Honey
Hope this gave you a smile today...

Suzz

Tuesday, July 7, 2009

Final Template Card

My final template card for awhile.. I needed four cards for a class and this is the final one using another shape from The Crafters Workshop. I went onto their website http://www.thecraftersworkshop.com/ and they have a bunch more fun templates, good thing my LSS doesn't carry all of them or I would be in trouble.


Products:

  • The Crafters Workshop -Lotus Template
  • Inkadinkado - Tree Stamp
  • Cuttlebug Embossing Folder
  • Versafine - Vintage Sepia
  • Adirondack Brights - Sunshine Yellow, Sunset Orange
  • Memento - Rich Cocoa
  • Clear Embossing Powder
  • Twine, Button Unknown

Thanks for stopping by...

Suzz

Sunday, July 5, 2009

Soft Flourish

I have been working on cards using the stencils/templates from the Crafters Workshop... This is one of them.


I used a glimmer mist across the stencil on the cardstock.
Products:
  • Hero Arts - Anytime Messages
  • The Crafters Workshop
  • Hero Arts - Old French Writing
  • Glimmer Mist - Sweet Pea
  • Martha Stewart Cornic Border Punch
  • Hero Arts - Heart Winged Butterfly
  • Adirondack Brights - Pool
  • Prima Flowers
  • Crystal Stickers - Teal

Thanks for stopping by...

Suzz

Wednesday, June 24, 2009

Orange and Blue

The challenge this week on the Hero Arts blog is complementary colors. I selected the orange and blue colors to play with.


I started with some Sizzix Stars that I cut from white cardstock. Hero Arts has a new clear set called everyday sayings which is really nice because it has a ton of different sentiments for different occassions in different fonts. I selected the congratulations because of the size and style. I stamped that all over the stars in a blue pigment ink. I also used a different sized congrats from a graduation clear set from HA too.

I sponged the edges with the Adirondack orange. The bottom half of the card is a stamp I received in a bundle from MSE. I love the uneven lines of the stripes and I actually kissed my polka dot background stamp from Hero arts to take off the ink. I had to mask and lay down each stripe individually but I really like the effect.

The top is clear embossed polka dots and sponged with the same orange dye ink.

Products:

  • Hero Arts - Clear Design Everyday Sayings
  • Hero Arts - Clear Design - Graduation
  • Hero Arts - Raindrop Background
  • MSE - Stripe Stamp?
  • Adirondack - Sunset Orange
  • Versafine - Habanero, Majestic Blue
  • Fiskars Circle Template & Shape Express
  • Sizzix Die Cut - Stars
  • Buttons, Ribbon - Unknown

One last question for you... This so reminds me of my brothers room when we were growing up... Do you remember the patriotic rooms? He had a red, white and blue bedroom with old fashioned soldiers dressed from the colonies.

Thanks for stopping by.

Suzz

Tuesday, June 16, 2009

Inspired by...

This week on the HA blog they are highlighting some of the designers who submit to the challenges and were selected by the HA designers. Jacqueline is one of the days on the blog. Her blog is here: http://myscrapbasket.blogspot.com/ . I am a big fan of her work as she is always creating dreamy, elegant and beautiful cards. You can spend alot of time looking at one creation as she always has multiple layers in her cards. This card is inspired by Jacqueline.


I also was able to use up some more scraps that I had started and never used. Almost everything besides teh embellishments was something I had started and never used on a card. Also the PP in the background was a scrap that Jacqueline sent to me!

Products:

  • Hero Arts Design Block Tree
  • Hero Arts - Real Wild Aster
  • Hero Arts - Friends Background
  • Hero Arts - Artistic Butterflies
  • PP - Unknown
  • Versafine - Vintage Sepia
  • Ranger Distress Ink - Pine Needles
  • Adirondack - Orange
  • Floradoodles - Minidelphin
  • Hero Arts - Anytime Messages

Thanks for stopping by...

Suzz

Monday, May 18, 2009

Raspberry Suite Challenge # 6

I had both Dawn's http://dawnmcvey.typepad.com/these_are_a_few_of_my_fav/2009/05/raspberry-suite-color-challenge-week-6.html and Kristina's color challenges sitting out yesterday and decided to play with Dawn's first because it only had 4 colors to work with.

That coral pink is a tough one. I don't know about you but I only have ribbon that was that color. No paper, ink or anything that popped out at me.


I used a damask stamp from Judikins and went from there. I am still suffering a lack of inspiration and it took me a long time to create this one card. :) My DH birthday is coming up and I am going to have to come up with something quick for him. :O

Products:

  • Judikins - Damask
  • Adirondacks - Pool
  • Martha Stewart - Ribbon
  • Memento - Rich Cocoa
  • Versamark
  • Zing - Brown Embossing Powder
  • Cuttlebug Embossing Folder - Textured Textile

Have a great Monday!

Suzz

Tuesday, April 21, 2009

Who doesn't love getting mail?

I love getting mail, especially if it is not bills! I recieved this in my mailbox yesterday...


with a very nice thank you written in it from Jacqueline! Love her cards and was so lucky to recieve one in the mail! Thank you Jacqueline!

I also had a chance to keep playing with using bleach to stamp on a glimmer mist background. Here is the results:


I wish I could take a better picture but alas... All rain yesterday and today... I have created a light box based on something shared on the Hero Arts Flickr Group but need the light source to finish it. I will get there... :)

Products:

  • Penny Black - Casual, Curlicue
  • Glimmer Mists (I made this awhile ago and not sure which colors I used. Sorry)
  • Vellum
  • Adirondack Brights - Orange
  • Versafine - Onyx Black
  • Versamark Watermark Ink
  • Clear Embossing Powder
  • Stampabilities - Matthew 7:7: 02
  • Hero Arts - Script
  • Spellbinders - Shapeabilities - Butterflies 2

Thanks for stopping by... I hope the spring flowers are blooming by you!

Suzz

Tuesday, March 31, 2009

Happy Blog Birthday Hero Arts...

Hero Arts Challenge http://heroarts.com/blogs/club/2009/03/30/its-a-one-derful-day/ this week is single layer cards and they are celebrating their anniversary of their blog this week. Lot's of fun activities on their blog this week.

Kiara is also hosting a challenge on her blog http://http//stampingcafe.blogspot.com/2009/03/one-layer-monday.html for a single layer card.

The Hero Arts flickr group had a thread about single layer cards and we mostly agreed that we start with single layer card when you first stamp and move up to the multiple layers and fix things by adding layers when we make a mistake. :) So this week will be interesting to see what people come up with.


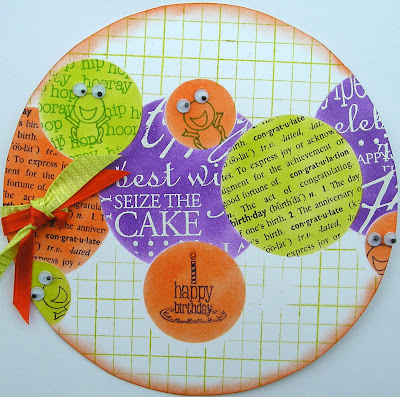
So here is my single layer card. Two things about this card...

One: it is for my eleven going on twelve year old daughter's birthday which is next week.

Two: Her room is painted in purple, green, and orange with circles... We used the same techniques as applied on this card in her room.


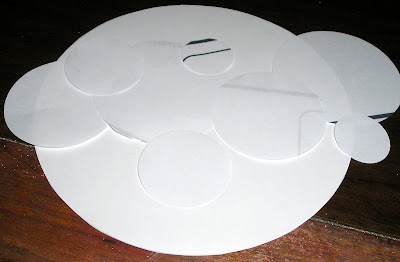
This take a little planning and laying out before starting. This was my template:


Recipe:
  1. Punch out all circles from a piece of copy paper. You need to use thin paper to help with the masking and reverse masking. I cut multiple circles in each size to allow me to play with placement.
  2. Keep the circles and the sheet you used to punch them from.
  3. Lay out your circles with overlaps where you think you want them. After you position them where you would like them and how you would like to overlap them...
  4. If you can keep your template with circles laying there as a guide and use another circle to work on.
  5. Start with your full circles and where you want them placed. Lay the piece of paper with the punched out circles and lay it on your card where you would like the circle positioned. Sponge or brayer the color for that full circle. Do this for each top circle/full circle on your card.
  6. Partial circles or underlapping circles. Lay the circles scraps on already sponged circles to protect them. (If you have repositionable tape you can lightly tack them in position.) Postion them exactly on top of the sponged in circle. Now take your sheet with the punched out circles and lay where you want the next circle to be sponged. Sponge the next color in the circle.
  7. Continue this until all your colors are sponged on.
  8. Repeat the same process but now stamp your images in using the same methods. Cover the circles you don't want to be stamped on and use the sheet with the punched out circles to mask surrounding areas.

Thanks for stopping by...

Suzz

Thursday, March 26, 2009

Smiling Faces

Another entry in the Hero Arts Windows Challenge... I kept thinking of flowers with the little faces in the center..

The little dolls are stamped on the inside and I cut out the holes in the card where the punch wouldn't reach. :) The center of the flowers was created using a 3/4" circle punch.

I drew in pencil (very lightly) the circle on the inside of the card by closing the card and tracing the opening. This gave me the positioning for the little girls face. The stamps are clear for the girl so it helped me line up the face perfectly. I erased the lines after I stamped if they were visible.

Everything else is very simple. I stamped the houndstooth on white cardstock and then stamped the flowers and cut them out.

Products:

  • Hero Arts - Houndstooth
  • Hero Arts - Sparkle Clear - Arigato
  • Hero Arts - DesignBlock - Outline Flowers
  • Versafine - Vintage Sepia
  • Adirondack Brights - Pool
  • Cuttlebug Embossing Folder - Swiss Dots
  • Martha Stewart - Cornice Edger
  • Hero Arts - Petite Birthday

Thanks for stopping by...

Suzz

Thursday, March 19, 2009

Blooming Spring

This card started with a glimmer mist yellow background with the intention of a spring card. I think the colors may be a little more summery but the thought is of warmer days.

Recipe:
  1. Spray glimmer mist across white cardstock. (Yellow, Tuscany Sun)
  2. After dry stamp woodgrain image with gold dye ink.
  3. Stamp Tree half on the background using brown pigment ink.
  4. Stamp flourish and birds using green pigment ink.
  5. Accent tree with flowers & gems.
  6. Stamp sentiment with brown pigment ink.
  7. Sponge orange dye ink around edges. Sponge edges with brown dye ink.
  8. Mount stamped image on brown cardstock and attach to orange cardbase.
  9. Tie ribbon around mounted picture.
  10. Accent bird eyes with white gel pen.

Products:

  • Hero Arts DesignBlock Tree
  • Inkadinkado - Flourishes
  • Impression Obsession - Sentiment
  • Prima Flowers
  • Versafine - Vintage Sepia, Olympia Green
  • Adirondacks - Bright Orange
  • Memento - Rich Cocoa
  • Memories -Honey
  • Gems, Ribbon - Unkown

Thanks for stopping by...

Suzz

Saturday, March 7, 2009

Winterfest 2009 - Multiple Challenges


I love Godelieve's short cards. She takes a 5 x 7 piece of card stock and folds it in half to make the card but you send it flat. Her challenge is to create one of these. I have tried this once before and wasn't too happy with my results. This card still doesn't achieve the effect she has with her lovely cards.

The second challenge for the little house challenge is from Andi. She said to use as many houses as we could on our challenge, so I tried to make a tree full of houses. :)

The third was to use birds which fit right into this card.
Products:
  • Hero Arts - Sparkle Clear - Home II
  • Hero Arts - Designblock - Tree
  • Versafine - Vintage Sepia, Crimson Red, Majestic Blue
  • Adirondacks - Earthtones, Stonewashed
  • Cuttlebug Embossing Folder - Distressed Stripes

Thanks for stopping by..

Suzz


Monday, March 2, 2009

Scraps Sunday...

Godelieve http://stampingmathilda.blogspot.com/has initiated a challenge at 2 Peas to use up scraps on Sunday http://www.twopeasinabucket.com/mb.asp?cmd=display&thread_id=2761796.

I am going to keep with this because usually by Sunday night I am toast... Ready to wind down get the kids geared up for school the next day and myself ready for work. That's the perfect time to take some left-overs and use them up. In addition to the fact that I have way too many scraps..

I started with the center picture which already was complete from a previous challenge (Kwerner color challenge) which never made it onto a card. I find the labels shape hard to place on a card but I love it whenever I see it used in other cards. :)


Products:

  • Hero Arts - Silhouette
  • Hero Arts - Sparkle Design - Mini Messages
  • Hero Arts - Clear Design - Designer Butterflies
  • Adirondacks, - Sunset Orange, Sunshine Yellow
  • Memento - Rich Cocoa
  • Versafine - Vintage Sepia, Black Onyx
  • Clear Embossing Powder
  • Spellbinders Nestabilities - Labels

Thanks for stopping by...

Suzz

Saturday, December 13, 2008

Joy to You

This is my final entry in the colors challenge for HA weekly challenge. The colors were Magenta, Paprika, Brown, Green, Taupe. I liked this set of colors as I thought they were more earthy tones.


Recipe:


  1. Take a glossy piece of cardstock. Drip 3 drops of Lettuce Alcohol Ink on the felt applicator and add 3 drops of blending solution. Drag the felt applicator across the 8 1/2 x 11" glossy cardstock in a straight line. Repeat all the way across the sheet of cardstock. Change the felt and do the same with the caramel color. The green stripes will have a darker area where you have overlapped. start your caramel rows in the lightest part of the green.

  2. I used a new stamp from Hero Arts which has a chicken wire look to it. I wanted to try a new technique I read about where you take the color off by using the blending solution on stamps. I did that but didn't think I got enough of an image. So I reversed it and applied rust mixed with blending solution on the rubber stamp and stamped it on the script piece of background on the card. It was interesting but a very muted effect. After my background dried I stamped the french script using my StazOn brown ink.

  3. The sentiment was stamped on the alcohol ink background using StazOn Green ink.

  4. Stamp the tree on white cardstock. Sponge the edges with a tan ink. Sponge orange and brown around the edges.
  5. Cut and mount all the pieces.

Products:

  • Hero Arts - Slanted Tree
  • Hero Arts - Old French Writing
  • Hero Arts - Three Holiday Messages
  • Hero Arts - Screen Shadow
  • Hero Arts - Shadow Ink - Soft Sand
  • Ranger Alcohol Inks & Blending Solutions - Lettuce, Caramel, Rust
  • StazOn Solvent Ink - Timber Brown, Olive Green
  • Blue Moon - Lost & Found Charms
  • EK Success - Adornments - Red
  • Martha Stewart Border Punch - Doily Lace
  • Adirondack - Sunshine Orange
  • Memento - Rich Cocoa
  • Ranger Distress Ink - Aged Mahogany
  • Gems - Unknown

Thanks for stopping by...

Suzz

Thursday, December 11, 2008

Kristina Werner Color Challenge # 34

Kristina's color challenge #34 http://kwernerdesign.com/blog/2008/12/color-inspiration-34.html contains the following colors:


I had purchased these cute turtle stamps after Halloween and decided I could definitely include the greens in the turtles.

Here is my entry in the challenge:

Products:
  • Inky Antics - Halloween Turtle Clear Set
  • Basic Grey -
  • Martha Stewart - Cornice Border Punch
  • Hero Arts - Native Grass
  • Hero Arts - Sparkle Clear - Love That!
  • Adirondacks - Lights Pigment Ink - Cloudy Blue
  • Ranger Distress Inks - Shabby Shutters, Aged Mahogany
  • Kaisers - Gems

Thanks for stopping by...

Suzz

Friday, December 5, 2008

Spinning Penguins...

Over at HA this week it is about creating quick cards... Well I discovered that I am not so quick. I knew what I wanted to do with this card before I started which is unusual. I knew the design, colors, and layout. It still took me a little time to execute the card. Although in my defense it was intermingled with running my daughter to gymnastics, showers, bedtimes, letting the dog out... I am sure you all know what I mean. :)

This was my quick card. I had two inspirations for this card... Lisa Spangler made the cutest little owl card on her blog with a cut out circle http://sideoatsandscribbles.wumple.com/?p=471 and Kelly had these gorgeous pink scraplings that she made. http://cruzinkellster.blogspot.com/2008/12/minute-cards-with-marths-stewart.html Based on those two wonderful inspiration pieces the spinning penguins were born...

Recipe:


  1. Since I am a lazy cardmaker I didn't measure out the centers of my ovals. I eyeballed them. I used my nestabilities and layed the pattern paper upside down on the cutting plate and laid the die cut in the middle and laid the C cutting plate on top and flipped it over. I then ran it through the cuttlebug. I then did the same for the left and right ovals.
  2. Emboss the patterned paper with the oval cut outs using the swiss dots embossing folder.
  3. Create a card 5" x 7" from pink cardstock. Cut out a rectangle on the front of the card to leave the ovals open to the inside of the card.
  4. Sponge the patterned paper with teal colored dye ink.
  5. Attache PP to front of the card with pink thread in between the pieces in the center of the oval.
  6. Stamp six penguins on the patterned paper with pink ink. Cut them out with your fine scissors.
  7. Stamp snowflake in teal onto patterned paper. Stamp three penguins in pink on the snowflake stamp. Cut out the hats and scarves.
  8. Attach the little hats and scarves to the front of the penguins.
  9. Attach the penguins with the hats and scarves to the front of the pink thread and the other penguins as the back sides on the other side of the thread.
  10. Punch 20 snowflakes from the patterned paper and sponge pink ink on the snowflakes. Attach them to the top and bottom of the card in 2 layers.

Products:

  • Hero Arts - Cap and Scarf Penguin
  • Hero Arts - Grand Snowflake
  • Basic Grey - Wassail - Snow Dust
  • Adirondack Brights - Pool
  • Versacolor - Opera Pink
  • StazOn - Fuschia
  • Martha Stewart - Snowflake Punch

Thanks for stopping by...

Suzz

Wednesday, December 3, 2008

Kwerner Color Challenge # 33

I love the color challenges... Sketches are harder for me to follow and I love color. So anything that can inspire a new look based on color is good with me... Here is the link to Kristina's great blog: http://kwernerdesign.com/blog/2008/12/color-inspiration-33.html. I also am doubling up challenges as these will also apply to the Hero Arts Blog weekly challenge. Lisa Spangler is hosting and has some really cute last minute card ideas and sneak peeks for the 2009 catalogue. http://heroarts.com/blogs/club/

Here is the wonderful color swatch:

Right away after seeing the colors I thought of doing a card with the blue spruce trees in teal and the orange skyline. I decided to try a second card which used the same colors for Christmas ornaments...


The recipes on these cards are fairly simple so I will share the products only. As Shirley says... I am taking the easy path today. :)

Products:

  • Hero Arts Designblock - Birds & Poinsettas
  • Hero Arts Clear Design - Classic Christmas Borders
  • Martha Stewart Clear Gift Tag Stamps
  • Hero Arts - Real Pine
  • Stampendous - Holiday Quad Cube
  • Hero Arts Clear Design - Three Tree Christmas
  • Marvy Uchida Purple Circle Punch
  • Ranger Distress Inks - Shabby Shutters, Broken China
  • StazOn - Pumpkin
  • Adirondack - Sunset Orange
  • Versafine - Deep Lagoon, Vintage Sepia
  • Memento - Rich Cocoa
  • General Kimberly Watercolor Pencil
  • Stampendous - Stamp N Stuff - Kaleidoscope Transparent Embossing Powder
  • Ranger Stickles - Orange Peel
  • Gems - K&CO

Thanks for stopping by..


Suzz


Thursday, November 20, 2008

Kwerner Color Challenge 31


I decided to play along on Kristana Werner's Color Challenge # 31: http://kwernerdesign.com/blog/2008/11/color-inspiration-31.html .


These colors are lovely together. They remind me of fall. Kristina's inspiration was a wreath with berries and vines.
Products:
  • Memento - Rich Cocoa
  • Adirondacks Brights - Sunset Orange
  • StazOn - Royal Purple
  • Versafine - Sepia
  • Hero Arts Sparkle Design - Anytime Messages
  • Hero Arts - Dandelion
  • Stampabilities - Wild Flowers, Floral Stem
  • Crystal Stickers Pearls - Colored with Sharpie
  • Ribbon Unknown
  • Paper Studio - Lace Trim
  • Spellbinders Nestabilities - Scalloped Oval

Thanks for Looking..

Tuesday, October 28, 2008

Happy Halloween....

3 little cards for my 3 not so little anymore children.... The best part of these card was I made them for the Hero Arts challenge http://heroarts.com/blogs/club/2008/10/27/its-mini-monday/ which is all about making mini's. So this is great because I just reached into my scrap basket and pulled whatever pieces I had and folded them in half. Since I won't be sending these in the mail I didn't have to have a matching envelope. Each card has a unique size and all the pieces on it were from my scrap basket. I may have to make a few hundred more to use up my scraps.. Hee Hee...

The first card is for my son who is 13... He like the hallowenscape after he saw it but I made this for him because it had all the spiders on it..


I really got a chuckle out of the ghost costume being made out of spiders. It might be a little busy but the google eyes makes him look scared of his own costume.

This one is for my littlest one she is 7 and she saw this card which I finished first and asked if she could have it.


and last but certainly not least this card is for my middle daughter who is 11. She is very logical and very very smart... She will appreciate a structured card.


Products:
  • Hero Arts - Sparkle Design Happy Haunting
  • Hero Arts - DesignBlock Tree
  • StazOn - Royal Purple
  • Adirondack - Sunset Orange
  • Brilliance - Silver
  • Memento - Rich Cocoa
  • Cuttlebug Embossing Folders - Birds & Swirls, Just my Type, Mosaic, Swirls
  • Fiskars Threading Water Punch

Happy Haunting to you and yours...

Next up my son is getting confirmed this weekend... So I will be attempting a confirmation card... Stay tuned...