Showing posts with label Graphic 45. Show all posts

Friday, July 14, 2017

Live by the Sun

I am back!  I wanted to share the second card inspired by the Summertime challenge at Frilly and Funkie.

This one started with the same background and circle of the first card I shared earlier this week. But I wanted to use the sweet fairy from the Masquerade stamps from Graphic 45.

I tried to make her effervescent by stamping her skirt and wings onto acetate with StazOn and then painting the backside with the pretty gold shimmery paint.

I was thinking midnight on a summer night with the fairies dancing and the flowers appear to be black with the moon behind them.

Happy Friday!

Suzz


Friday, March 31, 2017

Shine

Happy Friday!  I have new stamps in the house which always makes me happy.  I am sharing today a card inspired by vintage Hollywood. 


I recently acquired new stamps from Graphic 45 Vintage Hollywood and I paired it with a Marilyn Monroe stamp from Deep Red. 

I had a white star die cut from my previous project. I thought it would be the perfect frame for Marilyn. I stamped her off to the side and then everything kind of flowed from that idea.   I then colored her lips with the red and decided to go with the classic black, white and red combo.

I found my Yvonne Blair stamps from Impression Obsession while pulling out something and looked through them and found the Believe sentiment and felt it was a lovely sentiment to go with the image.

Have a blessed Friday!

Suzz

Monday, March 27, 2017

Pop Up Twist

Howdy!  I have a pop-up twist card that I spent all weekend creating for a birthday.  The tutorial is form Splitcoast Stampers and can be found here.

 I started with the fun Graphic 45 Masquerade papers.  I die cut tons of stars. Stamped and colored a series of these silly birds from a Simon Says Stamp

This is not a card to be sent in an envelope.  It got quite bulky with the layers of paper and die cuts and I even pop dotted a few of the stars.  

When you start to open the card you can see how the inside starts to turn and pop out. 
 And then the inside starts to open up:


 And then fully open:

 When it lays flat the center keeps it open

 I think they will have fun with this card and I added a lot of the silly birds to make it a happy and fun card. 

Thanks for stopping by!

Suzz


Sunday, February 8, 2015

Birthdays Birthdays

February and March are big birthday months in our family.  I ended up buying ahem all my January cards because I got so far behind.  That meant me getting pro-active and creating cards early for this month.  Both are challenging for me as one is for a nephew turning thirteen and the other is for my niece who is turning 18. 

For my nephew I was looking for a grungy mixed media effect using basketball as the focus.  He plays on multiple teams. I used the Graphic 45 sports stamps for the images.  The background uses a mix of the DarkRoom Door stamps.

For my niece I followed the same grungy style but mixed in stars and music.
I was trying for a new color mix of lavender, gray and yellow.  I might re-work this one as it didn't fly with my daughters.  I still have time. :)

Well that is all I have to share today. I am busy working on a few different projects for future shares and I will be back tonight with the new Simon Says Stamp Challenge!

Suzz


Sunday, February 2, 2014

Love Letters

When I heard  the challenge this week  at  Simon Says Stamp Monday Challenge    was Love Letters I knew exactly what I wanted to play with.  I had these cute little blocks in my alterable stash waiting to be decorated.  I pulled them out to create letter blocks that could make different Valentine's messages..


This particular project ended up being a little more work than I thought as I had so many sides to decorate with different images and letters.

I cut all the pieces for the sides from various coordinating papers. I then thought of the messages and the letters I wanted on my blocks. I stamped the letters first with black ink and added the various stamped hearts over the letters.

 The remainder of the sides is a combination of stamping and various images from pattern papers.
 I sponged a touch of white acrylic paint on the backgrounds to soften the edges.

 Products:
Authentique Smitten , Kelly Purkey Plain Jane  Alphabet, Smitten, LovelyMemory Box Love & Hearts, Hero Arts Watch Gears,  Graphic 45 - A Place in Time,    Prickly Pear - Singing Bird,  Ranger Archival Ink - VermillionRanger archival Ink - Jet BlackWhite Acrylic Paint,

Come share your love letter inspired project for an opportunity to win a  Simon Says Stamp $50 Gift Voucher.

Thanks for stopping by!

Suzz

Sunday, January 19, 2014

A is for Altered Arches

 Simon Says Stamp Monday Challenge  is brought to you this week by the letter "A"... The challenge is to be inspired by the letter "A".  I was inspired to create an altered arches using Authentique's Valentine's papers.  .

Here is the full display:

 Click on the image to enlarge it and see the full image.

A few close up pictures:
The other end of the arches:
and the middle:

The unfinished arches after the pattern paper was cut and taped down.  I smeared white acrylic paint over the surface to soften the edges:


The back side is covered in coordinating papers and linked together with hinges.
I traced the arches on the reverse side of the papers and cut them out.  I cut chicken wire to fit over the opening of the arch.  I stapled the chicken wire to the chipboard.  I taped the pattern paper onto the chipboard arches.  I then smeared white acrylic paint over the surfaces.

I attached the hinges on the reverse side of the arches. I hand cut the different images from the various papers.  The doilies were painted with pink and white acrylic paint. I sponged the edges of the cut images and the doilies with brown dye ink.

Products: Smitten, Graphic 45 Sweet Sentiment,   hinges ,   white paint,   Lace Trim, Idea-Ology - Lavish Trimming, Bo Bunny Doilies, Heart DoiliesScrew Brads, Ranger Distress Ink - Vintage Photo, Claudine Hellmuth Pink Acrylic Paint
 

Come join in the challenge this week  for an opportunity to win a  Simon Says Stamp $50 Gift Voucher.
Thanks for stopping by! 
 
Suzz

Sunday, March 24, 2013

All Zipped Up

Simon Says Stamp and Show Challenge this week  is all about quotes. I do love to use verses and quotes.  I didn't have to look far to find one of my very favorite quotes.


This quote is from Emily Dickinson and  is such a lovely verse that I find myself using it quite often. There have been so many cool zipper projects on-line and I thought I would give it a try.

I used some lovely lavender paper from Graphic 45  Secret Garden collection. . I had bought a few old zippers and pulled out one of them to use on my card. 
I cut the paper down the center.  I ripped along the edges and taped the zipper to the inside of the paper. I folded the edges back to show the inside. This took several attempts to figure out how to open up my zipper enough to show some of the inside.  I layered this over the reverse side of the same paper.

I stamped the sentiment using a lavender ink on white cardstock. I cut the sentiment apart.  I die cut a coordinating bird to nestle in the array of white flowers, ribbon and leaves.

Products:
Graphic 45 Secret Garden, Artistic Outpost - Quote and Quotable, Prima Flowers, Prima Flowers - FiestaPrima Leaves, Ribbon, Memory Box - Branches, Memory Box - Bird, Ranger Archival Ink - Blue Violet,

Don't forget to go check out all the other inspiration from the DT!

Come play along with us and share your favorite quote for a chance to win a Simon Says Stamp  $50.00 gift voucher.

Thanks for stopping by!


Suzz

Wednesday, March 13, 2013

Happy St. Patty's Day

Happy St. Patty's Day (A little early)!  My DH has a brother and sister (Twins) that were born on St. Patty's Day.  Every year I am looking for a way to incorporate St. Patty's Day into their birthday cards.


 I had an idea of a design that came to me last night. I was inspired by Cath's Moxie Fab World Card Creations Challenge of Emphasize the Negative.   I wanted a clean and simple design for my BIL and I was thinking about using the negative space from a couple of clover dies.


I knew I wanted to cut the card with a strip cut out of the front on the right side with a few clovers (Memory Box)  cut into the front.  The rest was looking for a paper to use on the inside and what stamp to use with the clovers.   I found a Studio G set I purchased just for this time of the year. :)


My second card was a quick and easy card too:
 I took a sheet of the March paper from the Graphic 45 calendar collection and cut a few of the images out and distressed the edges.  I just layered them and added a few stamped sentiments and done.  The sentiments are from the Studio G set and Memory Box.

Hope your week is going well!

Suzz


Sunday, October 7, 2012

Stirring up some Haunting Fun!

 Rustification is the challenge this week at Simon Says Stamp and Show.  You can take the idea of rust and create any kind of projects.  I knew I wanted to make something fun with a wood paint stick, I picked up at the home restoration store.
 

My son and I discussed what colors to use to create my rusty look and we decided to go with black gold and black again.

I stamped the fun images on white cardstock using black ink and colored them with distress inks. I added highlights using the white gel pen. 

Here are the step outs to create the rusty look:

1. Paint the wood stick with black acrylic paint: Let dry.
2. Smear Metallic Distress Stains - Brushed Pewter and Tarnished Brass randomly across the black paint.

3. Smear Versamark around the edges. Heat emboss using Aged Gold Embossing Enamel.


4. Smear StaZon Jet Black Ink over the surface of the gold embossing enamel.
I created a second spooky paint stick after the first one because the first one was fun! Here is the top half:

The bottom half

and the full stick!  I used some dollar store skeletons which got a touch of the tarnished brass rubbed over them along with some chain aged with the same techniques as the paint stick.  I attached the word Halloween using grunge board letters. The too were painted, embossed and stained.  They are hard to see in the picture but add another layer of dimension.

Products: Versamark Watermark Ink, Stazon Jet Black Ink, Adirondack Paint Dabber - Pitch Black, Ranger Archival Ink - BlackStampendous Aged Gold Embossing Enamel, Ranger Metallic Distress Stain - Tarnished Brass, Brushed Pewter, Graphic 45 Happy Haunting, Grungeboard Basics Alphabet, Ranger Distress Inks - Rusty Hinge, Scattered Straw

Play along with us this week in the challenge for a chance to win a $50 voucher from Simon Says Stamp
Thanks for stopping by! 

Suzz

Saturday, November 26, 2011

Stationary Set - CR84FN43

I was looking for some pattern paper to use for the beautiful  CR84FN colors and found the sweetest image in the Graphic 45 papers.  It was the inspiration for my project.
A side view showing the post it notes: 
 I started with creating a post it notes holder using the template here.  I loved how it turned out and decided to create the coordinating stationary set.

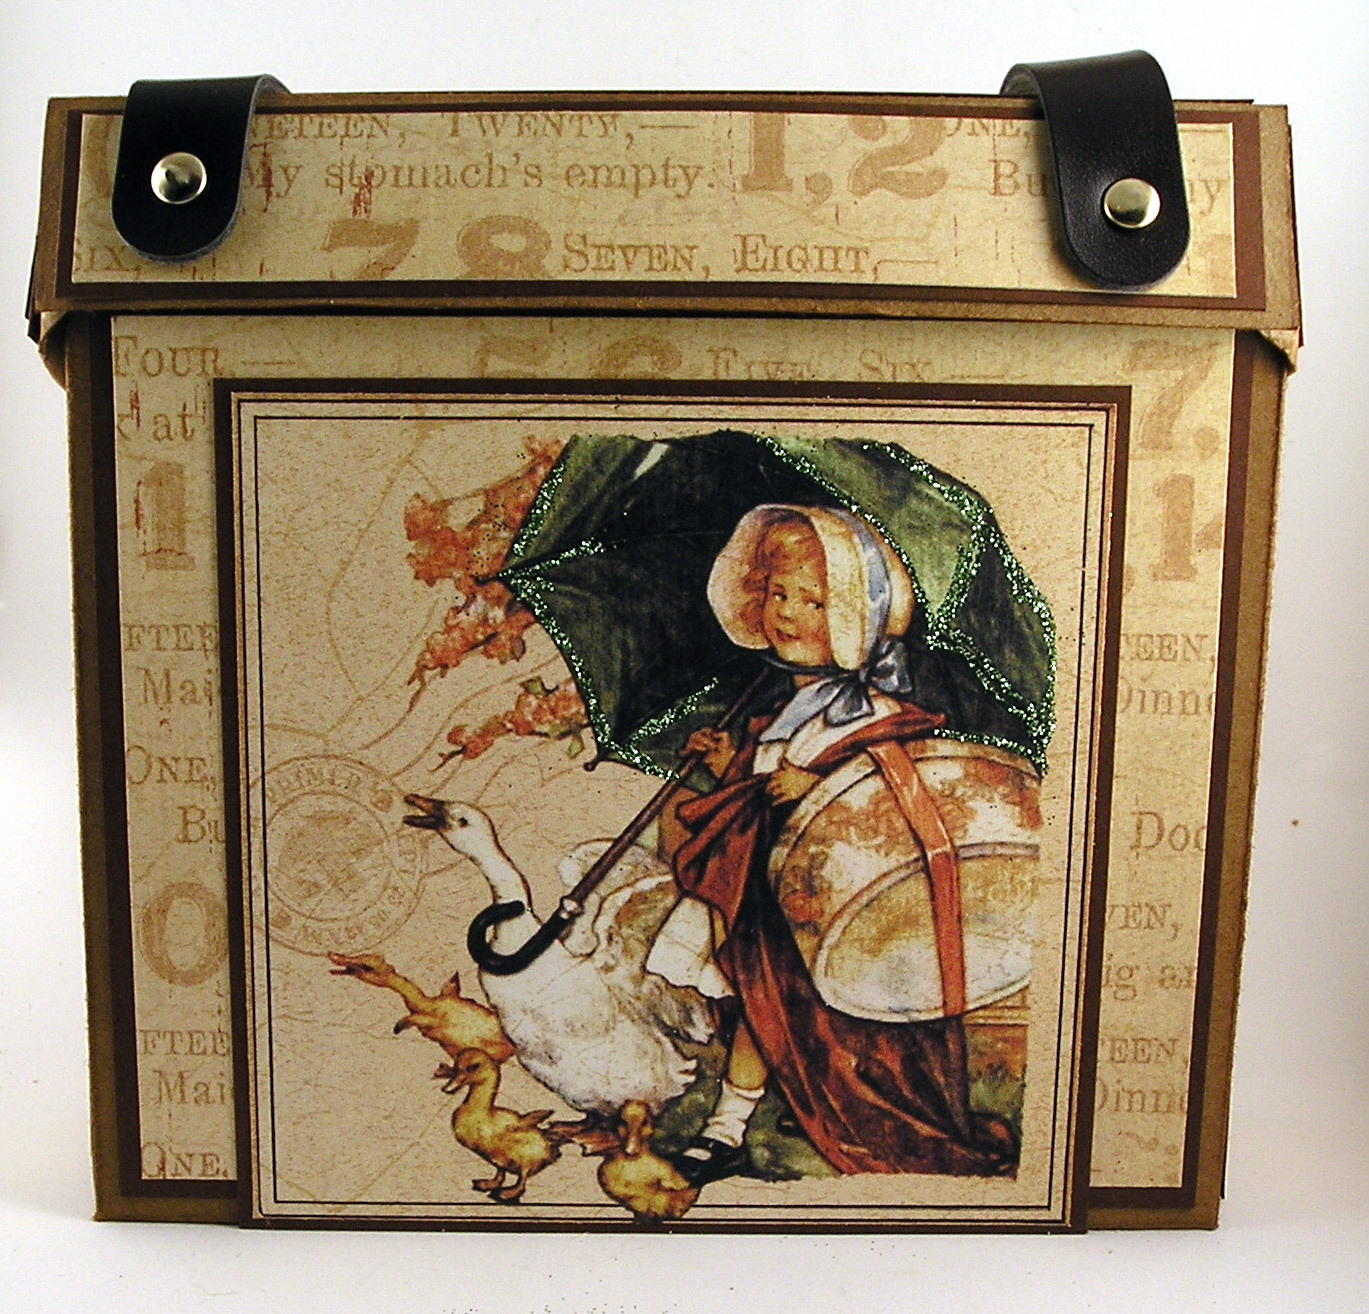
This is how it looks when it is closed:
 and when you open it up by taking the top off:

I have to admit I didn't finish it.  There are cut pieces that you create that you can attach to the part that lays flat and to fit in the pockets.  I gave it to my youngest as she is always playing teacher and she was thrilled. 
This template is on SCS and you can find it here


The only stamping this week was the thank you sentiment.  I ended up moving the tab to the bottom of the cover so it could tuck into the twine and hold the matchbook closed.  I also put the thank you face down so when they open it up they see the sentiment.  I thought this would be great as a teacher gift. :) 

The inspirational photos and quote for CR84FN43:

For all the details on the challenge this week go to the CR84FN blog. 

The wonderful CR84FN Design Team:

Deborah Frings * Sue Lelli  * Andrea Matthews *  Stephanie Kraft * Suzanne Czosek (me)  *  Heather Jensen * Mona Pendleton  * Lisa Somerville *   and our wonderful guest designer this month Mackie Robertson.

Do you like my new blog header?  I wanted to get something wintery up and replace my autumn banner.  I love how it turned out.  Fun to create as well!  Thanks for stopping by! 

Suzz

Wednesday, April 6, 2011

Journey

The Moxie Fab World Challenge is In My Beautiful Balloon and it intrigued me to see if I could create a hot air balloon. I decided to pair it up with the Hero Arts Monthly challenge which includes creating a masculine card.The design is based on the Card Patterns sketch #109

This was a challenge for me in more than one way as I tried to limit my ribbons, lace, flowers or fancy embellishments and create a hot air balloon. :)

The balloon is a circle with the bottom cut off and a rectangle with rounded corners. Stamp balloon using Hero Arts Antique Map and Old French Writing in a brown pigment ink. Sponge balloon using gold, light orange and brown dye inks.  The basket is a rectangle with rounded corners. Stamp basket using Hero Arts Envelope Pattern and Old French Writing in a brown pigment ink.

Thanks for stopping by...

Suzz

Saturday, April 10, 2010

Tag Tuesday Challenge - Sketch Challenge

So happy to play along with the Tag Tuesday Challenge at Louise's. I haven't been able to play for a few weeks.

This week's challenge is to use a sketch that Louise provided. Here is the sketch and her lovely tag.

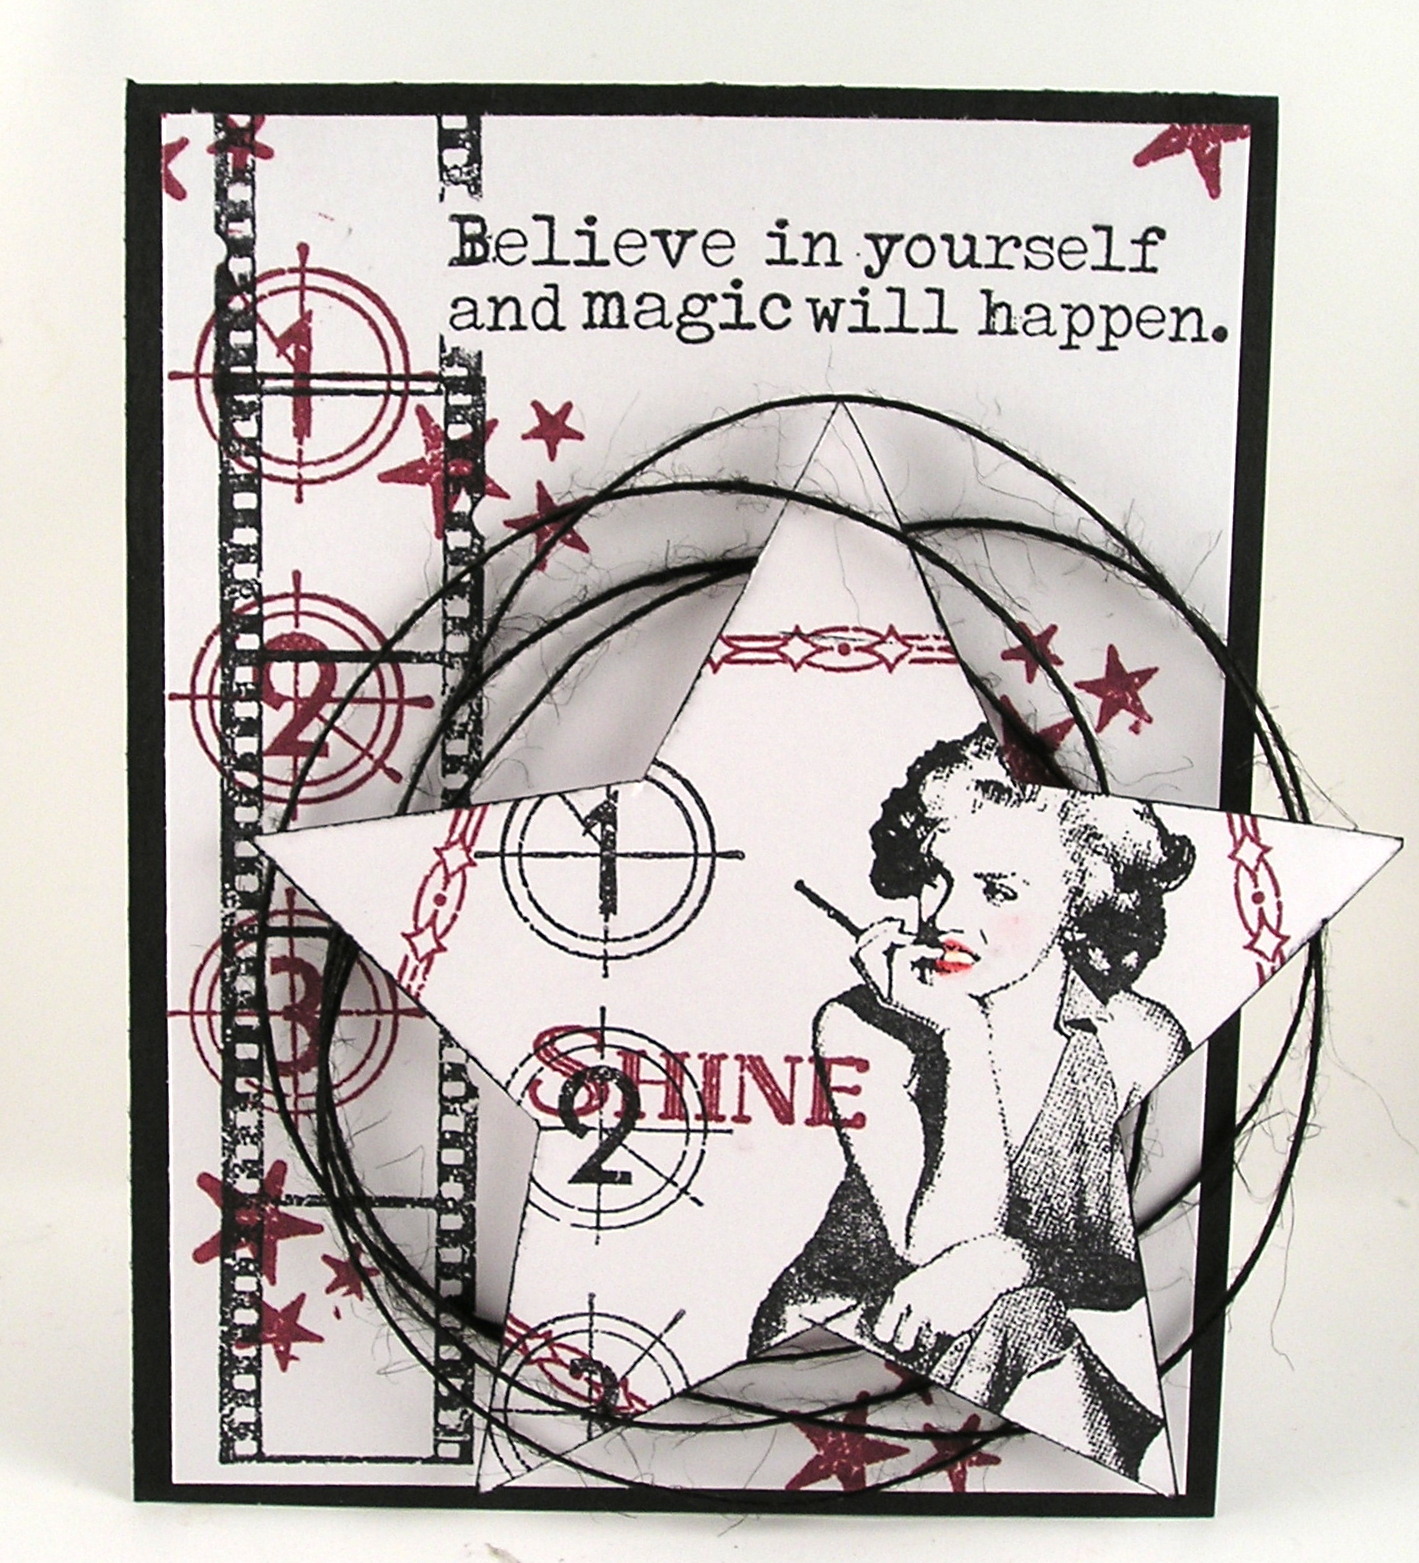
and here is my interpretation of her tag.

I have had this Graphic 45 paper that I purchased for another project which never got used and decided to use that as my circle. The rest are bits and pieces that I have lying around. Very little stamping. (Always scares me when I get to the end of the project and don't have a lot of stamping on it.) :)

Quick simple little tag.

Thanks for stopping by!

Suzz