Showing posts with label Simon Says Stamp and Show. Show all posts

Sunday, September 28, 2014

Finishing Touch


This week at  Simon Says Stamp Monday challenge.  we are finishing our STAMPtember celebration including a challenge to finishing off a project with a stamp.


 It all started with a session of playing with stencils embossing paste and Manila tags.  All laying out on my very messy desk.


 I had a lovely brown shimmery spray out on my desk too which I used to coat the dried embossing paste on my tag.

 I loved the effect and decided to add some of the stencil and paste over the sweet photo from the Tim Holtz - Ideaolog - Found Friends


 And then as luck would have it the photo got pushed aside and landed on top of my tag and inspired me to keep going.

 I decided I needed a background which I pulled a piece of cardboard which got a coat of paint, mist and more paint.
 I then started piecing together the project:

 and layered on the photo


 I misted a few feathers and a resin angel to match


 Some lace misted and tied to the top of the tag.

Flowers spritzed with gold and brown mists.

I added a few buttons painted with gold paint and some rosettes with a  little aging.


My finishing touch... a few stamped words on coordinating paper and added to the side of the photo.


Products: Maya Road - Art Journaling Words,  Resin Angel, Prima White Flowers, Lace Trim, Gold Paint Dabber, White Acrylic Paint, Ranger Archival Ink - Potting SoilFeathers, Heidi Swapp Gold Spray, Tattered Angels - Glimmer Mist - Tattered LeatherRanger Manila Craft Tags, Wendy Vecchi Embossing Paste    Memory Box Lanthenay Stencil.    

Don't forget that all this month is a party at Simon Says Stamp celebrating Stamptember!


http://www.simonsaysstampblog.com/

Why Stamptember?  Here is a little info on why Simon Says Stamp celebrates stamping in September.  Simon Says Stamp was founded in 2002 with an interest in exclusively selling rubber stamps. It didn’t take long until we realized we couldn’t stop there. For more than 10 years we have celebrated rubber stamping and its glory. We work to bring companies from around the world together in a one stop shopping environment. Rubber stamps still remain the heart of our business and we are celebrating by hosting a “STAMPtember®" event intended to inspire, educate, and celebrate the delight of rubber stamping. Part of the enticement of rubber stamping is that stamps can be used in creating or complementing ANYTHING! From stamping dates on bank documents and postage parcels in the early 18th century, rubber stamping has dramatically expanded to include card making, scrapbooking, mixed media and many forms of altering and expressing art.

  Don't forget to come join in on the fun and show off your stencils or stamps!


Have a fab week!

Suzz

Sunday, September 21, 2014

Trick or Treat Tag?

How about a little stamping an stenciling this week?  Simon Says Stamp Monday challenge.   is playing with stencils and /or stamps to create something. I had a cool background left over from some playing I did with stencils and paints.
One of my favorite things is to use up my excess inks, paints or sprays on the craft mats onto leftover cardstock  This background was a combination of leftover ink on a stencil. 

After I used the stencil with the spray I flipped it over and placed it onto a leftover remnant of cardstock. I then kept placing it onto the same piece of cardstock. 

I added a little dripping of yellow spray mist.  I then let it dry and used the same stencil to add white embossing paste for texture.  After all that I added a hint of paint around the edges.


I used the dauber to add a touch of paint around the edges.  While it was still wet I spritzed it with water to allow the paint to soften.

to add he images I used a combination of stamping the images directly onto the background and where the texture was to bumpy I stamped onto tissue paper and used decoupage to apply it to the tag which gives it a transparent effect to allow the texture and color bleed through.


Products:  Impression Obsession - Halloween, D Ranger Archival Black InkTim Holtz Halloween set  Ranger Dauber Paint – Honey  Ranger Dauber Paint – Salty Ocean.   Wendy Vecchi Embossing Paste, Signo Uni-ball white gel pen, crystal gems. Honeycomb Stencil


Don't forget that all this month is a party at Simon Says Stamp celebrating Stamptember!


http://www.simonsaysstampblog.com/

Why Stamptember?  Here is a little info on why Simon Says Stamp celebrates stamping in September.  Simon Says Stamp was founded in 2002 with an interest in exclusively selling rubber stamps. It didn’t take long until we realized we couldn’t stop there. For more than 10 years we have celebrated rubber stamping and its glory. We work to bring companies from around the world together in a one stop shopping environment. Rubber stamps still remain the heart of our business and we are celebrating by hosting a “STAMPtember®" event intended to inspire, educate, and celebrate the delight of rubber stamping. Part of the enticement of rubber stamping is that stamps can be used in creating or complementing ANYTHING! From stamping dates on bank documents and postage parcels in the early 18th century, rubber stamping has dramatically expanded to include card making, scrapbooking, mixed media and many forms of altering and expressing art.

  Don't forget to come join in on the fun and show off your stencils or stamps!


Happy Monday!

Suzz


Sunday, January 26, 2014

Deadwood

Welcome to the wild wild west... The challenge this week at Simon Says Stamp Monday Challenge is about cowboys... My  family and I took a trip out west which included visiting Deadwood which had me scrapping our trip.
I started with trying to create a poker hand reflecting Wild Bill's hand when he was assassinated which is called the Dead Man's Hand.  I did a little online searching to find out what vintage cards would look like and what the hand contained.

I started with the cards first which are always fun to create. I cut them to size and rounded the corners.  I distressed the edges with brown dye ink.  I stamped a soft damask using a gold ink.  I then added the suits in black ink in the quantity which was in his hand.  In my research on line there were varying stories on the fifth card and some showed it as not visible.  So I decided to create a fancy pattern on the backside of my card. Of course no saloon cards would be right without some glass rings and splatters.  I even added a bullet hole to one of my cards.

To create the background on my layout I took three steps: 

I sprayed the background with gold mist.  I then added a layer of bronze mist.  I finished with stamping the Wild West letters in gold repeatedly.

After that was finished I added in a row of damask along the left side in black and gold.


I highlighted the center with a black gem.  I stamped the saloon and highlighted it with some shadowing in the background.

I added the cowboy and a few pistols stamped in black on a similar background.  I added the grunge letters misted to coordinate and accented with metallic brads.  I added a date underneath my kids.

Products:  Stampers Anonymous - CMS109 - Wild West   Hero Arts - Black Metallic Decor Embellishments,   Versafine - Toffee,   Chipboard Letters, DarkRoon Door , Visual Artistry - French Connection, Ranger Distress Ink - Vintage PhotoHeidi Swapp - Bronzer Color Shine, Heidi Swapp - Gold Lame Color Shine, Ranger Archival Ink - Jet Black, Corner Rounder
 

Once again if you play along with us you have an opportunity to win a  Simon Says Stamp $50 Gift Voucher.
Thanks for stopping by! 
 

Suzz

Sunday, August 4, 2013

Paris

I love going to the mailbox and seeing what awaits me. There is nothing more exciting that receiving a handwritten piece of mail.  The challenge this week at  Simon Says Stamp Monday Challenge is airmail.  It got me thinking about my various travel stamps.


My first thought was this wonderful Hero Arts Around the World stamp that I rarely use but really love.


I misted the background of the tag with a touch of brown spray.


I stamped the background repeatedly with the postage using black ink.  I then added color to sections using my watercolor pencils and waterbrush.

I decided to die cut a few shapes and wanted to die cut the Eiffel tower.  I thought it would be fun to die cut it from travel themed paper tape.

I wrapped cardstock with paper tape.


I die cut the shapes from the tape. I then cut the clock from white carsdtock and inked it up with the Ranger Distress Stain - Aged Mahogany .

I added a few strips of the paper tape to the background before attaching the die cuts. I smeared Aged Mahogany over the surface of the Eiffel tower and sponged the edges with black ink.


 I added a gem flourish, leaf, and multiple flowers to finish my focal point with the letters for Paris around the edge of the clock.

Products:  Around the World, Tim Holtz - Sizzix Die - Eiffel Tower Die, Tim Holtz Sizzix Weathered Clock Die, Darjeeling Petaloo Flowers, My Moments Flowers,  Cavallini & Co - Paris Paper Tape, Prima Wood Engraver Button, TIm Holtz Idea-Ology Accoutraments, Pink Paislee Copper Luxe Letters, Ranger Distress Ink - Aged Mahogany, StazOn - Black Die Ink, Ranger Archival Ink - Coffee, Mister Huey - Chocolate Brown Spray, Aged Mahogany Distress Stain


Come join in the Simon Says Stamp Monday Challenge for a chance to win a $50 Give voucher for Simon Says Stamp.

Thanks for stopping by!

Suzz

Sunday, July 28, 2013

Make your Own Sunshine

The Simon Says Stamp Monday Challenge this week is an Ode to Sunshine. 

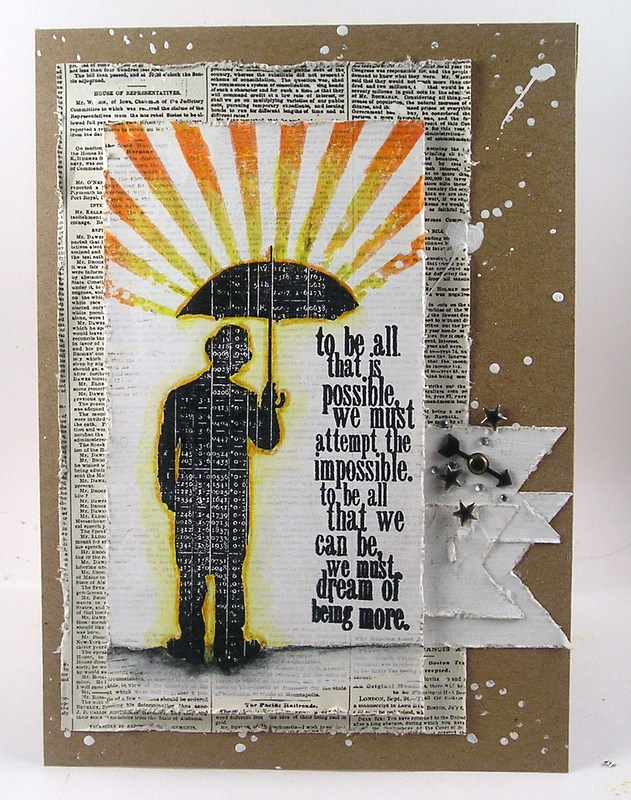
My card was inspired by the man with the umbrella holding off the rain and actually making his own sunshine.
I started with a piece of vintage paper.
I painted a middle section of the paper and let it dry.  I stamped the umbrella man in black ink onto the paper. I then inked up the sunburst image with yellow dye ink and then followed it up with orange dye ink. I stamped that over the top of the umbrella.

I stamped the sentiment along the right side. I then drew in the line for the ground along the bottom. I then used a waterbrush to soften the bottom. I used watercolor pencils and waterbrush to add a halo effect around my man.

I cut out the main panel and layered it over another panel of the vintage newspaper. I splattered white paint around the edges. I cut out a few different banners of the painted background and layered them on the right hand side. I added crystals, stars and a game spinner with brad to the right.

Products: Visual Artistry - Grunge Cirque, Visual Artistry - Purely Random, Vintage Paper,
Ranger Archival Ink - Black, Memento - Dandelion Dye Ink, Memento Tangelo Dye Ink    Waterbrush, White Paint, Game Spinner, Brad, Brass Stars, Crystal   

Now I encourage you to go off and spread a little sunshine and join in the Simon Says Stamp Monday Challenge for a chance to win a $50 Give voucher for Simon Says Stamp.


Sunday, July 21, 2013

Time to Put on our Party Hats!

The Simon Says Stamp and Show Challenge has a new home and a new name.  The new location is here and our new name is Simon Says Stamp Monday Challenge. To celebrate the anniversary of  our challenge we are hosting a celebration challenge this week. I decided to put on my vintage party hat to come to the party.


I needed an idea of how to create my party hat so up to the party decorations I went.


I de-constructed a party hat to get the general shape of the hat to create my own template. 


Next step was to pull out vintage newspaper print.

I laid down a stencil and used the gold embossing paste to create a harlequin pattern over the paper. I repeated this process on several pieces of paper.

I tore it into pieces and applied watered down glue under the pieces and over the pieces to cover the party hat. After the hat was covered with the newsprint and embossed pattern I smeared white acrylic paint to soften the effect in areas of the hat. I distressed around the edges with brown dye ink.

I cut crepe paper into strips. Placed tape around the bottom edge.  Crinkled and attached the crepe paper.   I stapled the crepe paper to hold more wrinkles in place with the tiny attacher.  I added that hint of brown again on my crepe paper with the brown dye ink.

I then die cut stars from cardboard and distressed with the gold embossing paste and white paint.


I attached the stars to the hat. I then made tulle poms by cutting a bow from white tulle. Cut the bow ends to form a pom pom.  I sprayed it with gold glimmer mist.  I then used a glue pen and added chunky silver glitter to the poms. I added an accent in the center with small brass stars.  I added more glitter around the bottom and finished the top off with another larger pom pom with glitter.


I had a hard time getting a good photo of my hat so I asked my youngest to put it on and took several photos. For her last photo I asked her to pout and this is the photo:

 I love the sad look. :)

Products: Wendy Vecchi Gold Embossing Paste, The Crafters Workshop - Harlequin Stencil, Melissa Frances Vintage Crepe Paper, Basic Grey Brass Stars, Stampendous Silver Crushed Glass Glitter , Tattered Angels - Gold Glimmer Mist, Vintage Papers, Glue Pen, Tiny Attacher, Ranger Distress Inks - Vintage Photo, Spellbinders Stars

Come and celebrate with us this week for a chance to win a gift certificate from the ever generous  Simon Says Stamp.


Thanks for stopping by!

Suzz

Sunday, July 14, 2013

It isn't easy being Green

I had to say "It isn't easy being Green" as our challenge this week is all about green at Simon Says Stamp and Show.  I kept singing the Kermit the frog song about "It isn't easy being green" while I was working on my project.

You can interpret green in a variety of ways as being in the colors that you use on your project or as in being green and up-cycling something.


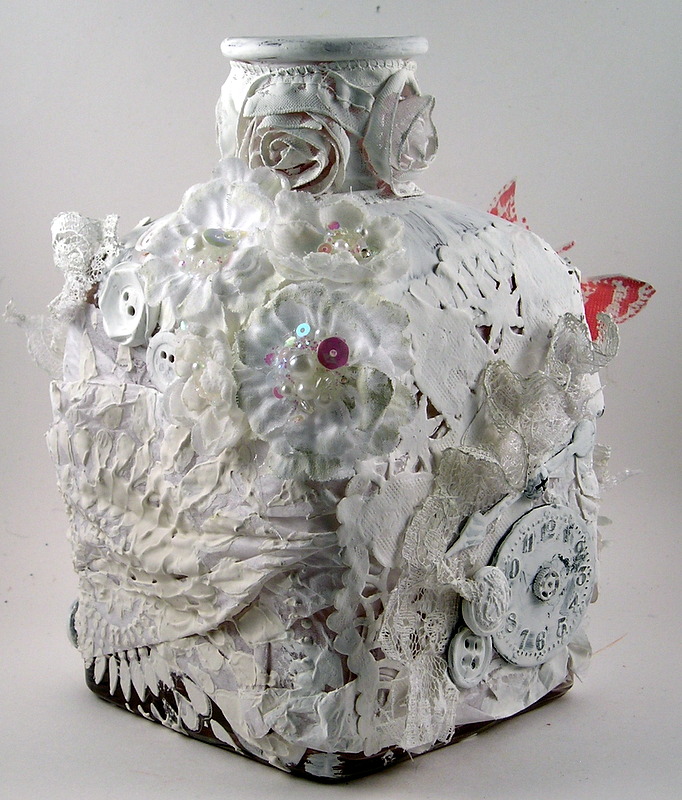
 My project has no shades of green on it but I did up-cycle a vase that was a previously failed project.  I tried a technique on it and wasn't successful.  This gave me an opportunity to up-cycle my failed project into something new.

I started with a colored glass vase.

And added a layer of tissue paper and doilies around the edges:

I then added a touch of grunge embossing paste through a stencil one one side and lace trims and flowers around the other areas.
I painted all the surfaces:

Including my embellishments:

And started adding embellishments:
Buttons, Flowers, and a stamped butterfly.
I added metal embellishments and other re-cycled bits and bobs.  I painted everything in white acrylic paint. I loved how it looked in white but wanted to see how it would look with color.

I pulled out the glimmer mists and misted areas in yellow and then added areas in pink.

The hardest part was getting photos to show of the softness of the misted surfaces.

The other side:

Another side view:

I finished it off with a spritz of perfect pearl mist. 

Products: Perfect Pearls - Pearl Mist,     Claudine Hellmuth Ranger Studio - Paint   PaperArtsy - Grunge Paste Medium Texture, Tim Holtz Idea-ology Timepieces, Keys, Studio Calico - Wood Butterfly Hero Arts Antique Engravings Butterfly, Buttons, Tim Holtz Idea-ology Lavish Trimmings, , Prima Flowers, Tattered Angels Glimmer Mist - Yellow, Pink, BO Bunny Medium Doily, Idea-Ology Game Spinners, The Crafters Workshop Mini Zinnia Stencil

Come join in and show us your green for a chance to win a gift certificate from the ever generous  Simon Says Stamp.


Thanks for stopping by!

Suzz