Tuesday, July 31, 2012

Take me to your Mummy

This card was inspired by the fun mummy and his puppy!  I love how the puppy is pulling on his costume and he is balancing the spooky pumpkin!


This is one of the new stamps from Stampendous and I paired it with another background stamp that I am in love with! 

The background was stamped using an orange dye ink on white cardstock with the edges sponged. I used a scrap cardbase. (I think I cut a strip for another project?)  I decided to attach the image using a circle and tie it from behind to hold it closed. 

The image is stamped in versafine and colored with watercolor pencils and waterbrush.  I sponged the edges with the same orange dye ink. The ribbon was died to coordinate with the colors on the mummy. 

Products: Mumeek, Cling Autumn Words, Ranger Distress Inks, Tattered Angels Glimmer Mist, Watercolor Pencils. 

Have a fabulous Week! 

Suzz


Sunday, July 29, 2012

Hope

Sentiments, verses, and quotes are all favorites of mine.  I love searching through my stamps looking for just the right quote or verse to use on my project.  I was thrilled to see the challenge this week for Simon Says Stamp and Show is  "What do you Say"..  The hardest part was picking out which sentiment to use on my project!

I finally selected the quote from Emily Dickinson about hope.  I loved reading Emily Dickinson when I was younger and this is a beautiful bit of her poetry.   

It inspired me to create a piece of home decor:

I started with this really cool Tryptich Arc Window set from 7 Gypsies.  I painted two of the pieces with white paint and added touches of purple.  I also had read about a technique of mixing gesso with baking soda to create a paste which you can than stamp into and get texture.  My paste wasn't setting so I ended up just leaving it and adding a layer of glimmer mist and white acrylic paint to the edges.  I then  added on layers of tissue tape and more paint and distressing.

That was just the arches. :)  
I glimmer misted a sheet of white cardstock to match the background.  I stamped the quote using versamark and heat embossed using white embossing powder.   Stamp the bird using black ink.  Add a touch of brown to the breast of the bird.

To create my home for my bird I layered in a crocheted doily. I spritzed seam binding with glimmer mist to create a coordinating ribbon for the nest and to tie along the bottom.  I also took some beautiful Prima flowers and glimmer misted them to match.

Pop dot the open arch  onto the background arch and start layering in the doily, flowers, bird, nest and finish off with the sentiment.

I was really pleased with the effect and how my home decor turned out.

Products: Artistic Outpost Quote and Quotables, Crafty Secrets - Fairyland, Glimmer Mist, Prima Flowers, 7 Gypsies Tryptich Arc Window, Seam Binding, 7 Gypsies Gaffer Tape, Gesso

Don't forget that you can play along too and have an opportunity to win the 50.00 gift certificate for Simon Says Stamp.


Have a lovely week!

Suzz

Saturday, July 28, 2012

Stampendous Blog Hop - Magic Book

Today is the last day of the Stampendous Release Week. To celebrate there is a blog hop with tons of inspiration and three wonderful prizes!

I couldn't' wait to use the new fabulous Halloween images to create a spooky incantations book!

My book opened looks like this:

My book closed:

The binding:
And front and back cover:


 For the details on how to create the book and the supply list: Magic Book Instructions

Stampendous will be drawing a winner for these great prize packs:


How do you win it? It's easy! THREE of the bloggers today will be choosing a random commenter from their blog, and those lucky people will be announced on the Stampendous blog Tuesday, July 31 (please leave comments by Monday, July 30 at 11:59 PM PST). The more places you leave a comment, the better your chances are to win!   Below is the list of team members who are in the hop today:

Stampendous Impressions
Kristine Reynolds
Lynn Mercurio
Jennifer Dove 
Taylor Usry
Jan Garber
Lea Kimmel 
Cyndi Bundy
Pam Hornschu
Rhea Weigand
Janelle Stollfus
Wendy Price
Tenia Nelson
Jennifer Ingle
Melinda Gleissner
Stephanie Lee
Susie Moore
Suzanne Czosek
Wendy Jordan

Thanks for stopping by!

Suzz


Friday, July 27, 2012

Hexagons

I love the unique look and feel of the Hexagons but have a hard time using them in my projects.  The Moxie Fab World Challenge hooked on hexagon got me thinking how to incorporate them. 

I decided to try to use them on a mixed media background.  That background became the base for two different projects.

First I created a tag:  

than I cut my other pieces into little backgrounds and created three mini cards:

and I ruined one section with too much stamping. :)  That one piece was recycled.

 To create the background:
  1.  Smear yellow paint across the cardstock.  I dipped my paint brush handle into my paint and rolled it across the surface.  Let dry. 
  2. Smear teal paint across the surface. Let dry. 
  3. Add white paint in spots.  I also used the old bubble wrap and white paint in areas. 
  4. I stamped randomly the Hero Arts Chevron stamp in darker blue randomly across the background. 
  5. The hexagons were created by using the hexagon dies to trace the shapes on with watercolor pencil.  I then used a waterbrush to soften the effect around the inside of the shapes. 
The tag included Stampers Anonymous Attic Treasures, Stampers Anonymous (letters), Artistic Outpost Typography, 
and my favorite pussy willow stamp.
The mini cards use robots from Hero Arts. 

My daughter loves robots and I think they are super cute. She already saw the unfinished cards and said very cute!

Have a wonderful weekend!

Suzz

Thursday, July 26, 2012

Stampendous New Release Blog Hop


The Stampendous DT is sharing projects using new stamps.   The new release is now available in Stampendous store. 

When I saw the new Jumbo Cling Snowflakes I knew I wanted to use this sweet image of my daughter:
The picture is very dark but I love how it pops against white, gray and lavender colors.


The background has a light sprinkling of Tattered Angels Glimmer Mist (Plum) to match her coat.

The snowflakes are stamped in gray with a hint of plum in the snowflake. I also added a touch of the Stampendous Crystal Ultra Fine glitter to the snowflakes.  The snowflakes are cut around the frame to fit the picture in the background.

I love the Altered Alphabet set for adding sentiments to my layouts.

My second project celebrates Halloween! The new release contains a variety of fun and vintage Halloween images. 

I started with the Steampunk Owl and stamped him on white cardstock.  I added a touch of color using watercolor pencils and waterbrush on the Owl. I sponged the edges with orange dye ink and then attached it to the front of a 7 Gypsies book cover.  Heat emboss the edges using Aged Gold Embossing Enamel.   I stamped the Halloween  from the  Halloween Sprite and heat embossed it using Aged Ivory Embossing Enamel.  After it cooled down I sponged over the embossing with  Tsukineko Purple StazOn ink. I added a hint of purple using the Aged Wine Embossing Enamel over the gold.


A few of my teammates are showing off new products from Stampendous as well! Not only do some of them have their own blog candy, Stampendous will be drawing a winner for this great prize pack.


How do you win it? It's easy! One of the featured bloggers today will be choosing a random commenter from her blog, and that lucky person will be announced on the Stampendous blog tomorrow. The more places you leave a comment, the better your chances are to win! Below is the list of team members who are sharing inspiration today:

Stampendous Impressions
Jennifer Ingle
Kristine Reynolds
Jennifer Dove 
Lynn Mercurio
Taylor Usry 
Jan Garber
Susie Moore
Lea Kimmel
Rhea Weigand
Wendy Price
Janelle Stollfus
Suzanne Czosek  
Tenia Nelson

Thanks for stopping by...

Suzz

Wednesday, July 25, 2012

Yuletide Greetings

Today is the new release of Artistic Outpost stamps.  The sweet MidWinter plate  is the newest release featuring scenic snow drifts and seasonal flora and fauna. This collection was inspired by a favorite Christmas hymn,"In the Bleak Midwinter".
Images in the collection include:  a frozen creek scene, a cabin in the woods, a strong reindeer, a forest hare, a royal cardinal, and appropriate sentiments. 

This was my last project and I really like how it turned out:


I used the Snowy Woods Santa stamped in Ranger Archival Ink - Coffee on white cardstock. I placed the lovely cabin in the distance behind the Santa image.  The sentiment was stamped in Crimson Red. I added accents of red, white and brown ribbons.  I added embellishments to the tag for a few more little details. 

In my next card I created a scene on a postcard:


I stamped the postcard heading from the Ephemera Backgrounds and stamped across the top.  I split up the bottom half and used the beautiful scenery from Midwinter across the back and added the lovely verse in the center.  I finished the scene off with the Elk pop dotted to add depth.  The background is highlighted with a touch of light blue dye ink and glitter.

The other DT members have created some beautiful samples with the new plate:

Thanks for stopping by! 

Suzz


Tuesday, July 24, 2012

Happy B-Day!

Time for a Mojo Monday Sketch!  Sketch #251.  I had this pack of Authentique papers in my stash in hues of yellows and grays.  I decided to pull them out and use them as my background for my project:

I tried to use up some of the strong patterns that are not necessarily me... But when I ended up with my finished card I felt like the whole card wasn't me. LOL!

The flowers are from a Hero Arts Clear set.  The sentiment is Memory Box.  (My girls are always looking for birthday cards).

I love the bee.  I bought some jewelry from Claires and they had the cutest bees on the jewelry. He works perfectly with the yellow gingham.  The flourish is from Zva Creative. 

Have a fabulous Tuesday!

Suzz

Sunday, July 22, 2012

Sisters

The Simon Says Stamp and Show challenge this week is Hey Girl.  I couldn't think of anything frillier, softer and girly than the sweet sisters from the Artistic Outpost Bird of a Feather plate.


I remember dressing up with coordinating outfits with my sisters growing up.  Of course we never wore anything this frilly ours would have been more of the 70's style of clothing. (Yikes!) I started with the sweet girls and created a shabby chic card.


I used a soft damask stamp and stamped it in a soft shade of gray to create my background behind my girls and on my card base.  I .layered tissue paper and white glue over half of the background.  The edges of the main panel is distressed using a distressing tool. 

 The sisters are stamped in black and colored with a hint of coloring pencils. I cut them out and popped them up to allow them to stand out. The bird cage is stamped on acetate using StazOn ink and cut out.  I popped up  the cage to give it depth.  The girls are framed using a new oval floral spellbinders frame and a row of pearls.  

The flower trim was a last minute addition to bring more of the lavender tones back into the card. I died the cream organza roses with glimmer mist. 


There is a $50.00 gift certificate at Simon Says Stamp  as a prize for one randomly selected participant in the challenge.


Have a Wonderful Monday! 

Suzz

Saturday, July 21, 2012

Sail On!

 Exploring or sailing somewhere new and seeing new things and places... We are getting very excited for our cruise that is coming up.  This card was inspired by the cruise. Of course our ship won't be wind powered. :)

The background is all piece of an alcohol inked background done with a few shades of blue and blending solution.

I added highlights of white onto the ship and compass to make them pop. These images are from  brand new sets from Our Daily Bread Designs called: Surging Sea and Smooth Sailing.

I hope our trip is more of the smooth sailing and not so much of the surging sea. :)

Have a lovely Saturday!

Suzz

Wednesday, July 18, 2012

All about Favorites - Artistic Outpost Blog Hop

This month the Artistic Outpost Hop is to share your favorite set.  My project started from Artistic Outpost sets that represent books. I spent so many hours as a child reading and re-reading books from the library. I could always be found with a book in hand.  This project reflects my love of books and I was thrilled to find so many of the images from the Artistic Outpost sets from children's books.

I made a reading log binder: 


I took two chipboard covers and painted them white.  I then used the  alphabet stamp and stamped it over the surface using Juniper Adirondack ink. Distress the edges using the brown dye ink.

Punch various size circles from  scrap cardstock. Use the circles to sponge blue circles using acrylic paint over the surface. Add a touch of white acrylic paint to the circles before they are dry to merge the color into the circle.

I stamped the various images on white cardstock and colored them and cut them out with detail scissors.

Here is a list of all the stamps used: Neverland, Oz Collage, Huck Finn, Secretary Pool, Wonderland, Favorite Book.


The rest of the Design Team are sharing their favorite sets. Hop along and see what they picked:

Thanks for stopping by!

Suzz


Tuesday, July 17, 2012

Life is Good

Happy Tuesday! 

I was playing around last night with the Mojo Monday Sketch #250 and a new pad of paper from Authentique.

I had all the paper cut and layered last night and left it overnight.  This morning I decided to go into my mixed stamp drawer.  I have all my stamps sorted by manufacturer.  This helps me when I am looking for a particular stamp from a company.  For my smaller collections by company I have a catch all drawer.  Going through these drawers are always fun as there are stamps I forget about in there and get to re-discover.


I pulled out the sweet image from Paper Bag Studios, the Stampers Anonymous wasp, and the Art Impressions Chicken wire.  I added the sentiment from the Artistic Outpost - Quotes and Quotables and the background from Hero Arts.

The paper did most of the work along with the beautiful sketch. I added a few details with the stamped images, distressing and flowers. 


Have a wonderful Tuesday! 

Suzz

Sunday, July 15, 2012

Family Gatherings


I wanted to do something very fun and different for my first challenge as a DT member on Simon Says Stamp and Show.  The challenge is Anything Goes this week, which really allowed me to come up with something different. 

I had these awesome wooden spoons just waiting for something to happen.

I was inspired to create some place card holders for a family gathering. Each spoon allowed me to create a  personalized place setting for my guest.

Here is my family of spoons:

Each spoon started with a layer of distress stains.  The stain applied to the wood beautifully.   I added a layer of smeared white acrylic paint around the edges and across the surfaces.  I stamped the definition stamp over the spoon.  Helpful Tip:   I did not use an acrylic block for this step which allowed me to push the cling stamp into the concave surface of the spoon.


The images are stamped on white cardstock and colored using watercolor pencils and a water brush. I cut them out and attached them with watered down Elmer's glue. I glued underneath the image and over the surface.

After that each spoon had their embellishments hand selected to coordinate. I used the stains to color seam binding to coordinate.  Each spoon has a memo ring attached  to slip a card with the guest's name on it.


I also created two other spoons with a few different accents.  I highlighted the words on the spoon and used mini clothespins for the clip.
See how the little fairy covers my clothespin underneath?

A visual display of the spoons in progress and a few of the supplies:
Don't my supplies look well loved?

Products:
 For more inspiration, info about the challenge, and the wonderful prize head over to Simon Says Stamp and Show

Thanks for stopping by! 

Suzz  

Branches & Glimmer Mists

I just received this Crafters Workshop Stencil and had to play with it!  I inked up for two challenges: Fashionable Stamping Challenge #26 - Let's Get Messy & Inky and the Moxie Fab World Happy Birthday Stamp it Card week challenge.

My first project I turned into a wall hanging:


Don't you love those hinges?  I bought them at a home recycling store for a cheap price. this started as a card but I wanted to add a little something different. So those hinges came out to create a wall hanging. Of course my dear hubby was wondering why I needed dead branches. :)  I used the Hero Arts Wood Grain stamp in the background and the birds from Artistic Outpost Neverland and the sentiment from Artistic Outpost - Lovely Day.

My second card uses the same stencil different glimmer mists and a tiny pop of black with the bird and sentiment:


The bird and sentiment are from Memory Box.  The backgrounds are all Tattered Angels Glimmer mists.

Just playing around on a hot and steamy Sunday!  My first post for SSSS is tonight and I can't wait to share what I have created!

Suzz

Saturday, July 14, 2012

Stampendous & EnviroTex Blog Hop - Plate it Up

I've enjoyed playing with the resin this week!  Carmi Cimiata of the Resin Crafts Blog is very inspiring and has taught me so many ways to use the Resin.all stored away for future projects. :)  I am so appreciative of her and the folks at ETI who sent us all some resin to play with! (Thank you Carmi!)

My project is a 1.99 Plastic Charger Plate from Hobby Lobby: 

It started looking like this: 


I measured the diameter of the inside and cut a circle to fit in the opening. 
I stamped the Jumbo Cling Iris using black ink and colored with glimmer mist on white cardstock.   I added some shading using watercolor pencils.  I then glued the cardstock to the center of the plate.  I applied glue around the edges and sprinkled Bronze Glass Glitter and sprinkled in the center. (Lesson Learned I needed to glue the top and the bottom to get an even coat.  That would have prevented the resin from seeping under my cardstock)

I added in the resin to the center and let it cure.    After it was finished I decided I wanted to add a touch of gold to the project: (I had no problem with mixing my resin and having it cure.) I followed the instructions and was in air conditioning so no humidity issues)


I used versamark to add Aged Gold Embossing Enamel around the edges and stamped the flourish around the edges and heat embossed using the Aged Gold Embossing Enamel.  My biggest compliment was when my son came into the craft room and was looking around for it as he liked it! :)

I created a second plate using my Stampendous stamps and StazOn inks:
This plate was glass and I used StazOn to stamp the flourishes around the edge.  I also stamped them on the inside using a lighter ink.  The bird was stamped and colored on cardstock. I cut it out and glued it to the plate before pouring my resin in over the glitter and image. 

Stamps: Cling Jumbo Songbird, Charm Collection

As you visit each blog, you'll be entered in our drawing for a great prize package when you leave a comment! If you don't tell us you were there by commenting, we can't include you in the drawing! We'll pick a winner from today's comments separate from the comments throughout the week.

Thanks for stopping by!

Suzz


Thursday, July 12, 2012

Stampendous & EnviroTex Blog Hop - Bird in a Frame


The Stampendous DT is playing with EnviroTex Craft Resin this week. Carmi over at the Resin Crafts Blog is also playing along with us and her projects are fantastic. 

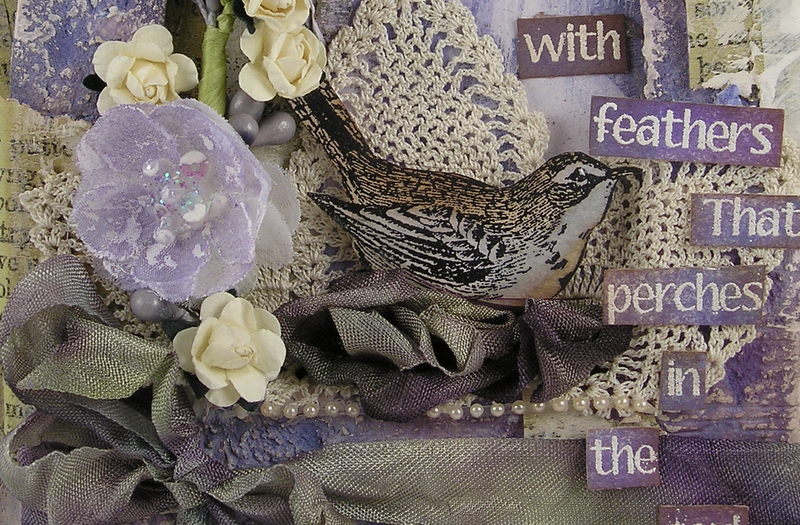
I tried a few different projects just learning how to use the resin.  I decided to start small and create a pendant for my first project:

 I stamped the background using the sweet Charm Collection Clear Set  and added touch of blue dye inks on the background and the bird.  I added the bronze glass glitter into the bezel and added the resin.I was really pleased with this and will use it on a project in the future.

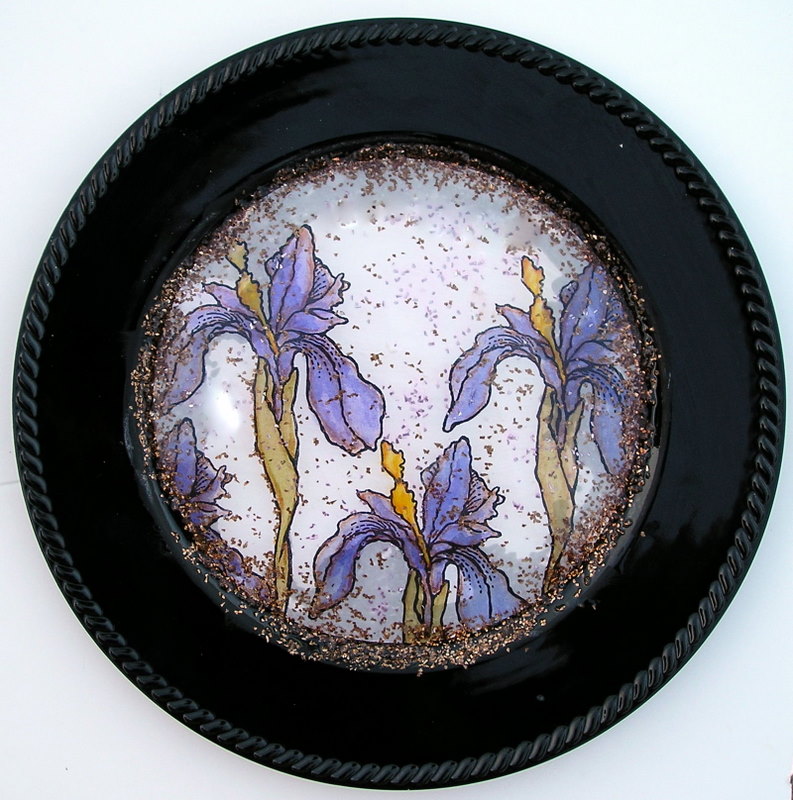
My next project I decided to try to create a paper weight using a jar top I had in my stash:
 I thought it would be fun to create some acetate stamped images to float in the resin:

 I used the Stampendous Butterfliesand stamped them using StazOn black ink on acetate.  They were cut out using detail scissors.  I covered all the metal surfaces using Versamark and Shabby White Embossing Enamel. I poured the resin and added a layer of gold glitter and my butterflies.  I added a few different metallic charms to the resin.  Then I thought I would add a touch of color and I added drops of purple glimmer mist. I then swirled around the glimmer mist and it made little purple bubbles and I loved the effect.

On Saturday I will share my next two projects with a few more lessons learned. :) 

Now off to see the DT projects for today:


Important details about the prizes... . Carmi has 3 prize packages that can be won by our fans in Canada where she lives. She will draw three Canadian winners from the comments on her blog all week. We have 3 prize packages for our friends with US mailing addresses.
  • We'll draw one winner from the weekly comments on our blog.
  • We'll draw one winner from the comments on Saturday's Big Blog Hop
  • We'll draw one winner from Facebook - You need to SHARE one or more of our posts about this project on your Timeline **
Each prize package includes a Jewelry pack of Resin, a bottle cap, bezel and button to try, and the Stampendous Charm Collection Perfectly Clear Stamps - perfect jewelry sized stamps.

Thanks for stopping by! 

Suzz


Wednesday, July 11, 2012

A Faithful Friend

I was very bad and bought two more 6 x 6 pads of paper over the weekend.  I picked up Authentique's Carefree Bundle and Lively Collection.  Some beautiful colors and patterns in both packs.  I figured I better use some of the new papers and they were the background for my card today with the layout from the Mojo Monday Sketch #249.   The ODBD challenge this week is also distressing or tearing. (I managed to include that.:)


I distressed the edges added a little white paint to tone down the background.  Then I stamped the flower from Our Daily Bread Designs Don't Worry set along with the sentiment and dragonfly from the Faithful Friend set.  They images are colored in pinks and oranges. The pink paper is stamped with the Crochet background stamp. 

I started with these bright bold flowers in my background papers but couldn't match the colors  in my flowers so I ended up switching out with the pink.

Thanks for stopping by.

Suzz


Monday, July 9, 2012

Happy Birthday

I was back in my scrap pile again.  I found a background resist piece created awhile ago.  I decided to finish it off in completely different colors and create a card for the Moxie Fab World - Stamp It Challenge - Birthdays. 

The original resist was stamped in lavender and clear embossed.  I decided to go to the rusts, browns and yellows. 

The background is a definitions stamp from Hero Arts.  I stamped over that with the beautiful Hero Arts Classic Fabric Design using versamark.  I head embossed with clear embossing powder.  I then sponged over the surface with Rusty Hinge and sponged the edges with Walnut stain.

I then took a piece of tissue paper and spritzed it with yellow and orange glimmer mist.  Sponged the edges with the brown dye ink.  I repeated the process to create the background for my butterflies and sentiment.
The butterflies are from the Stampers Anonymous Attic Treasures set. The sentiment is Inkadinkado.

My favorite part was adding the twine and stringing the butterflies into the twine.
I


Hope your Monday is off to a wonderful start!

Suzz

Sunday, July 8, 2012

It's a Mystery

Sundays are usually when I hide out in my craft space and on the T.V. I find the old mystery shows.  The London Elements set from Artistic Outpost included the Sherlock Holmes outline which inspired me to create a collage of images worthy of a Holmes battling Moriarty story.

 The collage is bits and pieces from various AO sets (Apothecary, Whimsical Melange, London Elements). One of my favorite details on the card is his address using the numbers from the Whimsical Melange plate.
 The background paper worked with the concept providing postage and text to blend the images together.

Thanks for stopping by.

Suzz


Friday, July 6, 2012

Celebrate

Happy Friday!  This summer is just flying by... I can't believe we are after the 4th of July already.  Another hot day for us here today. We are breaking records with the heat here.

I was meandering around on my craft desk this morning trying to put together a card for the Mojo Monday Sketch #248.  It was slow going for me..

Here is what I came up with:

I have this beautiful Calla Lily from ODBD that I have been wanting to use on a card and I paired it with the Celebrate from this set.  The background is stamped from the Crochet background stamp.  

I hope your Friday is wonderful!

Suzz

Thursday, July 5, 2012

Art

I promised to share the second set of tags created using Tim's July Tag technique. These tags were my second attempt and I think they turned out  better than yesterday's tag.


The colors I mixed for alcohol inks this time were Ranger Alcohol Inks - Raspberry and Sunshine. Doesn't that make you think of summer time? 

I used the same method of spritzing my glossy cardstock with a layer of water first.  Then I dripped on a big drip of alcohol ink on the paper and blew on it with the straw.  These were on one sheet of cardstock and in two different areas.

I added alcohol blending solution again at the end to dilute the colors and to help spread them across the surface.

The sentiments which were perfect for the tags are new ones from Stampendous and are a sneak peek. They will be available in July in the Stampendous store.  The butterflies are Stampendous too and are in a set and are available here.

The ribbon was died with glimmer mist to coordinate.

Thanks for stopping by!

Suzz

Wednesday, July 4, 2012

Happy 4th of July!

Happy 4th of July!

Tim's July tag celebrated the 4th with its colors and content.  I loved the technique he used and couldn't wait to try it out.


 Tim's technique used compressed air which I didn't have but that didn't stop me... I pulled out a drinking straw and used a little of my own air.

This was my first attempt at the technique. I have a few other tags I created using the technique which I will share tomorrow and I think I got a little better at my version of the technique with practice.

Recipe:
  1. Spritz surface of glossy cardstock with water. (I mis-read his instructions.) 
  2. drip red pepper alcohol ink onto surface. Blow on with straw. 
  3. Drip cloudy blue alcohol ink onto surface over red area and white. Blow with straw to spread. 
  4. Drip white mixative onto surface blow.  (This didn't work as it was too thick so I added a drop of alcohol blending solution and then blue.  Hence the blended white area.) 
I stamped the Artistic Outpost She-Roes set to get my words and images.  The ribbon was inked up with the alcohol inks and blending solution to fade it a little and mix it up.  I used the white acrylic paint on the ideology charm.

Happy and safe 4th of July!   

Suzz