Showing posts with label Glimmer Mist. Show all posts

Thursday, August 18, 2016

Blues

Hello! Today's tag is a continuation of playing with my scraps the other morning.  

I loved how this torn background looked and wanted to play with my Artistic Outpost stamps so I just started laying in bits and pieces until I got what I wanted.

The tag is covered with half newsprint paper from Wendy Vecchi and the other half the tag. I ripped off the newsprint after I had sprayed and stamped.  I then came back in with more spray on the right side to give the effect.

I stamped the girls on another piece of paper and then cut them out and attached them. Added a touch of shading around them and then added the skyline and sentiment.

Products:  Stampers Anonymous - Tim Holtz - Alphabet,  Artistic Outpost - PaperBoy, Tattered Angels - Turquoise Glimmer Mist.

Thanks for stopping by!

Suzz

Monday, April 25, 2016

Spring Inspired

Hello!  I was playing this weekend with Glimmer Mists and some new stencils and stamps.  I ended up with so many fabulous backgrounds and figured I better finish one of them.

I just purchased these jumbo journalling tags from Ranger and wanted to play with that as my surface.

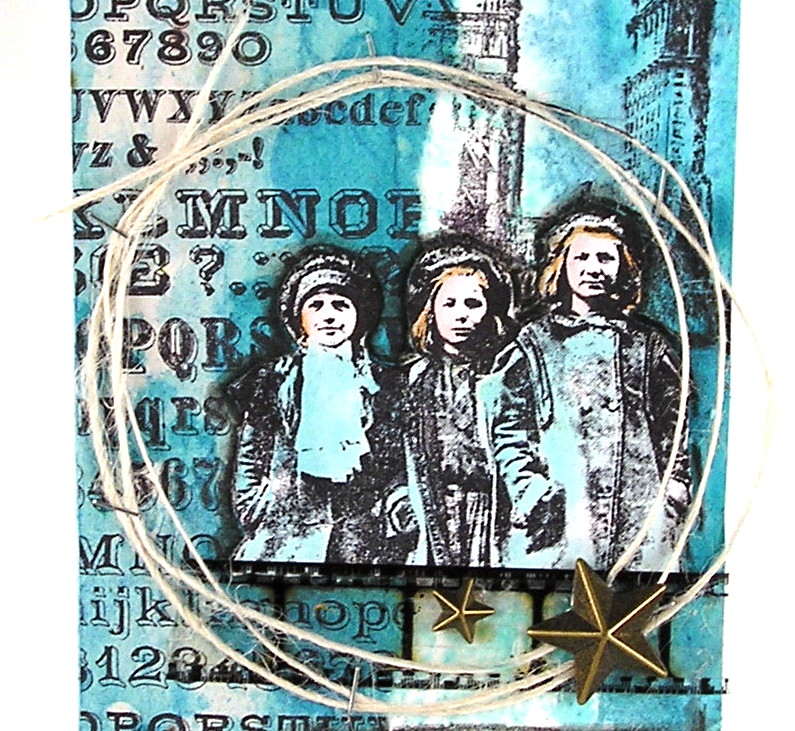
 I actually started with a stamped background with the fine print painted in white paint to create a resist.  After that dried I stenciled the numbers using crackle embossing paste. (I had to let that dry) 


 Then the fun began with dripping, spraying, and splattering the Tattered Angels Glimmer Mist over the surface.  I kept trying various effects until I got the background I wanted. 


 Then this morning I added the sentiment, circles, flowers and dragonfly to finish it off.  

Products: Tattered Angels Glimmer Mist  - It's Brown, Patina, Olive, Tim Holtz - Stampers Anonymous - Wildflowers,    Tim Holtz - Layering Stencil - NumericStampers Anonymous - Classics #1,  Stampers Anonymous - Courage ,  Wendy Vecchi - Crackle Embossing Paste, Ranger Archival - Coffee, Stampendous - Brown Embossing Powder, Vellum, Sequins, Mini Pearls, Watercolor Pencils

I would like to enter this in the following challenges:

Anything but Cute - Earth Day Challenge:  (Look at the pretty mood board which had me thinking flowers, earth, nature and of course greens and blues)


 Mixed Media Place April Challenge -Creative Gym #18


Thanks for stopping by!

Suzz


Saturday, January 30, 2016

New Beginnings

Hi!  I spent some time creating with some new goodies from Canvas Corp Brands for the Anything But Cute Challenge - Ring out the old and bring in the new and the Mixed Media Place - New Beginnings challenge. 

I recently received some new paints from the Tattered Angels and I wanted to play around with them along with my glimmer mist.  I followed the them of new beginnings with the inspirational words from a series of Stampendous stamp sets.

I started with a background with a stencil and the Tattered Angels glimmer mist.  I then came back in and used stencils and circles to create a series of circles painted and outlined with colored pencil.

I stamped the text using black ink over the background.  I used the remainder of the background to create a series of stars. I cut them out and stamped inspirational sayings.


Thanks for stopping by!

Suzz


Sunday, August 24, 2014

Love, Dream, Wish

I have to admit I love the feel and look of kraft.  The neutral background spawns all kinds of ideas and this week at  Simon Says Stamp Monday challenge   is witch-kraft.   I happened to have a paper bag sitting on my desk and was inspired to use this as the base for my project this week.


The sweet girl was brand new and sitting on my desk and I ended up stamping her and using her on multiple projects.
A quick coat of white paint to create a backdrop.  I then used up some different scraps to layer on the bag including a leftover misted background with some white paint.  I stamped the image on a pink inspired background.  I stamped her using a kraft inspired ink and added some fun accents.


I even gave her a little bench to sit on with a pen nib. I have to admit I have been using the Simon Says Stamp sequins quite frequently and they are my new obsession.

Stampers Anonymous Winged Things  ,Memory Box Stained Glass die cut,  Tattered Angels ValenciaParty Pink  .       Pink InkRanger Distress Ink - Tea Dye,   Love, Wish, Dream,  Idea-Ology Pen Nibs, Burlap, White Hemp, Pink Flower, Chipboard Button White acrylic paint, Simon Says Stamp Exclusive Chantilly Creme, Metal Numbers

For an opportunity to  win a   Simon Says Stamp $50 Gift Voucher come join in on the fun!

Happy Monday!

Suzz

Sunday, May 11, 2014

"M" is for...

"M" is for Map!  The challenge this week at   Simon Says Stamp Monday Challenge is all about the letter "M". This week is May's birthday (Happy Birthday May!)  and you can use the letter "M" as your inspiration. 

My project started with the beautiful map from Impression Obsession.  I stamped it in a soft blue to create my background.
I stamped the map twice on a piece of cardstock using the new Ranger Archival Ink - Cornflower Blue.   I then repeated the stamping on a piece of tissue paper. which I mixed with a touch of gesso and blue spray and then applied to the bottom half of the map.

I distressed the edges with a distressing tool.  I sponged the edges with brown dye ink.
I then stamped the ship, sentiment, lighthouse using a gray ink.

I added screw brads on the corner.  I hot glued the shells to the front. I added a mix of sand in between the shells.   The background layer is painted white with acrylic paint and then I pulled the gray ink pad over the painted surface. I then inked up the edges of the chipboard with the gray ink.

Products:  Impression Obsession Map, PaperArtsy - Hot Pick 1202 - Lighthouse, Ranger Archival Inks - Watering Can, Black, Cornflower, Ranger Distress Inks - Vintage Photo, Tissue paper,   Gesso, Eyelet Outlet Screw Brad, Shells, Sand, Tattered Angels Glimmer Mist - verdigris, Darkroom Door - Sail Away,    Virtual Artistry - Lost and Found,

Come play along with us  for an opportunity for a chance  to win a   Simon Says Stamp $50 Gift Voucher.

Thanks for stopping by!

Suzz

Saturday, August 31, 2013

Mixed Media Challenge

I decided to play along with my friend Mona's new Mixed Media Challenge #6 using the colors hot pink, light pink and gray. 
 I ended up with two different projects. The first one started from a piece of pattern paper sitting on my desktop. I had a piece of paper with gray woodgrain on the background.  I decided to stencil the damask pattern over the surface using PaperArtsy grunge paste.  While it was wet I sprinkled Stampendous Ultra-fine Micro Glitter over the surface.  after that dried I spied a leftover Eiffel tower die cut from a page in a book. I applied decoupage to attach it to the front.  I added smears of white paint around the edges.  My piece was a little too small for my cardbase so I applied Maya Road trim along the bottom.

Then I got stuck.  Walked away and came back thinking what if I add a bunch of flowers and trinkets?  So I laid them down and applied a coat of gesso. I sprayed over that with sprays (Black and Pink) The black turns gray with a light application.  I then decided I needed an image and found the lovely lady from Artistic Outposts Loverly London to use.  I stamped her on tissue paper and decoupaged her into the middle. I finished it with the french words along the top.

Along the way I played with a set of stamps from Hero Arts that I purchased because of Jacqueline and her inspiration using these new stamps.   If you haven't checked out Jacqueline's blog you should it is quite a treat to see what she has created.  This card is very much inspired by Jacqueline's style.


 This started from me stamping the flower with pink and gray onto a scrap piece of cardstock. Along the way it got misted when I was misting my other project.  I decided to keep going with it and added an Eiffel tower and some other images onto the card. This is a small card made from leftovers. I was pleased with the effect after it was done so decided to add it into my post.  Sets used: Hero Arts, Artistic Outpost - Paris Exposition, Loverly London, Stampers Anonymous Attic Treasures

The inspiration photo from Mona's mixed media challenge:


 Thanks for stopping by!

Suzz


Sunday, April 14, 2013

Butterfly Collage

Simon Says Stamp and Show challenge this weekend is about background stamps!  I love my background stamps and they have always been the first stamps I am drawn too.
I actually started this project from last weeks project.  Those frames I used in my project had to be misted. Whenever I am misting a shape I love to throw it on a piece of white cardstock so I can pick up the reverse image on the cardstock.


This was the leftover pieces from my previous project. I cut it down to use the portion of the background I wanted in my piece.

I stamped the background script stamp using Versamark watermark ink onto the background. I heat embossed the script with white embossing powder.

I then added a layer of poppies using versamark watermark ink and white embossing powder.  I also stamped a butterfly on the other misted scrap with no stencil.  I embossed the butterfly with white embossing powder.  I stamped the sentiment onto white cardstock and cut it into a shape of a banner. I decided to add a hint of orange to my pieces and used a sponge to apply orange dye ink.

The edges were distressed and added to a distressed cardbase. I spritzed a white flower with orange dye ink and added it to the center of the butterfly.


Come play along with us for a chance to win a Simon Says Stamp  $50.00 gift voucher.


Thanks for stopping by! 

Suzz

Sunday, March 10, 2013

Memories

Chic to be Shabby  is the challenge this week at Simon Says Stamp and Show.  

I was excited to play along as shabby chic is something I really enjoy..  I decided to create a wedding keepsake box.

The base of my project is a Graphics 45 Altered Art Box. 
I covered the surfaces with a variety of lovely soft pastel papers distressed and smeared with white paint. I coordinated with a variety of pinks, black, and soft greens.   The front is covered with a variety of roses which have been misted with pink glimmer mist. The ribbon was also died to pink color as well.

The box has two openings which allow for photos inside and out: 

Inside I mounted a frame die cut from pink vellum.  The frame is for additional photos or to add a keepsake.

Here is a picture of the box fully open. 
I added a pocket with the Hero Arts doily stamped using versamark and heat embossed with white embossing powder.  I created a tag to fit in the pocket with lace trim.

The box open standing up:
I love collecting papers and was happy to use them on this beautiful keepsake perfect for an anniversary gift.

Products: Authentique Festive, Authentique Lovely Prima Flowers, 
Spellbinders Grand Ovals Die, Hero Arts Starburst Lace, White Embossing Powder, Ranger Dabber - Snow Cap, Ribbon, Tattered Angels Glimmer Mist,Tim Holtz Idealogy Lavish Trim, Gem Flourishes


Come join in the challenge this week for a chance to win a $50.00 gift voucher from the ever generous Simon Says Stamp:


Thanks for stopping by!


Suzz

Sunday, February 3, 2013

Mirror Mirror On the Wall

Mirror Mirror On the Wall, Who's the Fairest of them All?  Can you guess what the challenge is this week at Simon Says Stamp and Show?  The challenge is Ever After!  Doesn't that get you thinking of all the different stories, movies and quotes from your favorites?  I started thinking about who didn't get their happily ever afters because of their wicked actions.. My idea was inspired by the evil Maleficent in Snow White.
I wanted to use an old mirror as my base for my project.  We only have one handheld mirror  in the house.  I decided to go purchase a mirror from the dollar store. After finishing this project and working with the plastic frame I definitely would have created this from Chipboard and Heidi Swapp Mirrors. or Simon Says Plastic Mirror Sheet.

I started with a vision of doing a faux metal effect on the back.  I embossed the surface with Stampendous Aged Gold Embossing Enamel.  I knew the plastic was going to get soft on the frame but because of the quality of my mirror it got a little bumpy. 

Since the Faux metal was going to be an option I decided to use one of my favorite stamps and stamp it over the gold embossing.  I stamped the damask pattern using versamark. I sprinkled  black Embossing Powder and heated it enough to melt the embossing powder.  The uneven surface (from heating the plastic) caused the uneven stamping. I actually like the effect as it looks like she has been using her mirror for so long it has shown the wear on the gold.  I used a stazon ink pad to smear around the edges of the mirror to help frame it out. 

I ran into a problem when I turned the mirror over to emboss.  The frame holding the mirror in melted and fell out.  
To solve the exposed area I embossed around the edges of the mirror in the gap. There still was a gap and I decided to improvise with the black feathers.  In my story the queen had black swans and she decided to use their feathers to decorate her magical mirror.  I then set about glimmer misting my ribbon and my flower accents with Black Magic(how appropriate was the name of the glimmer mist!).  I had to answer the queen's question in the mirror. I stamped the princess onto the mirror using StazOn jet black ink.  I thought about coloring her but since everything else was in gold, black, and gray, I left her as she was.  Of course the queen was furious that the mirror did not select her!

Products:  Stampendous Daffodil GirlTattered Angels Black Magic Glimmer MistPrima White Soprano, Stampendous Aged Gold Embossing Enamel, Stampendous Black Embossing Powder, Hero Arts Classic Fabric Design, StaZon - Jet Black, 
Versamark Watermark Ink

I hope you have enjoyed my magical mirror.  Come join in the Ever After  challenge for a chance to win a $50.00 gift voucher from Simon Says Stamp:

Have a magical day!

Suzz


Wednesday, December 19, 2012

Voyage

I had time to play around again yesterday and pulled out a new stamp from Impression Obsession that I hadn't used yet.  I love their Cover a Card stamps as they cover such a nice area and are perfect for backgrounds.
I started with a background created previously with a blue glimmer mist.  I pulled it from my leftovers folder. I have one just for backgrounds. I always use up any excess ink on cardstock and put the pieces of cardstock in a file folder.  When I knew I wanted to play with the new Map background I went looking for a background in blue.

I stamped the map over the inky background using Ranger Archival Ink. I then came back in and added touches of yellow around the key areas of the map lines.  I used my STAEDTLER watercolor pencil to add a little shading and my waterbrush to soften the area around the lines.

I then went looking for a coordinating stamp and found the B Line Designs cityscape to stamp over the map.  After that I spent time adding shading around the skyline and along the bottom of the cityscape to help pop the buildings from the details of the map.

I added the word Voyage from the Stampers Anonymous Classics #1 set and the Enjoy the Journey from a Lily Bee set.  To finish it off I just got this Mr. Hueys White Opaque spray and I wanted to see if I could get a snowy effect by spritzing it over the surface.  I sprayed a touch of it over the surface.

I liked how this turned out and decided to use a piece of it on my blog header.

Thanks for stopping by!

Suzz

Thursday, November 1, 2012

Joyeux Noel

Week #7 of Linda's twelve tags.  She has a beauty this week with so many different details to be inspired by. The challenge is sponsored by her store The Funkie Junkie Boutique.

I was inspired by her deer, the snowflakes and the trees in the background:
 I started with this piece of scrap glossy cardstock.  Those flowers you saw on my Pearls and Feathers post were glimmer misted with blue, brown and perfect pearls.  They left a bit of mist and ink on my craft mat. After I pulled the flowers out of the mist I placed my glossy cardstock over the ink and picked it up.  I ended up with a beautiful shimmery background.

I decided to pull it out and play with it for the background on my tag.  I had intended a different technique for my background but it ended up wiping off my brown shimmer on my background.  I decided to pull out my Crafters Workshop stencil and sponge brown dye ink over it to create my trees.

I then found this deer from last years tags cut from music sheet and heat embossed him with a rustique embossing powder.

The snowflakes are a pair of earrings that I broke apart and placed in my scene.  I finished the edges with distressing and a coat of Tinsel embossing powder.  I wanted my deer looking up at something so I stamped a bird in red and added a  tuft and turned him into a cardinal.

The Joyeux Noel is from Artistic Outpost Snowy Woods. The bird from B Line Designs.

A closer view of the tag:
Have a wonderful Thursday!

Suzz

Sunday, October 28, 2012

Pearls & Feathers


This week at Simon Says Stamp and Show the challenge is Just Add a Pearl.  I took the opportunity to create a card for my sister's birthday. 


I used a lovely blue glimmer mist combined with a brown chalkboard mist.  I started with multiple layers of old book pages and music sheets. I sprayed them with blue glimmer mist and add a touch of yellow.  I then sprayed over the surface using perfect Pearls Mister.


I misted my flowers with the same combination of inks.  I added a stamped clock in the background and a flourish.  Then layered in pearls, flowers, feathers and wooden clocks.

The birds are stamped and colored to coordinate into the scene.  I think my Sis will like her card.

Products:  Hero Arts Fabulous Flourish, Big clock,  Artistic Outpost Birds of a Feather,Prima Flowers Clock,   Patina Glimmer Mist, Chalkboard Spray, Perfect Pearls Mister - Pearl  

Come play along with us for an opportunity to win a $50 voucher from Simon Says Stamp
Thanks for stopping by!

Suzz


Sunday, August 12, 2012

My Favorite Technique

The Simon Says Stamp and Show Challenge this week  is to use your favorite technique. I had to think about it for awhile as I love trying new techniques.  Usually my favorite technique is the latest one I have been playing with.  After I stopped to think about it,  I realized that I pull out my mists almost everyday and use them in a variety of ways.  This prompted me to do a project using one of my favorite techniques of spraying glimmer mist on tissue paper. 


My family lives near Lake Michigan which made an easy decision of where to take Prom pictures this year. My son and his girlfriend look wonderful and the sky was overcast which provided the perfect lighting in addition to the gorgeous beach.  I knew the Patina Glimmer Mist - Tattered Angels was the perfect shade to partner with her beautiful dress.   I spritzed multiple layers of tissue paper to create a soft background.
 
The cardstock and tissue paper are sprayed with glimmer mist.  After the they dried I attached the layers of tissue paper onto the cardstock using tape.  I then brushed white acrylic paint over the edges and across the surface.  
 
I added a twist of twine around the edges and added touches of flowers, leaves and seashells to provide a layer of texture and softness.

Can you see the tissue paper and shells peeking out?


To finish off the layout I added a little lock and key with a heart shape in the corner.  I left room for my journal / notes in the center. 


Products: Prima (Laraine,Tasha). Patina Glimmer Mist - Tattered Angels,   My Mind's Eye - On the Bright Side     Adirondack Snow Cap Paint Dabber

Come join us and play along in the challenge.  Everyone who plays along in the challenge has an opportunity to win a $50.00 Gift Voucher to Simon Says Stamp.


Have a wonderful Monday!

Suzz

Sunday, July 22, 2012

Sisters

The Simon Says Stamp and Show challenge this week is Hey Girl.  I couldn't think of anything frillier, softer and girly than the sweet sisters from the Artistic Outpost Bird of a Feather plate.


I remember dressing up with coordinating outfits with my sisters growing up.  Of course we never wore anything this frilly ours would have been more of the 70's style of clothing. (Yikes!) I started with the sweet girls and created a shabby chic card.


I used a soft damask stamp and stamped it in a soft shade of gray to create my background behind my girls and on my card base.  I .layered tissue paper and white glue over half of the background.  The edges of the main panel is distressed using a distressing tool. 

 The sisters are stamped in black and colored with a hint of coloring pencils. I cut them out and popped them up to allow them to stand out. The bird cage is stamped on acetate using StazOn ink and cut out.  I popped up  the cage to give it depth.  The girls are framed using a new oval floral spellbinders frame and a row of pearls.  

The flower trim was a last minute addition to bring more of the lavender tones back into the card. I died the cream organza roses with glimmer mist. 


There is a $50.00 gift certificate at Simon Says Stamp  as a prize for one randomly selected participant in the challenge.


Have a Wonderful Monday! 

Suzz

Tuesday, May 10, 2011

Wildflowers

I was playing around with some colors for a challenge and they didn't quite come together and I ended up with this card instead.  I was happy with the pretty background. The quote  from Hans Christian Anderson seemed very fitting for a card made up of wildflowers. Then I botched stamping the sentiment on the panel so instant fix... Re-stamp on vellum and overlay in the exact same position! :)

The background is glimmer mist and a lovely stencil from Layers of Colors. (A scrap from another abandoned project.) The verse is from Verses Rubber Stamps and the flowers are all Hero Arts.


Hope your day is fantastic!

Suzz

Tuesday, May 3, 2011

Wonder

Simon Says Stamp and Show challenge is to show  your Hands. I had this beautiful compass stamp from Class Act - Chapel Road Artstamps - Find Your Way and decided to combine it with the Scribe hands.

The background is a thin piece of wood and glimmer mist with orange, green, and purple. The image is stamped using black archival ink. 

The sentiment is stamped using brown pigment ink on ivory cardstock. Sponge edges with vintage photo dye ink.

Thanks for stopping by!

Suzz

Wednesday, February 16, 2011

Bubble Wrap and Mists

Cath over at the Moxie Fab World has multiple challenges going this week for Stamp It Techniques.  I immediately was inspired by the Stamp It techniques - Stamping with Mists and the Stamp It techniques - Stamping with Markers.  I created two mini cards and one square card using the same images and techniques for both the challenges.


The background bubbles were created using bubble wrap and glimmer mist. It was so fun to spray the bubble wrap and stamp it onto the cardstock.  Then I cut random circles from the inky background. The edges were sponged with dye ink to add depth.

The images are stamped and colored using watercolor markers. The images are Imaginisce, Hero Arts, Inkadinkado.

Thanks for stopping by!

Suzz