Showing posts with label EK Success. Show all posts

Wednesday, July 21, 2010

Moxie Fab World - Let's Do Fun & Cute and 2S4Y Kazan's Sketch 57

Wow what a long title. :) I decided to incorporate Kazan's sketch 57 from 2S4Y this week and the Moxie Fab WorldLet's do Fun & Cute Style Challenge into one card. 

Here is Kazan's sketch...


Here is my take on the sketch and a fun and cute card.


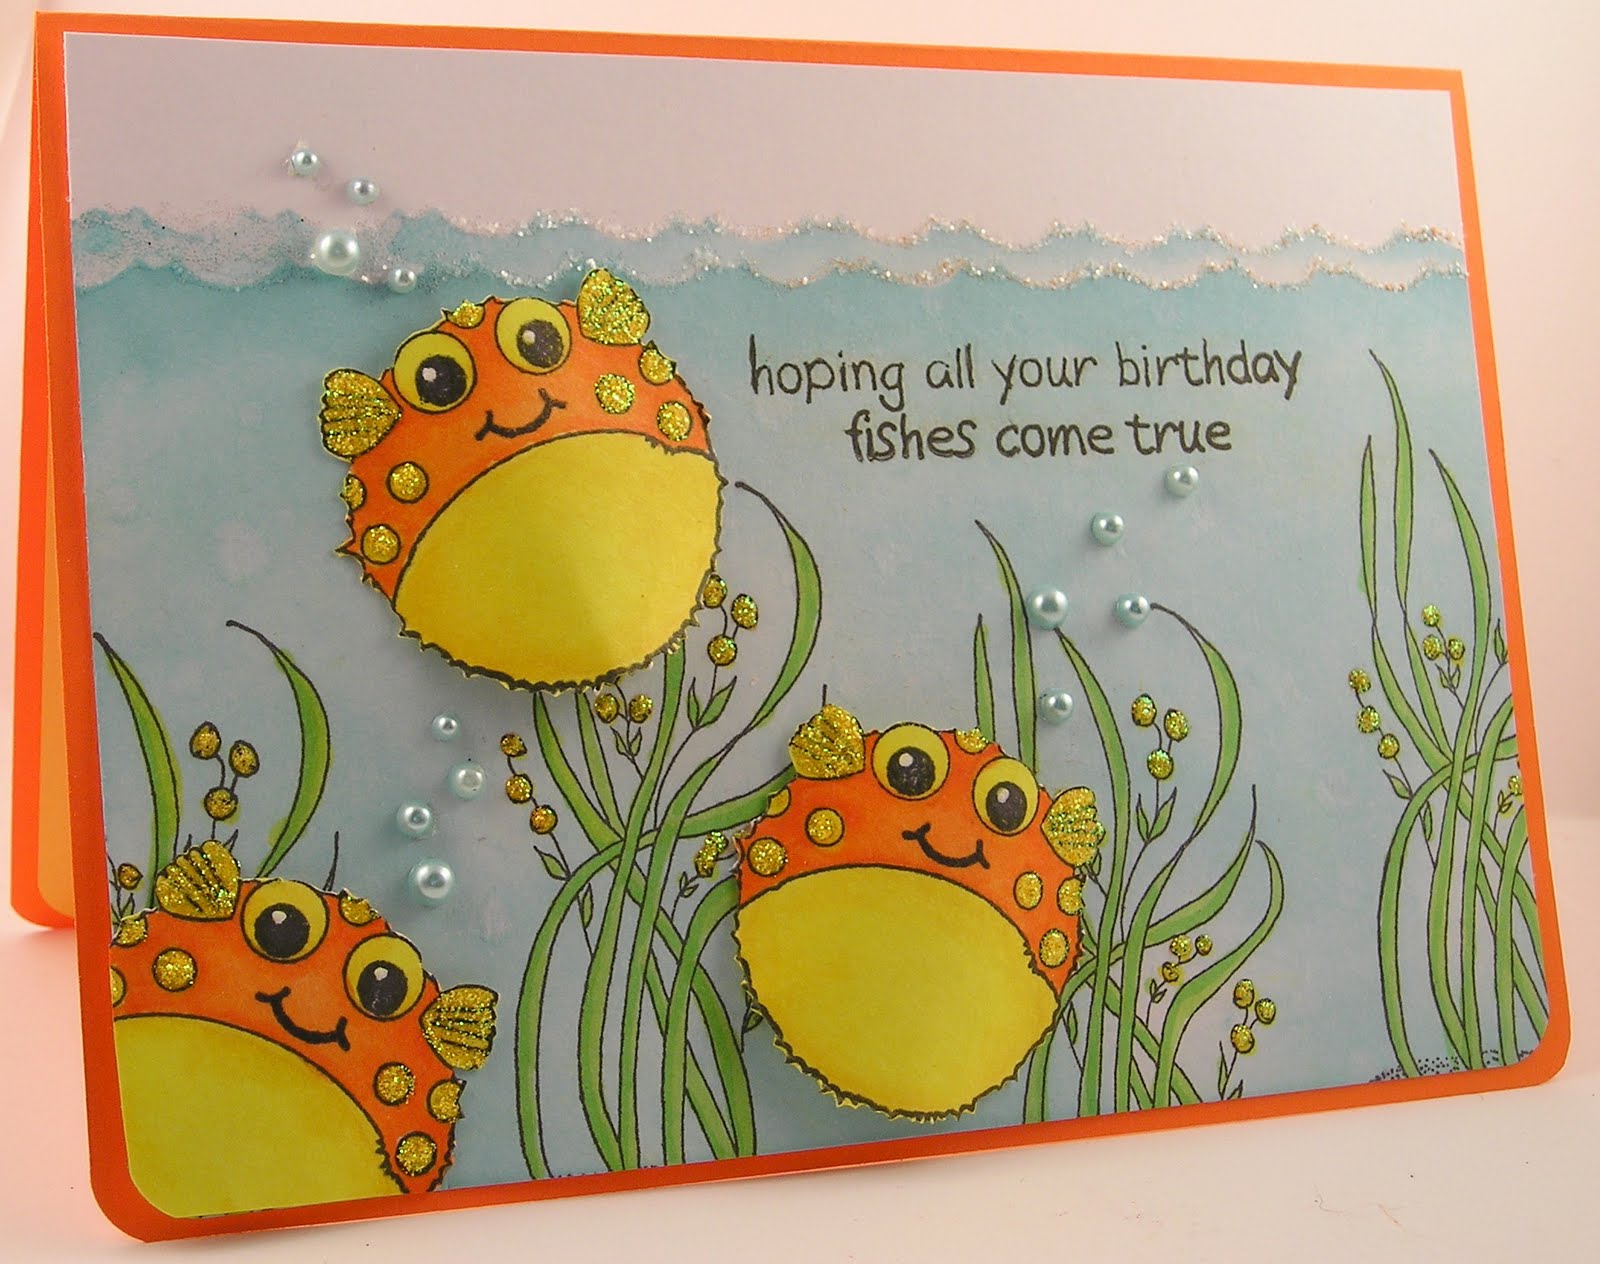
These little fish are from Imaginisce and are Blow fish. I loved how cute they were and had to put them in the shopping basket when I saw them at the store. When I saw the sketch I immediately thought of these little guys. I had fun coloring them and creating a little aquarium for them to float around in.

I even tried to help them puff up!  Here is an angled view of my fish. :)


Isn't that too funny!  They must have been upset with me to puff up! I keep thinking of Ms. Puff on Spongebob!

The Seaweed stamp is from Great Impressions. The fish and seaweed are colored using Copics.

The background is sponged on using Ranger Distress Inks Tumbled Glass.

The sea foam is created using an EK Success punched border as a mask two times and varying the depth of the color sponged on.  I added a line of glue and glitter to create a little foam along the top line of the water.

I enjoyed creating this card and now have a fun and cute card on hand for the next birthday that pops up!

Thanks for stopping by!

Suzz

Friday, January 22, 2010

Sending some Sunshine your Way

This is another card for the Cards for Kids Drive that Jennifer McGuire is hosting.


I have three adorable punches from EK Success (frog, crab, and starfish). They were the inspiration to start a little beach party.

The crabs are created using red pattern paper that I received from Sanne (thanks Sanne).


I also used this fantastic Cosmo Cricket paper that I think looks like waves for my ocean. After I had my ocean and my fun crabs I knew they needed to have a beach party, so I made them a beach ball to play with and a little sunshine.

After I had done all that I realized there was no stamping and I couldn't let that happen so I created the sky using the friends definition stamp.


The inside of the card has the sentiment "Sending you Sunshine and Laughter".


I hope you are having a sunny day!


Suzz

Monday, November 9, 2009

Winter Birdhouse

I had visions of a row of birdhouses all looking different similar to the famous houses in San Fran. The painted ladies... Well only one made it onto my card. This card was created for the Caardvarks Circle of Friends challenge.


The background was sponged on the bottom and top. The bottom was sponged with a purple and blue dye ink. The top was just the blue.

Recipe:

  1. Stamp Flourish on white cardstock with versamark and heat with clear embossing powder.
  2. Sponge with blue and purple dye inks.
  3. Cut out circle and rip across the edge.
  4. Rip little piece for snow drift on the post.
  5. Cut out other circle and sponge lightly with blue dye ink.
  6. Stamp snowflakes randomly with versamark and heat emboss with clear embossing powder.
  7. Sponge over snowflakes with same dye ink.
  8. Punch snowflakes from purple dye ink background.
  9. Cut 1 1/4" x 2" rectangle of white cardstock.
  10. Stamp swirls on rectangle using plum dye ink.
  11. Stamp definition stamp on white cardstock using blue dye ink. Cut 1/8 " strip.
  12. Cut two 1/8" x 1 1/4" pieces for the roof. Glue the tips together and attach to top of the birdhouse. Trim corners of birdhouse off.
  13. Punch border of blue stamped definition and trim to fit bottom of the bird house.
  14. Use hole punch to create bird hole!

So easy and addictive. I still have 3 other fancy birdhouses that didn't make it onto the card. It is too much fun making creative birdhouses... (victorian, ranch, tudor...)

Products:

  • Hero Arts - Artistic Windows
  • Hero Arts - Flourish Background
  • Hero Arts - Friends Definition
  • Ranger Distress Inks - Broken China, Dusty Concord
  • Memento - Soft Plum, Black Tuxedo
  • EK Success - Snowflake
  • Fiskars Border Punch
  • Versamark
  • Clear Embossing Powder
  • Amuse - Holiday Bird
  • Memory Box - Merry Christmas
  • Copics
  • Versafine - Purple
Have a lovely day!

Suzz

Sunday, August 23, 2009

Caardvarks - My StampBOX Challenge

Caardvarks challenge this week is to use black, white and hot pink... Now how can you go wrong with that? Here is the link to the challenge: http://caardvarks.blogspot.com/2009/08/mystampbox-challenge.html


Strong colors and I love them.. I made the tissue flowers again because I think they are so beautiful and I used 2 new Hero arts stamps.

Products:

  • Hero Arts Designblock - Antique Flower Background
  • Hero Arts - Cling Stamps - Special Moments
  • StaZon - Fuschia Pink
  • White & Clear embossing Powder
  • Versamark Watermark Ink Pad
  • Versafine Black Onyx
  • EK Success Punch (Leaf)

Thanks for stopping by... I hope you enjoy your Sunday!

Suzz

Monday, July 6, 2009

Wedding Card

This was a wedding card that I needed to create yesterday and get sent off today. The card is for a fellow stamper who is very sweet. I am pretty sure she isn't visiting my blog so I am safe to share the card here.

The color is actually Enchanted Gold Embossing powder and it is gorgeous and I am sorry to say that you can't see the shimmer here and really appreciate the lovely color.


The flourishes and flowers are embossed with the gold embossing powder as well as the sentiment.

The flowers are from that lace flower stamp from Hero Arts which I really do love. I cut out the flowers and layered them.

The card is scored above and below the ribbon which doesn't show up on this picture either. :(

Products:
  • Hero Arts - Lace Flower Cluster
  • Hero Arts - Everyday Sayings
  • Hero Arts - Heart Flourish
  • Ranger - Enchanted Gold Embossing Powder
  • Versamark Watermark Ink
  • EK Success - Border Punch
  • Ribbon, Pearls Unknown


Thanks for stopping by...

Suzz

Thursday, June 25, 2009

Black and White

I decided to try a black and white card for the Hero Arts challenge. I was hoping to do something elegant. I added the pink flowers as a touch of color.

I don't think I executed my vision but I think that happens alot. :)

Products:

  • EK Success Border Punch
  • Kaiser's Pearls
  • Hero Arts Anytime Messages
  • Hero Arts Lace Flower Cluster
  • Hero Arts Blossom Lace
  • Versafine Black Onyx
  • Lace Trim - Unknown
  • Martha Stewart Cornice Edger

Thanks for stopping by...

Suzz

Wednesday, June 17, 2009

Final Scraps for awhile

I have been still working on those scraps pile. This one has a lot of different die cuts that have been laying out on my desk and I decided to layer them into one creation.

Next up will be another card inspired by one of the winners of win a day on the HA blog.

Products:

  • Hero Arts - Lupine
  • Hero Arts - Birthday Wishes (Birthday Messages Clear Set)
  • Hero Arts - Heart Winged Butterfly
  • Hero Arts - Archiver's Special Edition Clear Set
  • Versafine - Vintage Sepia, Deep Lagoon
  • Memento - Rich Cocoa
  • Spellbinders - Labels 1, 2
  • EK success - Border Punch
  • Cornish Heritage Farm - Grid Paper

Thanks for stopping by..

Suzz

Sunday, June 7, 2009

Background Stamps

I drew up this sketch and then tried to execute it... I am not very good at translating sketches to cards. I wanted to use three bows across a circle. Unfortunately... I didn't have enough ribbon in the color and size I wanted to get bows. So I ended up with knots...


and the card was modified from the sketch because the visual effect was not as pretty as the sketch. :)

Products:
  • Hero Arts - Wavy Leaf Pattern
  • Hero Arts - Raindrop
  • Hero Arts - Sandra's Letter Background
  • EK Success Border Punch
  • Fiskars - Circle Template
  • Versamark Watermark Ink
  • Light Purple Embossing Powder
  • StazOn - Vibrant Violet
  • Kaiser's - Gems
  • American Craft - Ribbon
  • Prima Flowers

I have been so busy lately that my cardmaking has reflected it. My son has just graduated from 8th grade. My mom is sick and we have been working on getting her medication correct. We have a new puppy and then there is always work. So this has been a little bit why you have seen so little of my cards lately.

Have a great day!

Suzz

Sunday, May 24, 2009

Go Green Challenge

I do have my second circle card to share tomorrow and I have to admit it is one I really enjoyed making. I bumped my circle card because I have one last card I made for the HA go green challenge which ends today.

The white background is from a Making Memories set and I used it to stamp the leaves pattern. The only issue is there is a finish on the paper which made it interesting to stamp on and emboss. I stamped using a pigment ink and clear embossed but I think the heat gun actually melted the finish and left the orange a little muted.

Products:

  • Hero Arts - Design Block - Floating Leaf Pattern
  • Hero Arts - Happy Birthday
  • EK Success - Border Punch
  • Versafine - Habenero
  • Ranger - Clear Embossing Powder
  • Prima Flowers
  • Ribbon, Gems Unknown

Thanks for stopping by... I hope you are enjoying a beautiful weekend.

Suzz

Sunday, May 3, 2009

Sunday Sunday


I have 2 cards to share. One is for fun and using up some background paper I made using the old smear the ink on the acetate and spritz it with water and the other is for the HA blog challenge May Flowers this week.


Recipe for card #1:

  1. Start with a piece of acetate and smear the oranges, yellow and green ink randomly on the acetate and add water until the colors run together.
  2. Lay white cardstock on the ink. Flip over with the acetate and smear the color around until you are pleased with the effect. Set aside to dry.
  3. Cut circle (4") from dye ink background.
  4. Stamp Fern using brown dye ink on circle. Slightly offset and stamp again using green dye ink.
  5. Accent brown with white gel pen.
  6. Versamark entire surface and heat emboss using clear embossing powder.
  7. Repeat. (I wanted a more even finish so I did this 2 times)
  8. Woodgrain background: Cut 5" x 5" white cardstock square. Stamp woodgrain 4 times using pigment ink. Spray entire surface with tuscany sun glimmer mist. (Beautiful orangey brown color)
  9. The rest is assembly. I wrapped the twine 3 times and threaded each end through the two buttons on either side. Tied a separate piece of twine through the big button and made a bow and used glue dots to hold each piece down.

My second card was made from some beautiful scraps sent to me from Jacqueline. She sent me some music paper and pink vellum. (I never used any colored vellum before and I love the effect!)

Nothing to difficult here but the ribbon is actually this really pretty plum velvet and it looks brown. :(

I also took clear buttons and used the scraps of the music paper to make the background for the buttons. (The designers at HA were doing this and I thought what a fun way to use up some of my little scraps)

Products:

  • Hero Arts - Three Ferns
  • Hero Arts - Design Block Woodgrain
  • Hero Arts - Design Block Outline Flowers
  • Cuttlebug Embossing Folder - Birds & Swirls
  • EK Success - Border Punch
  • Glimmer Mist - Tuscany Sun
  • Versamark Watermark Ink Pad
  • Butterfly Punch - Marvy Uchida

Have a great sunday!

Suzz

Sunday, April 5, 2009

Raspberry Suite Challenge # 3

I also played along with Dawn's color challenge: http://dawnmcvey.typepad.com/these_are_a_few_of_my_fav/2009/04/raspberry-suite-color-challenge-3.html These are very pretty colors too!
I don't have any Stampin Up papers so the colors are always a guess for me based on how it displays. I wasn't sure about the Berry color so I uses a salmon colored pink. I hope it was close enough!


I had an idea in my head which didn't translate the way I wanted to when it was executed.

Products:
  • Hero Arts - Petite Happy Birthday, Birthday Definition, Screen Shadow
  • Memento - Angel Pink
  • Versafine - Crimson Red, Toffee (intended to represent the kraft color)
  • EK Success Border Punch

I wanted to share 2 other things as I was thinking about the great customer service and I think companies should be recognized when they give such great service.

I had heard about a recall on my 3M ATG Tape runner. I called 3M customer service and they made it super easy to replace my tape runner and sent me additional rolls of tape!

I had a problem with my express shape cutter from Fiskars and I sent them a few email describing the problem and within a few days I had a replacement one along with new blades!

Love when companies do business like that! It made it so easy for me and these are both heavy duty items for me. I use them alot! So I am tremendously pleased that they backed up their warranties with such great service.

Thanks for stopping by..

Suzz

Kwerner Challenge # 48

Here's Kristina's latest color challenge. http://www.kwernerdesign.com/blog/?p=1218 Love these colors!

I have a vintage farmhouse clear stamps from Fiskars. I love the background stamp. (Bottom Half of the card) and it has a rooster. I decided to put this card together using this set. Don't know who would like to recieve a rooster on their card but I thought it was too cute!

Products:

  • Fiskars - Vintage Farmhouse
  • Hero Arts - Old French Writing
  • Versafine - Deep Lagoon,
  • Ranger Distress Inks - Shabby Shutters
  • Marvy Uchida - Oval, Oval Scalloped Punches
  • EK Success - Border Punch

Thanks for stopping by...

Suzz

Tuesday, January 13, 2009

Pocket Cards

The Hero Arts Challenge http://heroarts.com/blogs/club/2009/01/12/motivating-you-with-pockets/ is pockets. I wanted to make a clear pocket.... I had cut out these cute little hearts for the Kwerner color challenge last week and they were not used so I decided to pull them out.

The area with the pink background is the pocket. I put cranberry alcohol ink on the acetate to make a pocket that adds some color and texture but allows you to see the cute heart link inside.

The interesting part was after I made the three little hearts I linked them together using craft metal and I cut up a flat magnet and attached it to the back. So after I give the card they can pull out the linked hearts and hang it up on the refrigerator!


Recipe bits and pieces:

Hearts:

  • Cut out using my sizzix die cuts.
  • Stamped letters using versamark and heat embossed with light pink embossing powder.
  • Letters are Making Memories Stickers. Stick on cardstock, sponge with red ink and cut out and pop dot.
  • Using hole punch punch holes in top and bottom of each heart.
  • Take craft wire and cut two 1" pieces. Using a rounded needled nose pliers bend around the end to get S hook.
  • Hook the pieces together and tie ribbons on top and bottom. (I would swap top ribbon to a sturdy ribbon. Mine flops when I put it on the refrigerator)

Pocket:

  • Acetate cut out and inked with red alcohol ink and blending solution.
  • Attach pocket and use lace trim to cover adhesive.

Products:

  • Hero Arts - Sandras Letter Background
  • Hero Arts - DesignBlock - Wavy Leaf Design
  • Versamark Watermark Ink
  • Light Pink Embossing Powder
  • Acetate
  • Ranger Alcohol Ink - Cranberry and Blending Solution
  • EK Success Adornments
  • Red Craft Wire (Unknown)
  • Sizzix Hearts Die Cut
  • Magnet - (This was given out at a parade as advertisement. It worked great.. Thin, lightweight and easy to cut and glue dot onto the cardstock)

That's it... I hope you enjoyed it. Now I will put this away for valentine's day...

Suzz

Thursday, January 1, 2009

Happy New Year!

Happy New Year and I hope it brings you and your loved ones a blessed year!

Yesterday I worked on Kristina's Color Challenge... http://kwernerdesign.com/blog/2008/12/color-inspiration-36.html

Here are the colors:

I loved this color combination. I immediately die cut some hearts in red and green thinking I would emboss them. I ended up using the cut out as a mask instead. Here is my main heart.


I stamped the pretty floral/flourish stamp on white cardstock and embossed using light pink embossign powder. I then took the cardstock where I had cut out the hearts and used that as a mask and sponged on the red ink to make my hearts.

I purchased these charms with sentiments. I thought this was an appropriate sentiment.
Products:
  • Paper Inspirations - Floral Flourish
  • Creative Beginnings - Pastel Pink Embossing Powder
  • Martha Stewart - Doily Lace Border Punch
  • EK Success - Red Adornments
  • Sizzix Heart Die Cuts
  • Ranger Distress Inks - Fire Brick
  • Plaid Enterprised - Fresh Metal Charms - Love

Thanks for stopping by...

Suzz

Tuesday, November 4, 2008

Chalk & Versamark

I love using versamark and clear embossing powder to pump up the volume on my colors whether it be colored pencils, chalk, glimmer mist or distress inks. I saw a technique that I had never tried using versamark and chalk. This technique was used by a stamper on 2 Peas embee. Here is the link to her picture: http://www.twopeasinabucket.com/pg.asp?cmd=display&layout_id=1396451 .

She describes it as covering the background in chalks and then stamping an image on top with Versamark and heat embossing with clear embossing powder. I combined this technique with using masking as Jennifer McGuire has a video on masking and is hosting a challenge. http://www.twopeasinabucket.com/mb.asp?cmd=display&thread_id=2682492
Here is my card:

I purposely left it very simple to highlight the trees and the colors. I also had to photograph it on a different background to show it was a white card base.

Recipe:

  1. Apply chalks in various colors to the background. I used eyeshadow applicators to rub on spots of color and my finger to blend them together. I used yellow, blue, and green in various shades.
  2. Stamp the tree on a post it note to make my mask. Cut it out.
  3. Stamp with versamark the tree multiple times using the mask to overlap the trees and give the effect of the forest. (I did have some blue left on the stamp from the mask I created. I think it came through on a few of the trees faintly which I think helped with the overall effect.)
  4. Heat emboss the trees with clear embossing powder.
  5. Using a white gel pen I added dots of white to give a snowfall in the background. It doesn't show up very well in this picture but added a nice touch IRL.
  6. Stamp the sentiment on a scrap piece of the chalked background. Mount with the twine and tag holder.
  7. Layer with teal cardstock and mount on white card.

Products:

  • Pebbles Pearlescent Chalks
  • Versafine Olympia Green
  • Signo White Uni-Ball Gel Pen
  • Tag Holder Unkown
  • Twine - EK Success Adornments
  • Penny Black - 3738B wondrous
  • Paper Inspirations - G10198 Art Brush Pine Tree
  • Versamark Watermark Ink
  • JoAnn's Clear Embossing Powder

Thanks for wandering over...

Friday, October 3, 2008

Fat Book Page Challenge...

Andi who has a great blog: http://www.andisperfectgravy.blogspot.com/ is hosting a challenge for Stamptoberfest. Her challenge is for Fat Book Pages. http://www.twopeasinabucket.com/mb.asp?cmd=display&thread_id=2661702 I have never created these before and thought it would be fun to try.


This is the front of my page.


Andi suggested putting something on the back of the page and highlighting who created it and for what.

I just thought I would highlight it was for stamptoberfest 2008.


Recipe:

  1. Cut 2 squares 4 x 4". I actually created my background previously and was able to just cut the green squares. To create the green background I mixed Zemon Lest Glimmer Mist with Olive Green Glimmer Mist. The Olive Green Glimmer Mist has a ton of gold shimmer in it.
  2. On the front I stamped my tree banch with versamark and embossed it with Copper emobssing powder.
  3. I then versamarked my sentiment just below the branch and embossed it with a slate blue.
  4. I then stamped the hummingbird and embossed it on light blue paper with the same slate blue embossing powder and cut it out. I really wanted a black crow but I didn't have anything the right size. :(
  5. I then embossed the buttons and the charm to match the embossing done previously. The buttons tend to move and the charm will get hot, I used a stylus with a metal tip that I could stick in the button hole and hold it in place.
  6. I assembled all the pieces. On the back I embossed the berries and stamped the letters used the same string from the front and added a bird charm.

Products:

  • JudiKins Copper Embossing Powder
  • Versmark Watermark Ink Pad
  • Versafine Blue Lagoon Ink Pad
  • Stampendous Pearlustre - Sapphire Embossing Powder
  • Inkadinkado - 97982-K Hummingbird
  • The Artful Stamper - (Berries on the back)
  • Penny Black 3886J - berry branch
  • Verses Rubber Stamps - QQ0838-F Apache Blessing
  • EK Success - Ribbon
  • Charm - Michaels, brand unknown
  • Bird Charm - Blue Moon Lost Charms

Thanks for Looking!

Friday, September 19, 2008

Just stopping by to say Hi....

No Challenge for this card. Just wanted to create a holiday card using my Basic Grey Paper. The Cuttlebug embossing folder looks just like the paper and I thougth it would be fun to design something using both of them.

Products:
  • Hero Arts Clear Design Warmest Winter Wishes
  • Basic Grey Paper
  • October Afternoon - Sugar Cookies
  • Versacolor Opera Pink
  • Versafine Black Onyx
  • Hero Arts - Holly Bird
  • EK Success Adornments - Red
  • Cuttlebug Embossing Folder - Spots & Dots

TFL!