

The challenge at Simon Says Stamp Monday Challenge is all about the big stamp. Whether it is a background, large image, pattern, or maybe just a big stamp pad. I have a great fondness for big stamps and love to use them in the background to add texture.


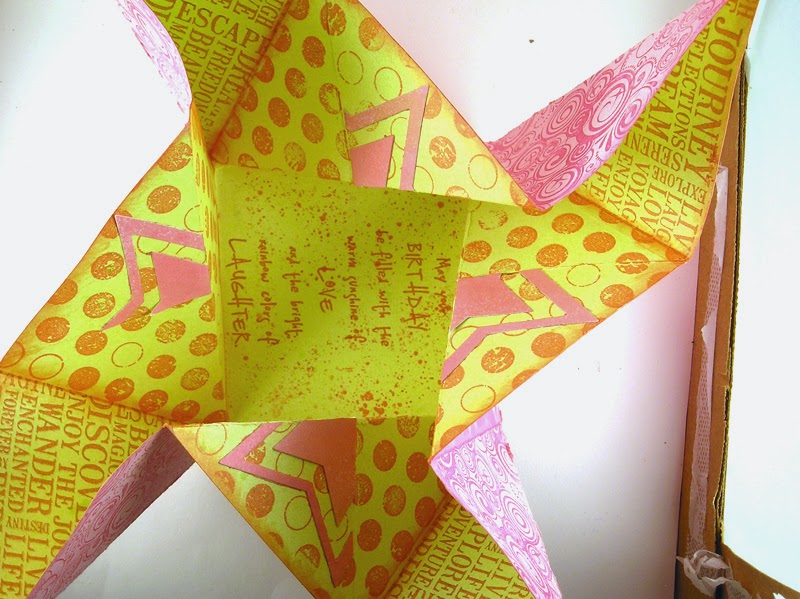
and here is it opened up:

On the other side:

Partially opened which explains the funny angles on the previous picture:

And finally in the process of being opened:
Want to see how to fold this up?

I actually created two of these and I am going to show you some of the folds with my second version of the project.
1. Measure out your paper into thirds. I used 12 x 12 for this to make it easier. :) I knew my thirds would be every 4".

2. Turn the paper 45 degrees and repeat the score at 4" from the edge. Do this for each side of the paper.
3. Next we are going to fold each corner into the center. Take the corner and pull it to the center and using a bone folder score the edge. Repeat this again on each corner.


To make mine more flexible I flipped my paper over and repeated the scoring. The next step is a little trickier.
4. Fold the paper in a diagonal over so that the opposite corners touch. But don't score across and don't fold completely. Score only the corner to the middle square. See the diagram below.
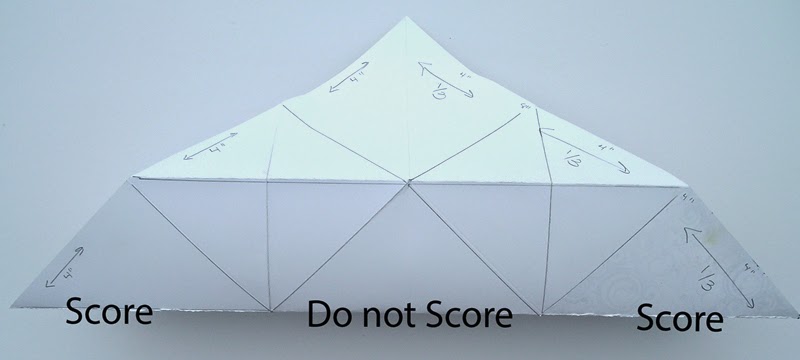

Repeat this in both directions. This will leave you the square with no crease for your front. After you complete this you will have completed your scoring and you know can fold it up.
5. The first step is to pull the sides up all around. Push in the centers on the side to start the folding in to the center. You can see I have pushed in the triangles which has the large triangle flaps starting to form.

This is how the flaps should fold in together. I had a really hard time getting this to work and had to have my older daughter help me. :) So don't give up. Keep trying until you get the folds to work.

This is how it looks when it all folds together. This view is from my second project.

6. To tuck in the folds to the center start with one flap and fold it to the center.

Take the second flap and fold it over and tuck it under the first flap:

Take the third flap and tuck it under the second flap.

The fourth flap tucks in under the third flap:

And the finished product. The front on this one:

Here is the inside and out of this project:


I made a model from white cardstock and marked it up to determine where to stamp to coordinate. I masked off the sections with post it notes to stamp the sections.
Heidi Swapp - Color Shine - Primrose, Ranger Archival Ink - Magenta Hue,
Impression Obsession - Splatter, Hero Arts Classic Fabric Design, Hero Arts Large Fabric Design,
Stampers Anonymous - Bird Feather, Botanical Remnant Rubs, Visual Artistry - French Connection, Heidi Swapp - Color Shine - Citron, Hero Arts Music Background, Stampers Anonymous - Spring Sprung, Stampers Anonymous - Tiny Things, Visual Artistry - Lost & Found, Simon Says Exclusive - Stars Dies , Simon Says Exclusive - Amazing Birthday, Memento - Pear Tart, Ranger Distress Ink - Picked Raspberry The Crafters Workshop - Star Stencil, Hero Arts - Life of the Party Dots Impression Obsession Swirls & Stars

Suzz

Such a cool folded card Sue! Love all the stamping and the great interactive nature of this. Wonderful combination of patterns.
ReplyDeleteThis is such a cool card, Sue! Love that it has so many sizes to it. The color combo is beautiful!Hugs, Sandra
ReplyDeleteFun and beautiful project
ReplyDeleteWow! Great project! So creative!
ReplyDeleteWow... this is so fun and fantastic! Suzz. Love your steps tutorial. The birthday card is amazing. :)
ReplyDeleteOh my Suzanne! What an awesome project! All the stamped detail looks fantastic! Thanks for sharing your creative process!
ReplyDeleteSuper cool folded piece! Thanks for sharing how you did it! Super awesome!
ReplyDelete*mwah*
Steph
Simon Says Stamp!
Wow - that is SOME fold! how fun! love all or your stampings and great colors!
ReplyDeleteThis is soo cool! I've never seen it folded like that. Love it! I'm also lovin that beautiful pink with that green. So pretty!
ReplyDeleteCool card and great tutorial! Thanks for sharing with us! Barbarayaya
ReplyDeleteWOW! this is amazing Suzz! I love it and I will try to do it too...
ReplyDeleteThank you for sharing your wonderful works.
This is such an amazing card Suzz and as someone who loves creating cards with intricate folds, it really appeals to me!! :) I absolutely love how you've showcased the big stamps and thanks for sharing the fabulous tutorial!! :)
ReplyDeleteHoly cow! When I read your post and saw all those folds, I shook my head and kept saying, "I did not see that coming!" What an absolutely delightful "surprise" with all those folds and treasures! As usual, you've given me inspiration and a smile with your project!
ReplyDeleteOH my goodness!!! How fabulous and fun is this?!?!
ReplyDelete