Tuesday, November 30, 2010

Freckles the Clown

Today is my last post for Scrollworks as a guest designer this month. The photo stamps have been a great learning experience for me and I have enjoyed it.

Here is my card using the fun Freckles:


The background was created by stamping in alternating red and black inks using the Ringer stamp. I foraged in  my pattern papers and found some polkadot paper to offset my image.  The stickers are Making Memories.  The shiny stars came from a leftover party decoration. I think they were the perfect touch for the little clown. I created a little tulle puff to set my image into.

The image was stamped with Ranger Archival Ink on a matte finish cardstock. The clown costume and face were colored using watercolor pencils and a touch of the waterbrush. The clown costume was accented with some little star gems.

Hope your day is full of celebration. 

Suzz


Monday, November 29, 2010

Card Patterns Sketch #92 - Let Heaven and Nature Sing

I had some really fun tissue tape from Making Memories  and was lucky enough to find the matching paper Mistletoe. I love the fun combination of patterns in Christmas colors. After I saw the sketch from Card Patterns I knew it was a perfect fit.

My card:

The holly is a new stamp from Memory Box called Holly Sprig B1416. The sentiment is also Memory Box called Heaven Sings B1385. I have to say that this sentiment for the holidays is one of my favorites this year as I love using my nature stamps. The birds are from Inkadinkado.

Here is the wonderful sketch #92 from Card Patterns.  


Have a lovely day.

Suzz

Sunday, November 28, 2010

Joy and Blessings to You!

Happy Sunday to you! 


I created this card today for the Simon Says Stamp and Show your Distress Inks. I love using my distress inks. I went looking for some inspiration today in Jacqueline's flickr photo stream and found this beautiful card. I was trying to capture the softness in her hydrangea in the blurry watery edges on my berries.

The Ranger inks used were Aged Mahogany, Brushed Corduroy and Vintage Photo.  The stamps are Hero Arts and Penny Black.

Thanks for stopping by!

Suzz

Saturday, November 27, 2010

2S4Y - Laura's Sketch #66 - Mr. Santa

Okay... I promise to put away my vintage Santa's. :) I used the same image as the last time around. But it all started with wanting to create these polka dot banners as my scallops from the sketch...


I was looking at Laura's Sketch #66 and wanted to use the banner instead of scallops.

So I went back and forth on all my stamps looking for something fun to go with my polka dots. (Which I had to make because of all my pattern paper I didn't have one with the right sized dots in the colors I wanted) Let's just say this card took a long time to create. :)

So Mr. Santa it was with a music background.  Seems like a simple card but for the time and effort I put into it you would have thought I was carving it from rock.

Anyways, the materials include: Stampers Anonymous - CMS053, Hero Arts Music Background Cling, Hero Arts Polka Dot Cling Background, Hero Arts CL463 Let's Get Merry, Twinklettes Diamond Dust, Twine, Button, Ranger Distress Inks Fired Brick, Vintage Photo, Versafine Black Onyx.

Hope you have a lovely Saturday!

Suzz

Friday, November 26, 2010

Wings of Dreams

Recipe:

  1. Lay doily on white cardstock. Spray with Key Lime Pie glimmer mist.
  2. Pull doily up and let cardstock dry. Lay Tattered Angels mask onto doily background and spray with Patina glimmer mist. Pull up mask and let dry.
  3. Cut 4 3/4" x 6 3/4" of doily background. Cut around corners of doily.
  4. Stamp sentiment using Versafine ink. Sentiment is from Verses.
  5. Stamp butterfly on white cardstock using StaZon Teal ink.
  6. Glimmer mist butterfly with mix of green and blue.
Hope you are having a great Friday! I have a friend coming over to stamp and looking forward to it! Of course it might involve a little shopping too. :)

Suzz

Wednesday, November 24, 2010

Happy Thanksgiving!

Happy Thanksgiving to everyone in the U.S.!  Thanksgiving is a time when I  give thanks for all my blessings. I also like to remember all of my loved ones we have lost and remember the wonderful Thanksgivings we had with them as well.  Wherever you are I hope you have a beautiful day with people you love.

This is my and Lisa Somerville's last week as part of the PDCC Design Team. It has been a wonderful time and I enjoyed playing along with the fun colors and the fabulous design team. 
We were lucky enough to be able to select some beautiful stamps from our sponsor this week Stamp Attack.

Here is my card created using the fun colors and the lovely stamps.
I wanted to try something different with the same colors and created this wintry scene.

Here is the inspiration photo from Sarah:

Head over to the Play Date Cafe Challenge. Our sponsor this week is Stamp Attack they are providing our wonderful prize this week. 

The Play Date Cafe design team:


Have a fabulous Thanksgiving!
Suzz

Artistic Outpost - Jane's Countryside Release

Today is release day for Artistic Outpost. The new release is called Jane's Countryside. I am a big Jane Austen fan and love all her books. I probably have read them all multiple times over. Such a perfect set of images for me.

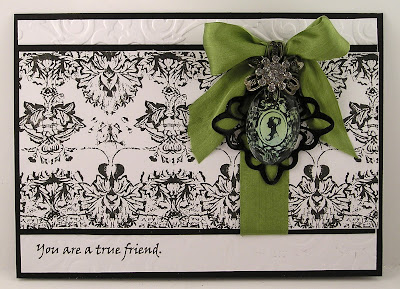
Here is one of the projects I created using the beautiful cameo and damask background:


The cameo image is so very pretty and all I did was stamp it in black and glimmer mist the background with Key Lime Pie and Patina. After the image dried it was glued to a Tim Holtz pendant. The black frame is from the Spellbinders Medallion Die Cut. attach to the ribbon and a beautiful accent was created which could easily have a pin attached to make a brooch.

Here is the lovely plate of Jane images.


The links to Jane's Countryside at Artistic Outpost (Mounted, Unmounted)

Artistic Outpost has a great holiday sale going on right now. You can find the details here.
The design team has created some really beautiful projects and cards which you can go see in the Artistic Outpost Gallery. The design team is also sharing their lovely projects on their blogs.
Have a wonderful day!
Suzz

Tuesday, November 23, 2010

Be Merry

 I played around with the fun colors from Mona's CR84FN5 and still playing along in the Hero Arts Monthly Challenge.

I loved creating the background with the Hero Arts Cling Music image and the large Flourish.  The Santa image is from Inkadinkado - Paper Artsy.  The music was stamped first using Versafine Vintage Sepia. Heat up the background to dry out. Stamp the flourish multiple times using versamark and clear emboss. Sponge Hero Arts Soft Sand Shadow Ink over the entire surface and brown dye ink.

Here is the pretty inspiration photo from Mona.


Very fun... I have another card on the table that I hope to finish up today.

Thanks for stopping by...

Suzz

Sunday, November 21, 2010

Hero Arts Monthly Challenge

I have a big confession to make... Over half of my stamps wood, cling and clear are Hero Arts. I love their products. I had some free time last night with no commitments and I decided I better get some  of my beautiful Hero Arts stamps out and play with them. They have been a bit neglected with all of my other stamping projects. :)  The challenge this month at Hero Arts is to use inks, create gifts or gift tags. 

I started with this card:


The snowflakes were stamped on white cardstock using Versamark and embossed with Kaleidoscope embossing powder. This creates the resist and a tiny bit of glimmer on the snowflakes.

Apply chalkboard spray from Tattered Angels in Evergreen. Spray Ranger Perfect Pearls Mister Forever Blue over background. The background has this very soft shimmer that I can't show in the picture.

Heat dry and flatten. :) I put my design blocks upside down on the paper and let dry for awhile before heat drying.

Stamp partially the Old French Writing using Versafine Vintage Sepia.  Stamp sentiment from Northwoods onto background using Versafine Vintage Sepia. This didn't show up clearly enough for me so I added some brown embossing powder from Zing and heat embossed it.

Stamp large flourish using versamark onto background.

Sponge edges using brown dye ink. Accent with sea foam pearls and mount onto white card base.

I loved the soft blue green background and decided to keep using it! I created three sheets of cardstock to play with.

I also pulled out some shapes and templates I have acquired from different projects and hand traced them onto some of the paper as well as die cut some shapes using my Spellbinders dies. 

This little tag started with stamping the Hero Arts Sentiment Silent Night Holy Night multiple times in the background.  
 Stamp the Madonna and Child using Versafine Vintage Sepia over top of the sentiment. Sponge the edges with brown dye ink. Add a touch of water color pencil to the faces and bodies. Add ribbon and twine. Done. :) 

The next one was die cut with two Spellbinders dies.

Stamp the Antique Flower Background using Versafine Spanish Moss unevenly to allow variation. Stamp Winter Pine using Versafine Vintage Sepia. Add color to the tree trunk and branches using a watercolor pencil (brown) and white gel pen for highlights. Stamp sentiment on another piece of the misted background. Cut and sponge edges with brown dye ink and highlight with white gel pen. Add tiny bird in the tree using same brown ink. Sponge edges of Oval. Add ribbon.

Last but not least.


 Cut circle. Stamp music background using brown dye ink. Stamp Big Pine Bough using Spanish Moss (Versafine) accent with watercolor pencil and gel pen. Stamp bird on white cardstock using brown pigment ink. Color using brown, light green and turquoise watercolor pencils. Accent with white gel pen. Sponge edges of doily, circle and bird with brown dye ink. Stamp sentiment (Memory Box Heaven Sings) on piece of misted background. Attach ribbon and bow.

Hope you stuck with me through the end. :)

Have a blessed Sunday... We are all excited as next week is a short week due to Thanksgiving. Yeah!
As always thank you for stopping by...

Suzz

Saturday, November 20, 2010

Beyond the Sea

Happy Saturday!

Here is a little card, (for me) that I created this morning. I created it based on the CardPatterns Sketch 91 using a circle which also works for Marks Finest Papers Challenge #30 and for the Simon Says Stamp and Show whatever makes you Happy!


The Artistic Outpost lighthouse is stamped using Versafine Black Onyx on October Afternoon SeaSide. 
The background is colored using watercolor pencils and white highlighter. After I finished I clear embossed the entire image. 

The background paper is from the same collection. I embossed the brown cardstock using the Cuttlebug embossing folder. 

I have to confess that after I started playing with the Oz collage plate last time I had to run out and pick up a piece of burlap.  I wanted to have some on hand for the scarecrow.  It has been sitting on my shelf and today after I pulled out my Beyond the Sea lighthouse image I knew I wanted to incorporate the burlap. It works as great texture and you can unravel the edges to create a fringe.  
The stars are from the Christmas trim section at Hobby Lobby and actually are a garland for a tree. I keep pulling them off the wire to use as accents. 

Here is the lovely sketch from CardPatterns. 


I also am happy to share that Artistic Outpost is having a sale! Here are all the details!

Artistic Outpost is running Pre-Black Friday sale now through November 30th, 2010!  The Artistic Outpost Pre-Black Friday Sale features 10% off all rubber stamps, and that's not all! For every $50 you spend, they'll also send you a special $10 gift code to be used on your Artistic Outpost purchases in January**  These gift codes stack! If you spend $100 you will get a $20 certificate, spend $150 get a $30 certificate. You'll also receive free shipping when your order totals $50 US ($150 internationally).

To receive your Pre-Black Friday Savings click here to shop, then use the coupon code BlackFriday to receive your 10% reduction on your rubber stamp purchases. **Gift Codes will be emailed to you in December. (GC valid on purchases January 11 - 31st 2011).

*Please note if you order more than 6 sheets of EZMount cling foam, free shipping will not apply. These items are bulkier and require extra shipping costs.

Thanks for stopping by!

Suzz

Friday, November 19, 2010

Photo Stamps - Tutorial

I spent some fun time playing with the photo stamps from Scrollworks and learning some techniques and tricks as well as making a few mistakes along the way. :)

There are samples in this post of various types of inks and paper to share with you to give you insight into how a photo stamp will appear depending on how you ink it, stamp it, type of ink and paper.

The first examples use everyday white cardstock. Georgia Pacific Image Plus


The image used for all the examples is the lovely Emily from Scrollworks. 

All images were stamped using the unmounted images on an acrylic block with tack and peel. Using with an EZmount or padding can make it easier to get sharper images.

First Row:

Image 1 was stamped by using a brayer to apply Versafine Black Onyx Pigment ink onto the stamp. Hold stamp on angle to verify enough ink has been applied. Stamp on cardstock. 

Image 2 was stamped directly onto the cardstock using Versafine Black Onyx pigment ink.

Image 3 was stamped by applying Versafine Black Onyx pigment ink to the stamp directly and then laying  the paper over the inked image. Brayer top of paper to apply ink to paper. 

The second row of images on the top all were inked up by applying the ink pad to the stamp and stamping directly on the paper.
Images in the order displayed left to right used the following inks Ranger Archival Ink Jet Black, Memento Black Tuxedo Dye Ink, and StazOn Jet Black ink.

StazOn and Ranger Archival Inks provided the sharpest images.

Matte Finish Paper from Marco's

The exact same inks, application of ink and stamping techniques are the same in this sample. The inks took to the matte finish paper beautifully.  The paper helped produce a much clearer and more beautiful image of the stamp. 

The too inky image was a mistake which can happen when inking multiple times without cleaning the stamps and also brayering too much ink onto the image.

Inking up notes: 
Applying excessive ink or an over juicy inkpad will get a very dark image when stamped. 
Clean the stamps after using.
For juicy inkpads - apply ink with the brayer to control the ink application on the stamp.


The images also looked lovely on a pattern paper background. 

Glossy cardstock with StazOn ink:

Now onto  bloopers and blunders...

I had a few failures along the way.  This lovely image is June and here are a few of my mistakes:

You can see if you don't ink the image properly or provide enough pressure while stamping  you are not going to get a great image. A touch of glitter on your stamp will also show up as black dots. (Don't ask how that happened. :)

Depending on the type of effect you want to achieve with your stamps you can select your paper and inks to fit the project. I had so many lovely Emily's laying on my desk that I decided to create something user her and share.

This image was stamped using StaZon and the matte finish paper. The image is also  lightly colored using watercolor pencils and a little water. She is framed by a Tattered Angels chipboard  Framed Font. The black die cuts are Spellbinders Medallion Fleur De Lis.

Hope the photo stamps tutorial is useful.

Have a Fab Friday!

Suzz

Wednesday, November 17, 2010

Play Date Cafe Challenge #56

This week at the  Play Date Cafe Challenge is Player Appreciation Week. We have three sponsors and multiple guest designers and prizes.  We really appreciate the fantastic players who join us in the challenge every week. This week is a celebration of all the great players we have. 

Here is my card using the fun colors this week:
The papers are Cosmo Cricket and the stamps are Artistic Outpost - Snowy Woods.
We were also  provided stickers from EAD , who is one of our sponsors this week. Here is my projects using the stickers and the colors. 


Here is the inspiration photo:

Our sponsors  and guest designers this week are:

EAD and the guest designer is Amy Costello
Discount Cardstock and the guest designer is Tami Mayberry
Wilson Designs and the guest designer is the owner Kim Wilson

The Play Date Cafe design team:


Have a wonderful Thursday!
Suzz

Happy Thanksgiving - A little early

I know my kids and myself are eagerly awaiting next week when Thanksgiving arrives... Family, Time off, setting up our Christmas decorations...
All family time mixed in with just relaxing and spending time with friends too!

This morning I created a Thanksgiving card to give to my MIL who is hosting Thanksgiving this year.  She is a fantastic cook and it will be wonderful to bring something to the dinner (easy appetizers) but not prepare it. :)


I started with a sketch from a challenge blog called Friday Sketchers.  The design is  similar to yesterday's card. I used the lovely Memory Box paper from the Blackbird collection called Evening Roost. I love how it reminds me of my Grandma's old apron. The stamp is from Inkadinkado and something I purchased second hand as I wanted a turkey image and loved the scene with the gobbler and the pumpkins and wheat.

Very simple design. Although I admit I pulled the leaves off a fall decoration we are getting ready to put away in anticipation of Christmas.

Here is the sketch and the challenge is at Friday's Sketchers Challenge 128


Thanks for stopping by...

Suzz

Tuesday, November 16, 2010

On the way to the Market

I stopped here... and here... before finally arriving. :)

Do you ever find you start with something and it takes you a few tries to get there?  Well... I had this Santa image stamped and colored on my desk.  I saw the wonderful sketch #66 from Kazan from 2S4Y and decided to combine the two. Here is the output of this little crafting session...

Here is the final card:


Before that version was this version which was sitting on my desk since last night and this morning I took a long look at it and thought the proportions were wrong. So I re-sized it and cleaned it up. (Off popped Santa and the gems to re-use on the new card.)


And in between those cards was my original stamped Santa and his card.  

The good news is that I ended up with two Christmas cards to send out! :)

Here is the great sketch from Kazan:


The products used in the projects; Making Memories Christmas Tissue Tape, Versafine Vintage Sepia, Black Onyx, Stampers Anonymous Letter to Santa CMS053, Cornish Heritage Farm - Scrapblok - Aged Sheet Music, Stampabilities - Vintage Holly IR1026, Cornish Heritage Farm - Night Before Christmas

Thanks for sticking with me on the way to the market. :)

Have a lovely Tuesday!

Suzz

Monday, November 15, 2010

Christmas Ornament

I created this for my Memory Box post today over on the Outside the Box blog. I thought I would share here as well! :)

This is my second medallion ornament/tag. My first I made for a class at my LSS and forgot to take pictures before I brought it. This is better constructed and will help me in teaching my class.

This has been so popular this year and I had seen it in so many places that I wanted to try it out and make one. I love the look and how it reminds me of a vintage ornament on the tree.

Products:
  • Memory Box D1399 Partridge in a Pear Tree
  • Memory Box Papers - Mistletoe, Tinsel, Truffle
  • Versafine Vintage Sepia
  • Memento Rich Cocoa
  • Twinklette - Diamond Dust
  • Watercolor Pencils
  • Spellbinders Circle, Scalloped Circle nestabilities dies
On the OTB blog I included a few other pictures with details on how to create the medallion.

Have a warm Monday!

Suzz

Sunday, November 14, 2010

Hope Feathers

I took a quick peek at Mona's colors this morning and her card and they both were fabulous! So of course I pulled out my supplies before church and started playing around. Mind you nothing on this card was what I started with this morning. :) Mona's color challenge CR84FN4 this week is light purple, purple and grey.

Here is where my card ended up.


And here is the yummy inspiration photo:

The flowers were made from tissue  paper that came in my daughter's shoes. It had such a fun pattern that I pulled it and set it aside for future use.

I love this verse from Verses Rubber Stamps called: Hope Feathers QQ1007-D. The verse is:

Hope is the thing with feathers
that perches on the soul,
that sings a tune without words
and never stops at all. 
Emily Dickinson

And since I have a few bird stamps this comes in handy and is great to send to someone needing a little hope. The music notes is Hero Arts Cling stamp, the birds are Inkadinkado Dawn Houser. Inks: Hero Arts Lilac Shadow Ink, Memento London Fog, and Versafine Imperial Purple.   Other supplies: May Arts Silk Ribbon, Spellbinders Die Cuts Ovals, Labels 10, Doily. 

Hope you are having a wonderful Sunday!

Suzz

Saturday, November 13, 2010

2S4Y Laura's Sketch #65

I had a little time today to play and wanted to use Laura's sketch 65 as my starting point. I ended up with a Christmas card which allowed some playing with my inks.

 Here is the sketch:
The background was created by mixing Ranger Distress Inks Tumbled Glass and Peeled Paint. The background was stamped over with the Damask and Music Sheet backgrounds in mix of the same colors.

The Hero Arts collage stamp was stamped using the Versafine Vintage Sepia and colored with watercolors.

Hope you are having a lovely weekend!

Suzz

Friday, November 12, 2010

Vintage ATC

I am back with my second post for Scrollworks. This sweet image is called Sally and is found here.
 

Stamp image using Versafine Vintage Sepia on white cardstock. She turned out much softer and more muted which was the effect I was trying to achieve. Add golden & flesh tones using watercolor pencils and aqua brush. Cut out image. Ink image with Versamark watermark ink and heat emboss with clear embossing to bring out the highlights of color.
The background is stamped using Mirror Mirror. The sentiment is called Wonderful You.  Accent the ATC and images with a lock and key charm and a touch of ribbon and twine.
Next Friday, I will share a tutorial on the photo stamps and the different types of inks and papers that produce different effects.
Suzz

Warm Winter Wishes Challenges

I saw the beautiful shades of blue at the Warm Winter Wishes Challenges at Flourishes. The challenge is to use shades of blue in a winter wishes. Well I have this beautiful poppy set from Flourishes and thought what a beautiful set to make winter flowers and send as a winter card to someone who is in the deep snowy winter like me.

Love this set of stamps they are beautiful and shades of blue they look gorgeous too!

Have a lovely Friday!

Suzz

Wednesday, November 10, 2010

Play Date Cafe Challenge #55

It is time for another Play Date Cafe Challenge. Sarah selected the colors and the inspiration photo for the challenge. 

Our sponsor this week is Innovative Stamp Creations they are providing our wonderful prize this week and also provided the team with beautiful stamps to play with.  Here is my take on the colors using the lovely Take Flight stamp plate.

Continuing with my circle fascination I chose to tamp the image on a circle and color the images and sponge the edges with two shades of blue.   The butterflies were stamped a second time an colored using  shades of  red,and pink. They were cut out and attached to give dimension.  Simple little card with a tiny charm accent (Okay really an earring from a set I bought to accent cards.)

Here is the inspiration photo from Sarah:


Betsy Griffin Innovative Stamp Creations owner is our guest designer and has also created a beautiful project on the Innovative Stamp Creations blog.


If you are looking for more inspiration, go and take a peek at the rest of the design teams projects! Most of the design team ended up using the same images and I love the variety of designs using the same set of stamps.
The Play Date Cafe design team:


Looking forward to seeing what people create using the colors!

Suzz

The Tin Man's Heart

This was one of the cards I created using the new Oz Collage from Artistic Outpost. I knew I wanted to ink him up in Foil (aluminum foil from the kitchen) as soon as I saw the image. That triggered the inspiration to create the foil background using the embossing folder.  The image is stamped several times and pieced together.

I love this sentiment.  My daughter snatched this card up right away for her friends birthday. This made me  happy as the tween cards are always so difficult to design.  She actually couldn't decide between this card and the raffia lion easel card.  She decided on this card because of the sentiment.

The trick with the aluminum foil is to back it onto a piece of cardstock before you do anything. Also make sure you use a thin layer of adhesive. A spray adhesive on the cardstock would probably be the best adhesive as the glue tape can show through. 

StazOn ink stamps on to the foil and you can also use alchol inks or copics on the foil. Don't put copics or alcohol inks over your StazOn as it will erase your Stazon ink. :)  But you can stamp on dried alcohol inks/copics with StaZon.

Have a beautiful day!

Suzz

Tuesday, November 9, 2010

Mojo Monday #164

 I am in a square and circle phase right now. I hope to be over it soon. :) I saw the sketch for Mojo Monday #164 and was immediately "strangely attracted to it" (a phrase my son said one time when he was about five that just gives me a hoot to think about) I pulled out my Memory Box Poinsettia and other stamps to create this. Love the deep rich colors. I love my non-traditional colors for the holidays too but the warm burgundies and browns are so pretty too.


Here is the inspirational sketch:


Products:
  • Memory Box Believe
  • Memory Box G1404 Renaissance Tile
  • Memory Box Heaven Sings B1385
  • Memory Box G1411 Peace Collage
  • Memory Box Tinsel, Rhubarb Tart
  • Versafine Vintage Sepia, Toffee
  • Watercolor Pencils
Hope you have a lovely Tuesday!

Suzz

Sunday, November 7, 2010

Pink, Light Pink and Light Green

 Love the color combination of pinks and greens or pink and any color. :) I happened to have made up a butterfly previously and he has been floating around waiting for a card to land on. When I saw Mona's colors for her challenge this week CR84FN4 I decided to make that card.
Products: Stampin Up Bingo stamp, Ranunculus Field - Stampendous, Verses - How Do I Love Thee, Memento Pear Tart, Hero Arts (sentiment, butterfly, window screen), Versafine Vintage Sepia, Memory Box Paper.

Here is the beautiful inspiration photo:

Hope you are having a lovely weekend.

Suzz

Saturday, November 6, 2010

Follow the Yellow Brick Road

I loved all the images from the Oz Collage so much I wanted to create a card that showcased multiple images and it all started with Dorothy and her journey. So I created a stair step card following the yellow brick road.


I thought it would be fun to show the scenes as she met the characters along the yellow brick road.

The scarecrow had to be in the cornfield, the lion in the woods and Dorothy with Toto at the beginning of the journey.

The stair step card recipe is from Splitcoast Stampers forum of techniques. I usually can find any folding techniques there.

The images are all stamped using versafine pigment inks and colored using watercolor pencils. The road is hand drawn with white gel pen on yellow cardstock. The corn and twigs were gathered from outside. The papers are from October Afternoon or Cosmo Cricket.

Have a lovely Saturday!

Suzz